
Want to share something cool with your coworkers? Need to send an urgent tutorial to a prospect? Or do you just wish to share your occasional gaming fails highlights?
In this guide, we’ll show you how to screen record on Windows with 3 different tools. While there are a lot of screen recorders, we are here to give you the best.
Quickly jump to a specific tutorial:
- How to Screen Record on Windows with the Snipping Tool
- How to Screen Record on Windows with Xbox Game Bar
- How to Screen Record on Windows with VEED
Note: If you are a Mac user and are curious on how you could record your screen, teleport to this article!
[#TOC1]How to Screen Record Using the Snipping Tool[#TOC1]
Best for Windows users who need a free and basic screen recorder for recording their work
The Snipping Tool is widely known for its quick screen captures and easy copy-paste features. It comes as a built-in tool in both Windows 10 and 11 (and some previous versions as well).
With a simple press of Shift + Windows Key (Win) + S, you can immediately crop out a portion of your screen, and then paste a screenshot of that portion anywhere — both online or offline.
But did you know that the Snipping Tool also allows you to screen record videos? The tool comes in handy if you want to quickly create simple screen recordings with no bells or whistles.
That said, the tool does come with a few drawbacks:
- Unlike the screen capture feature, there is no keyboard shortcut for screen recording. You’ll have to open the tool first before you can record.
- The tool does not allow you to record sounds or voice overs.
- This is a feature that Microsoft introduced in Windows 11. So to the folks using Windows 10 and below, you’ll have to upgrade first before you can use this feature.
Here’s How You Can Screen Record Using the Snipping Tool
For the Windows 11 users, here’s a step-by-step process on how to record your screen using the Snipping Tool:
1. Go to the search bar next to the start menu and type Snipping Tool. You can also press Win + S to open Windows Search.
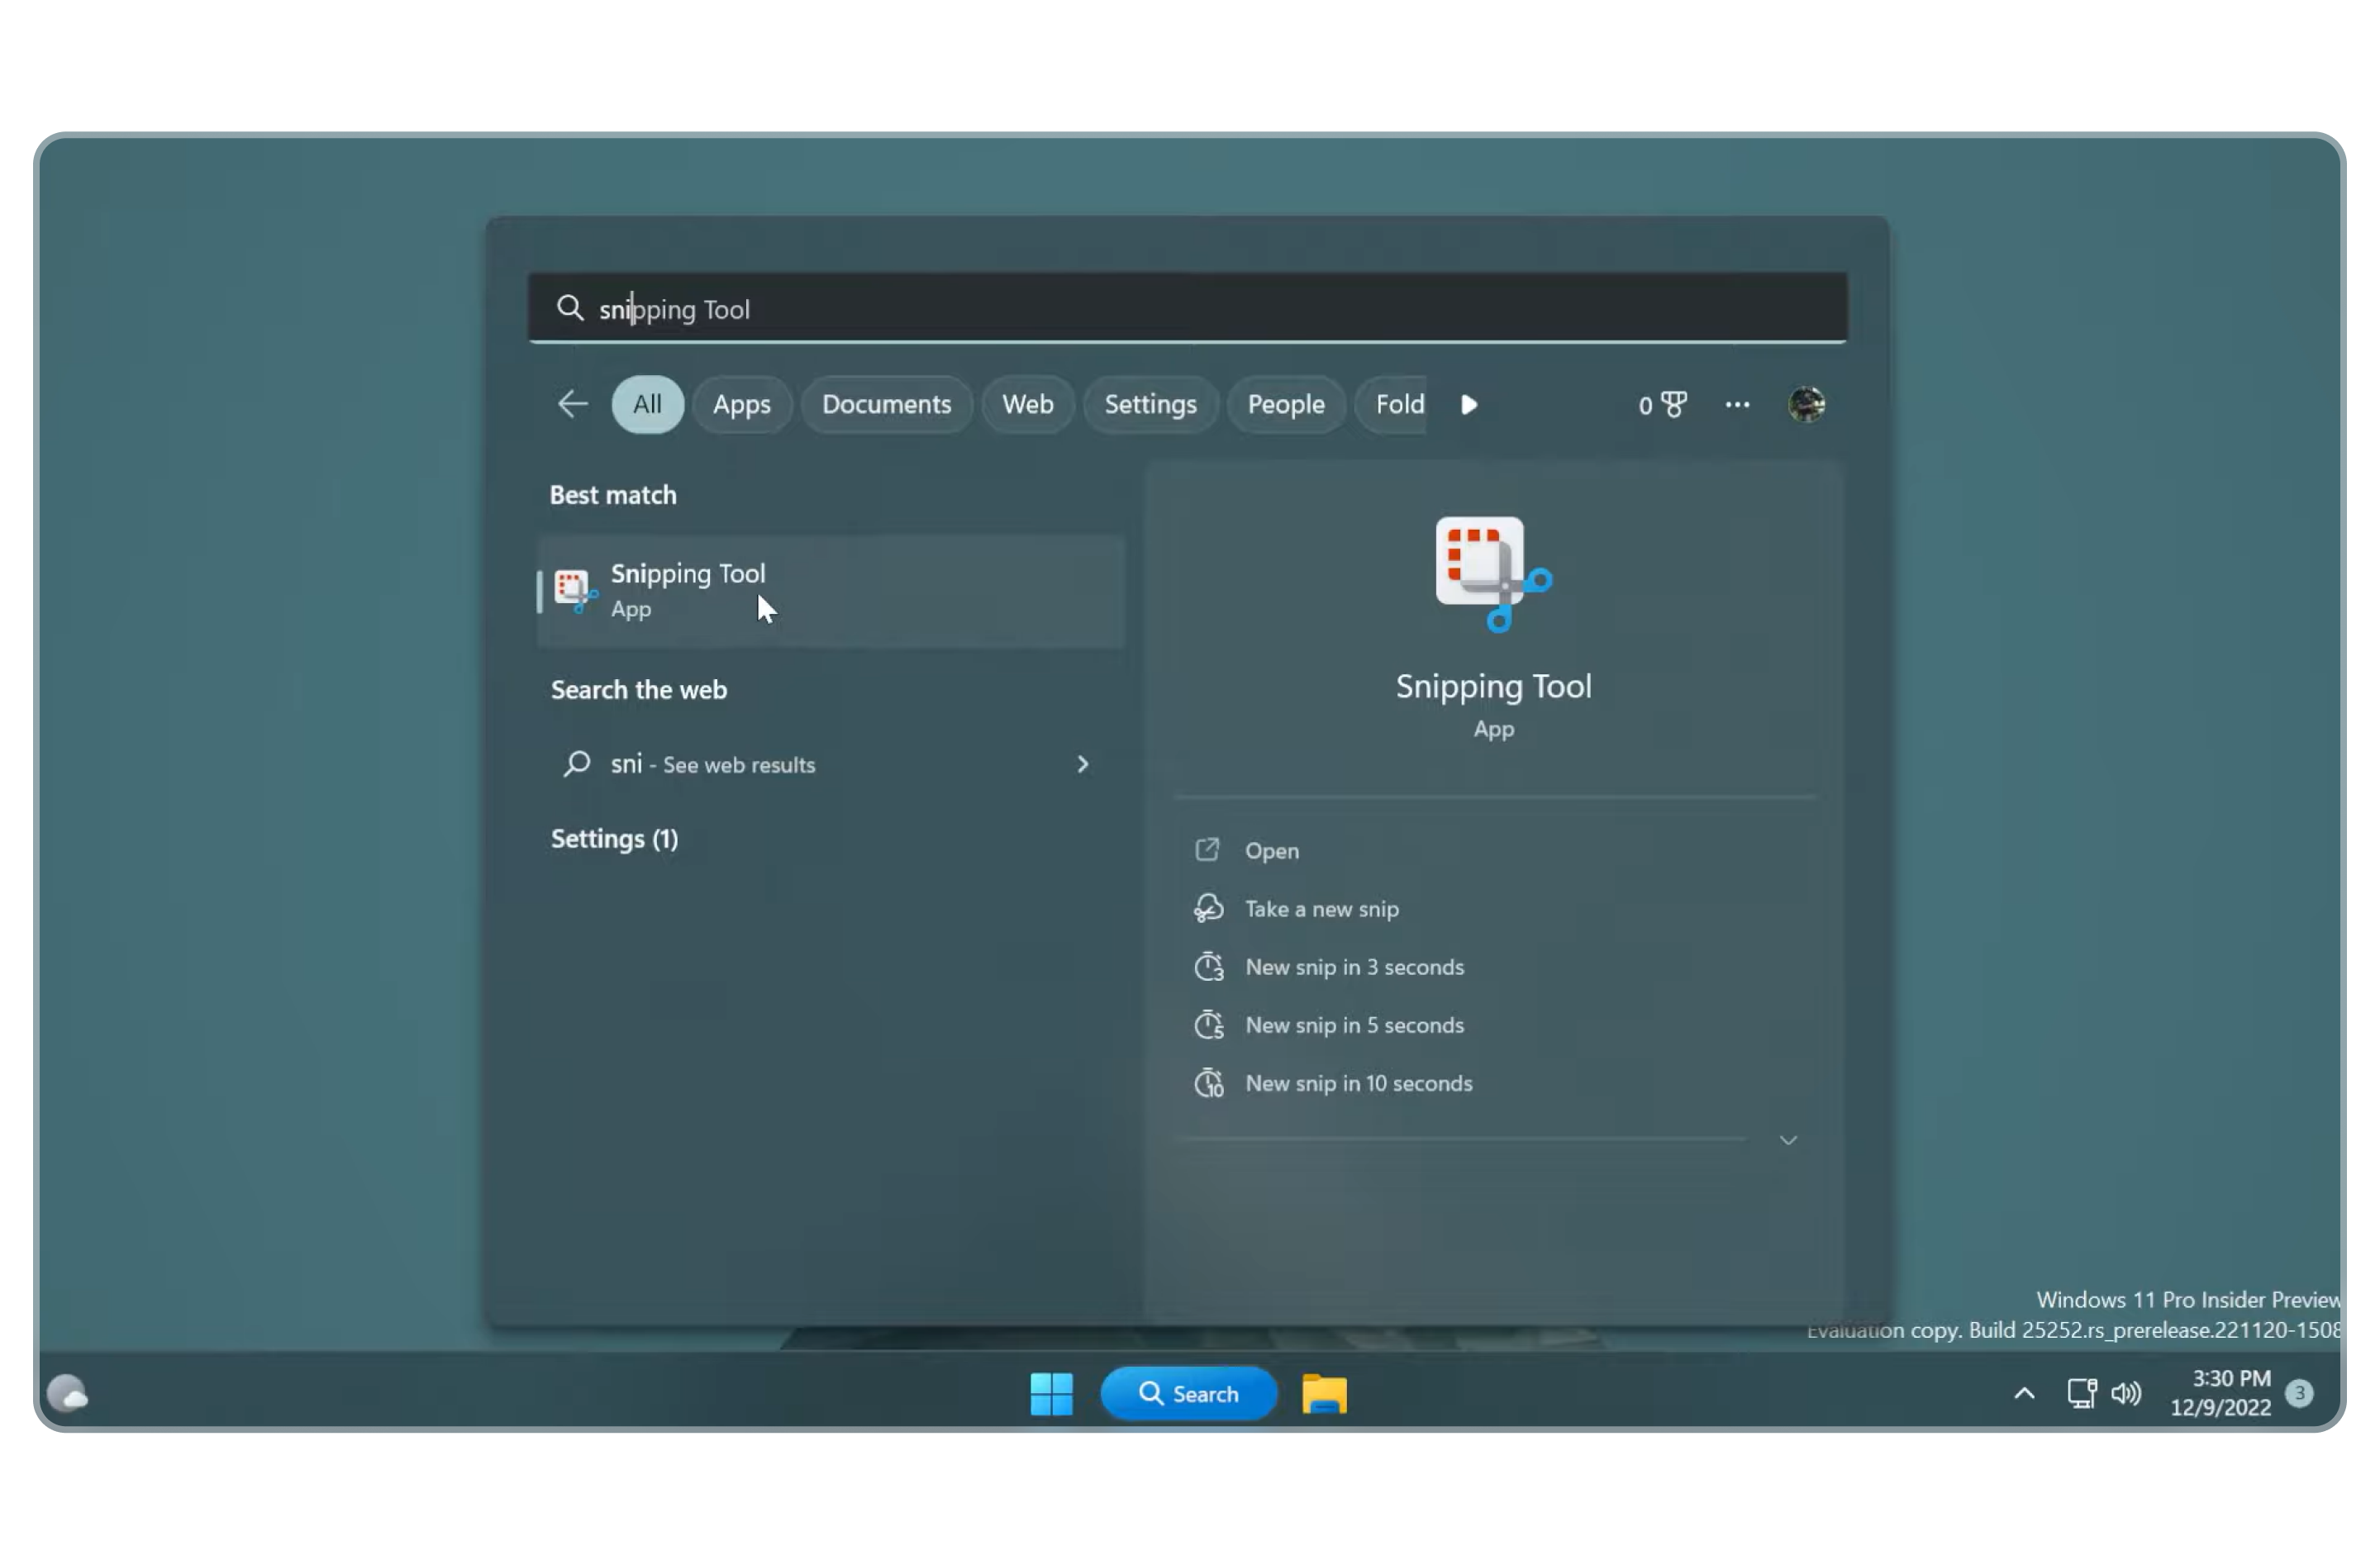
2. Open the app and click on the camcorder/video icon to the right to switch from screenshots to screen recording.
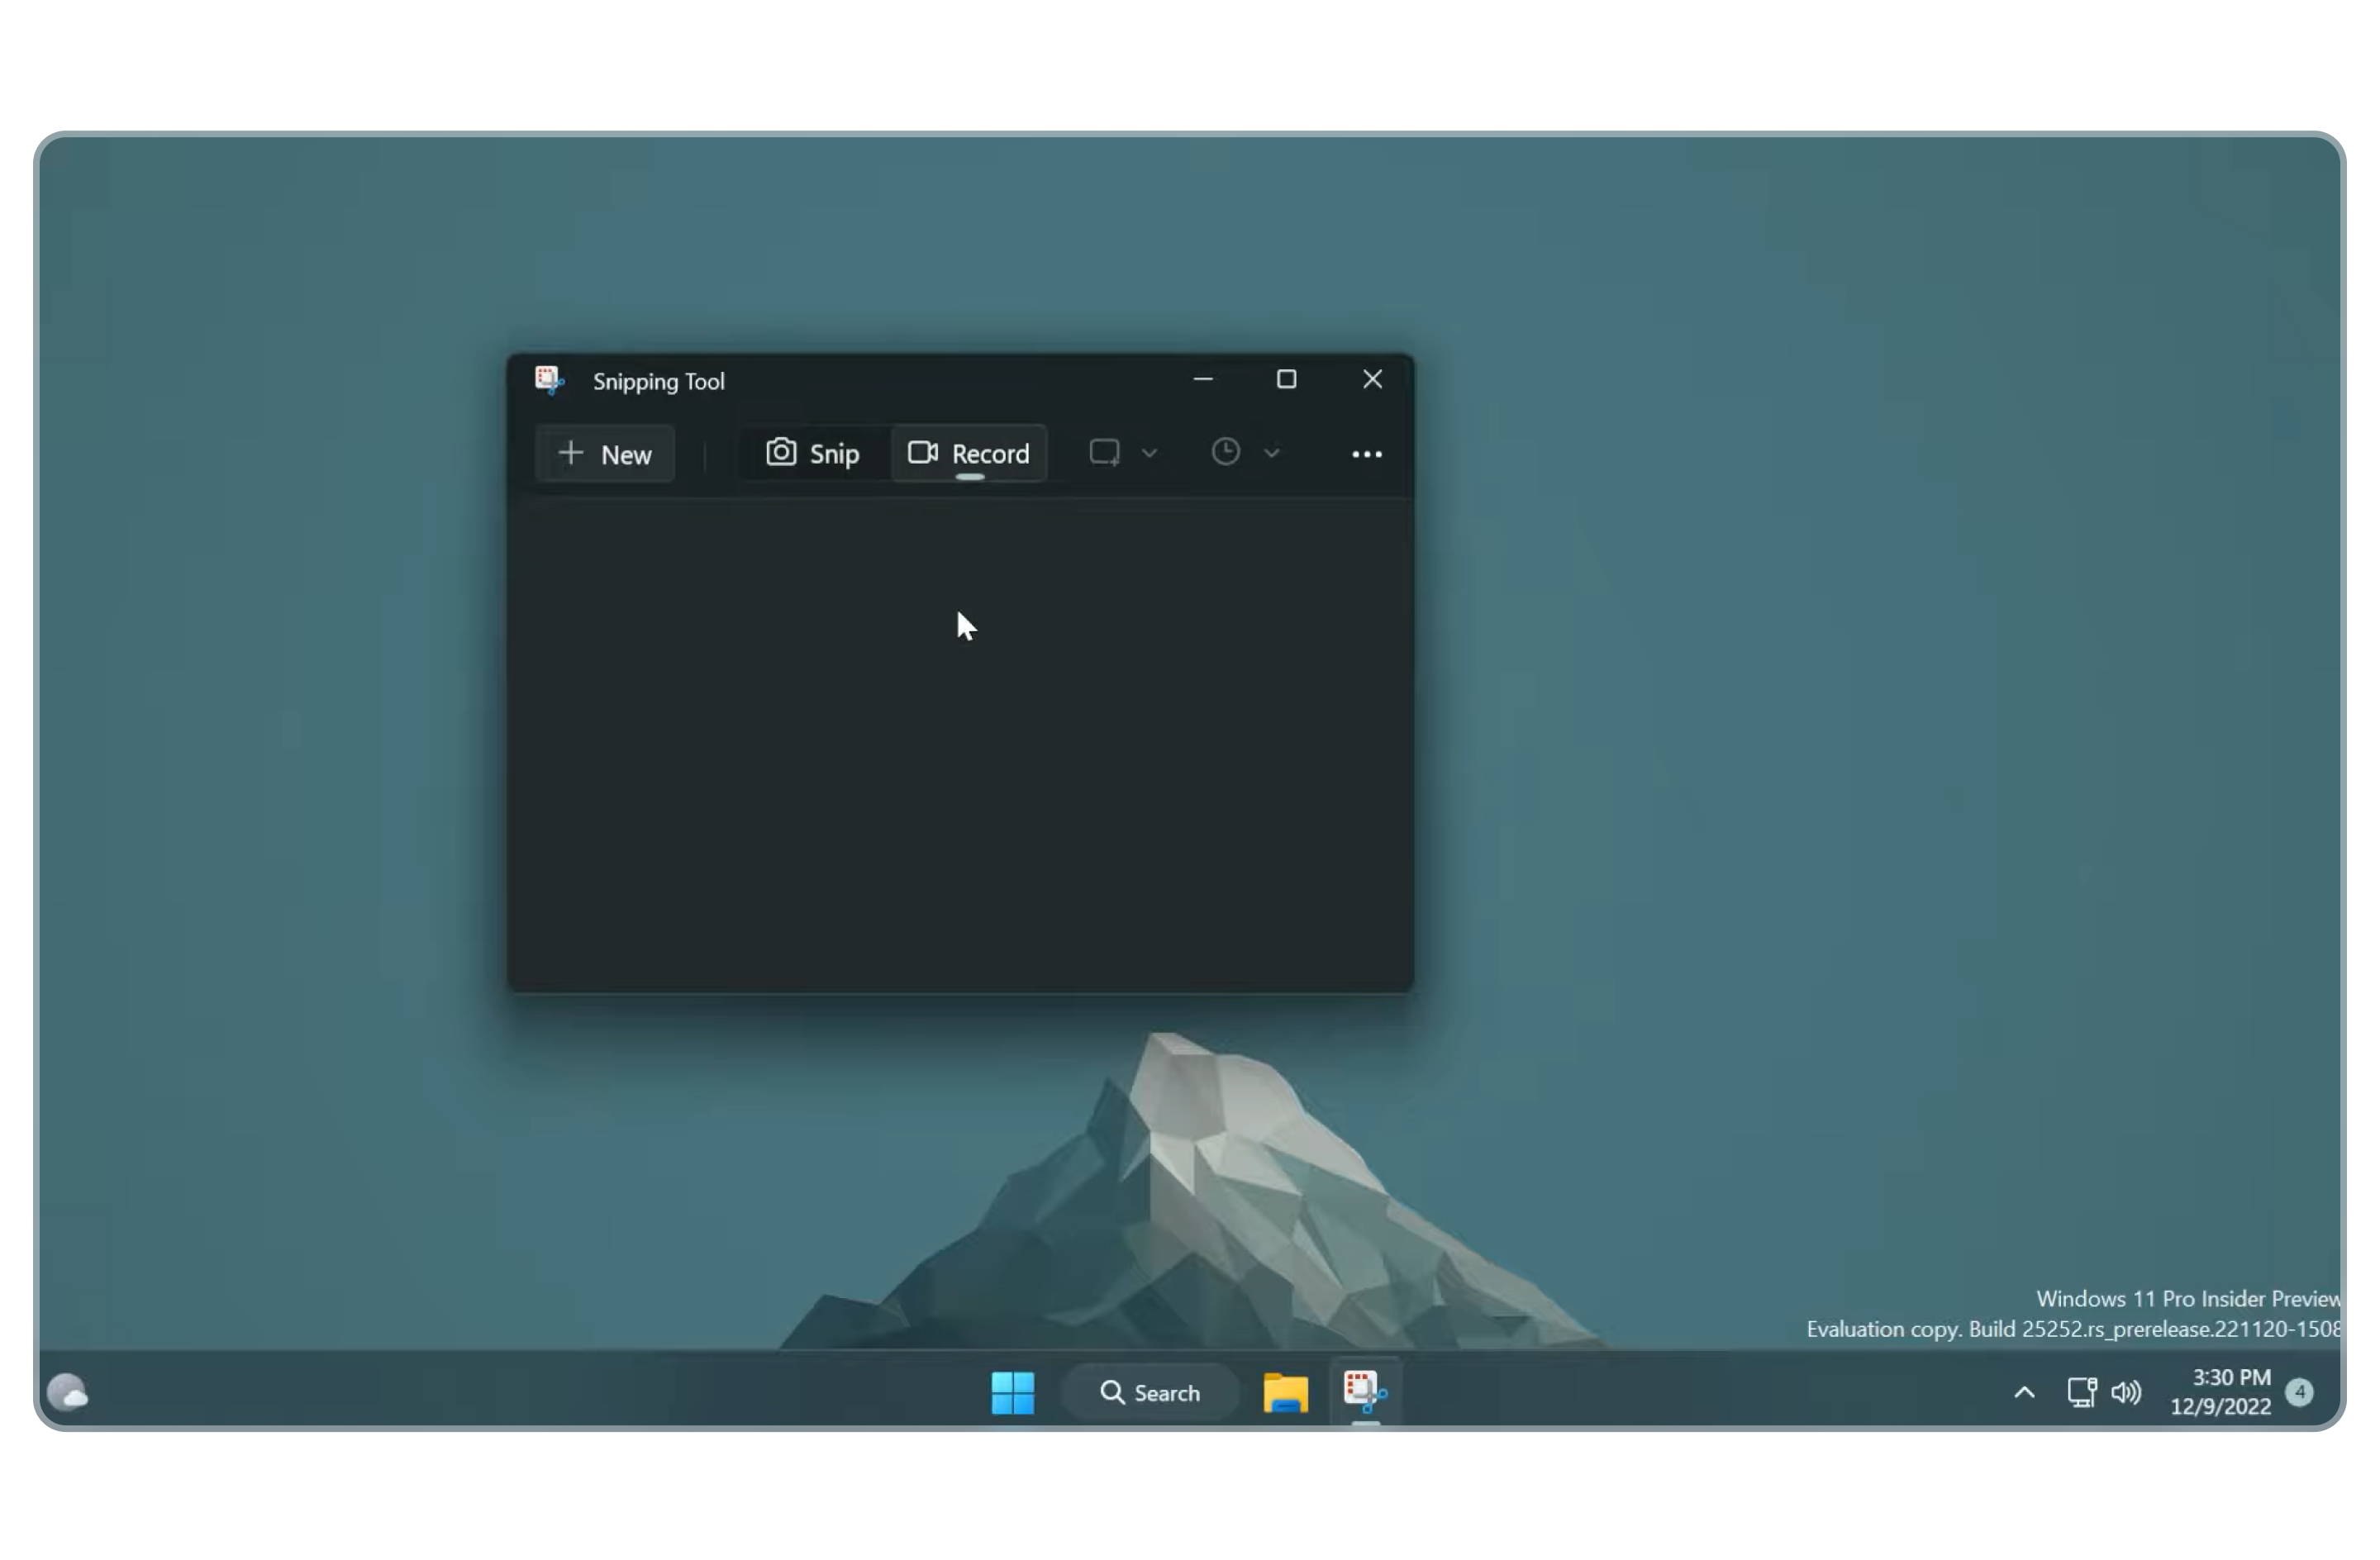
3. Click on New. An overlay should appear showing the start button and the time. You can do either of two things:
- Crop and record only a section of the screen
- Record the entire screen by clicking and dragging the cursor from one corner to the opposite one
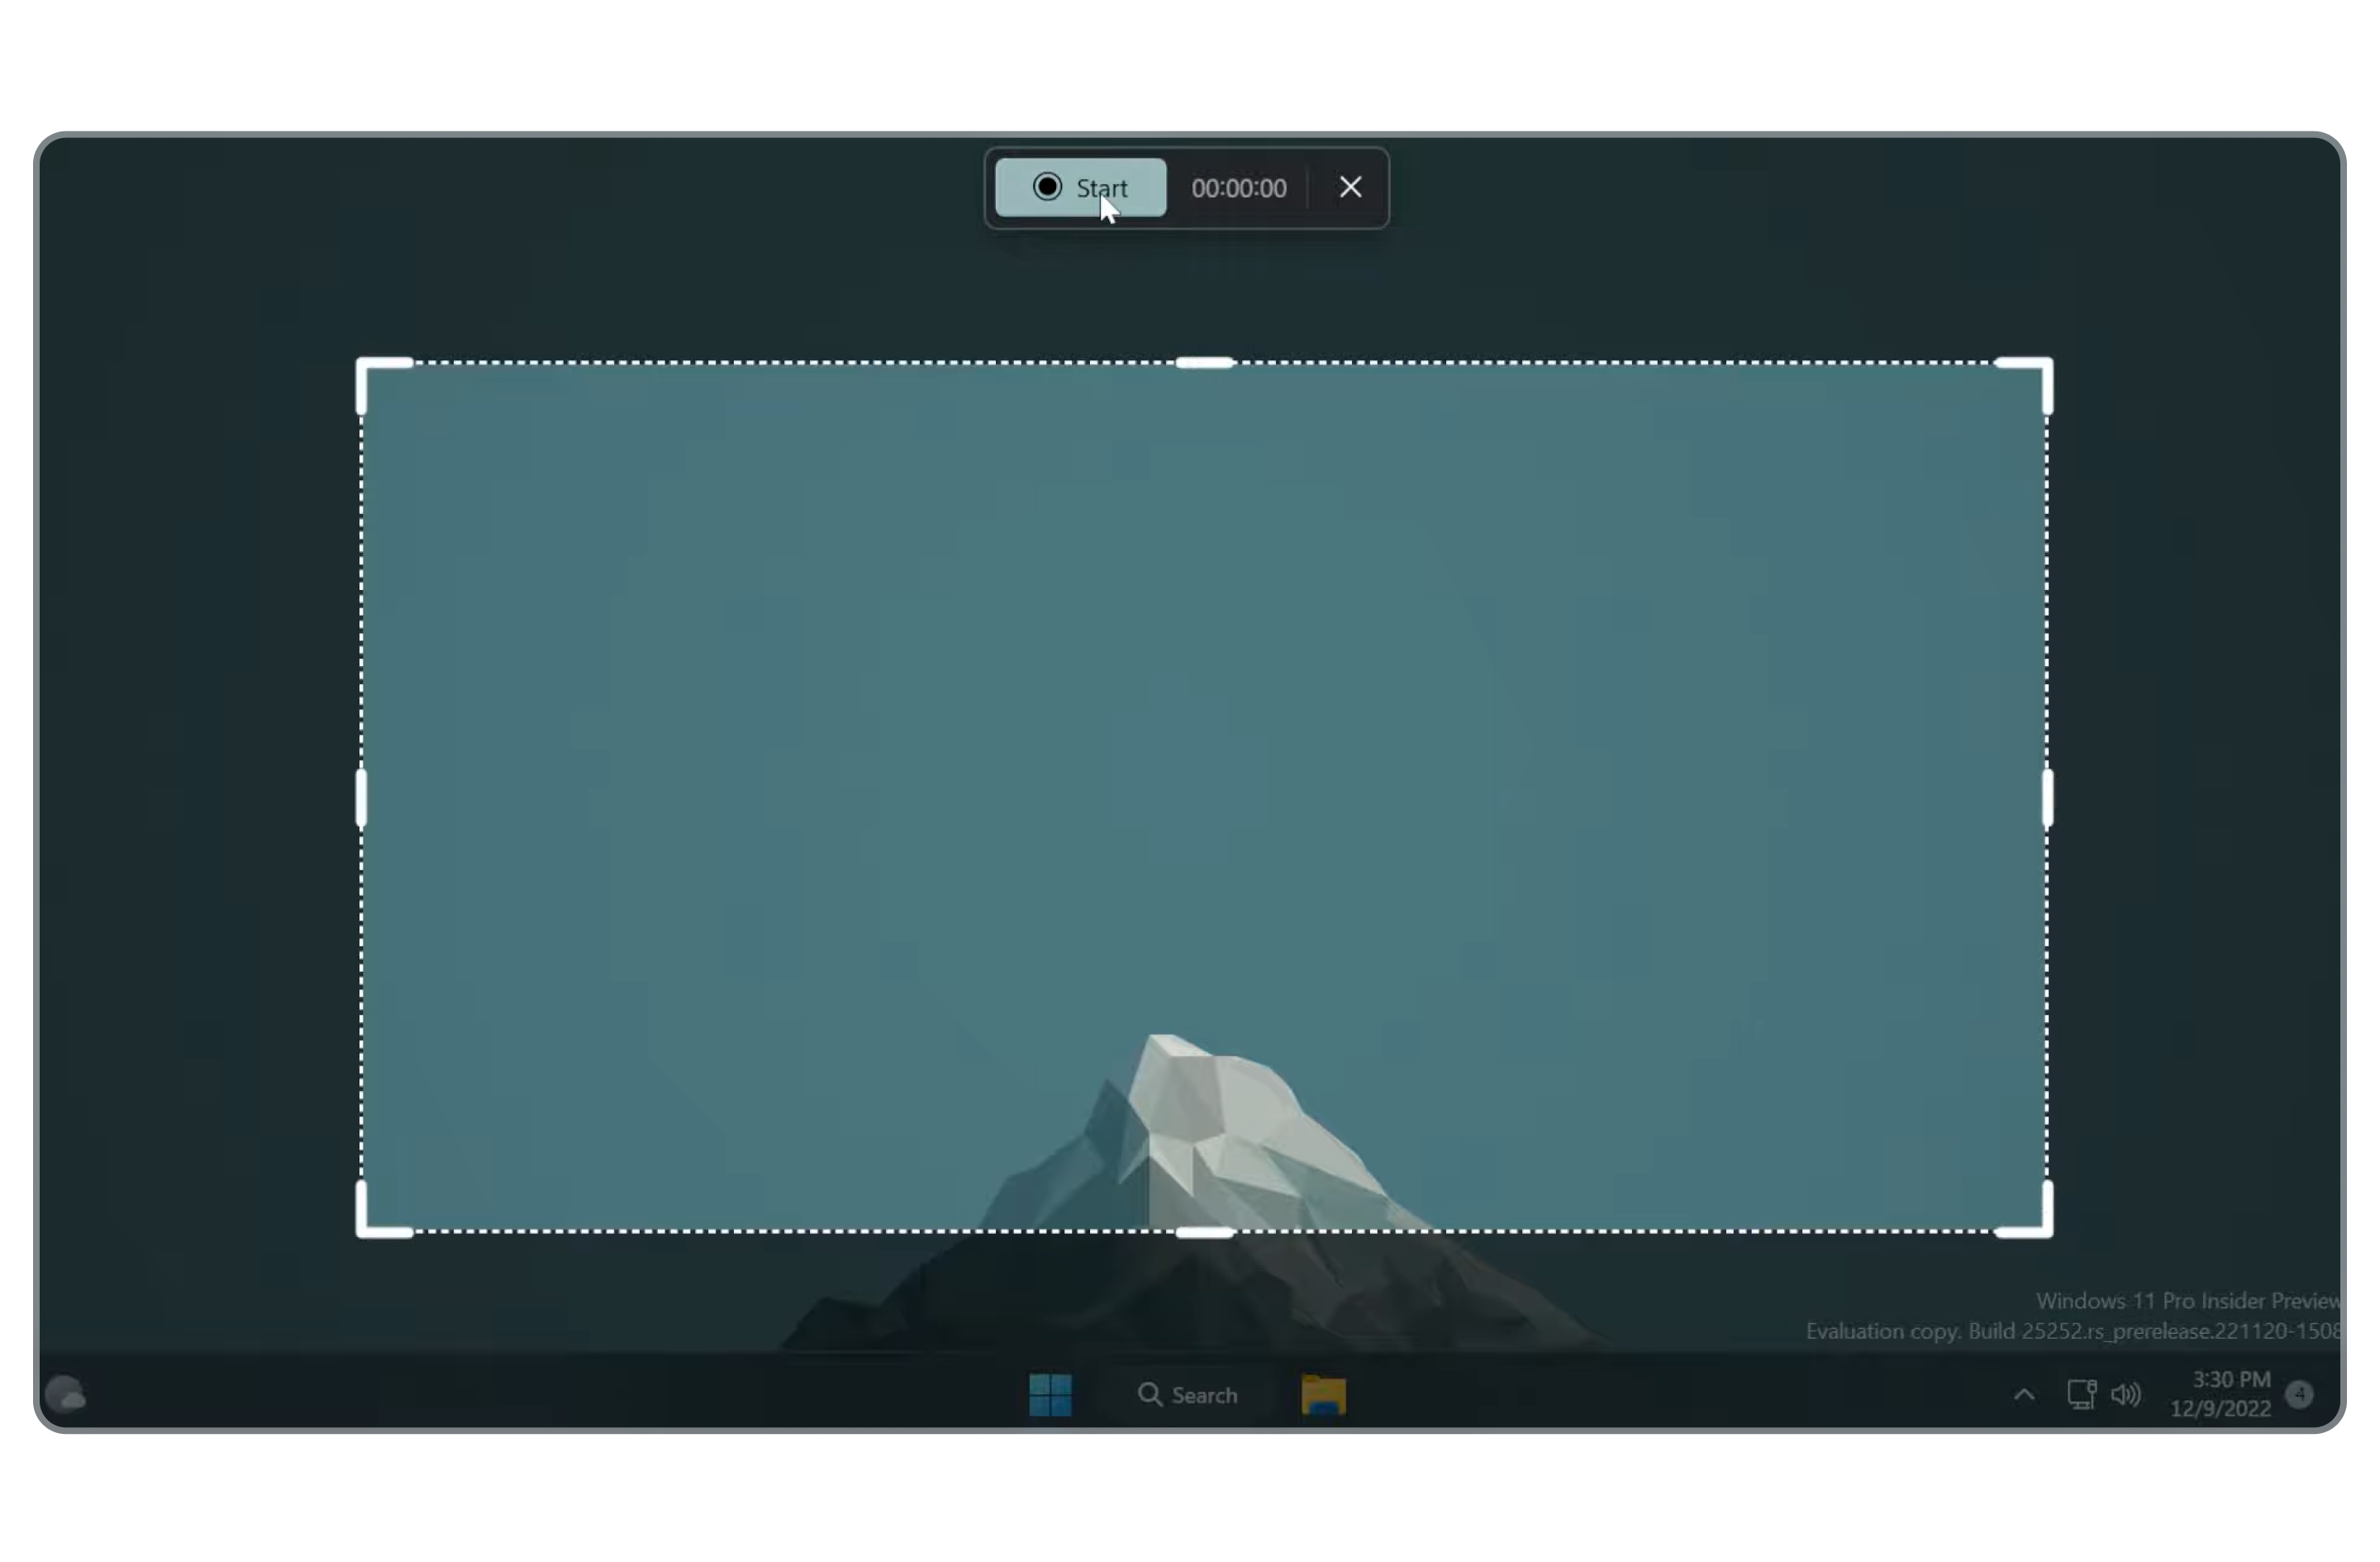
Pro Tip: You can also use the shortcut Ctrl + N to start a new screen recording session, but you have to be in the screen recording menu for it to work.
4. Once you’ve selected the area you wish to record, click on the Start button at the top to begin. This will initiate small a countdown, before your recording begins.
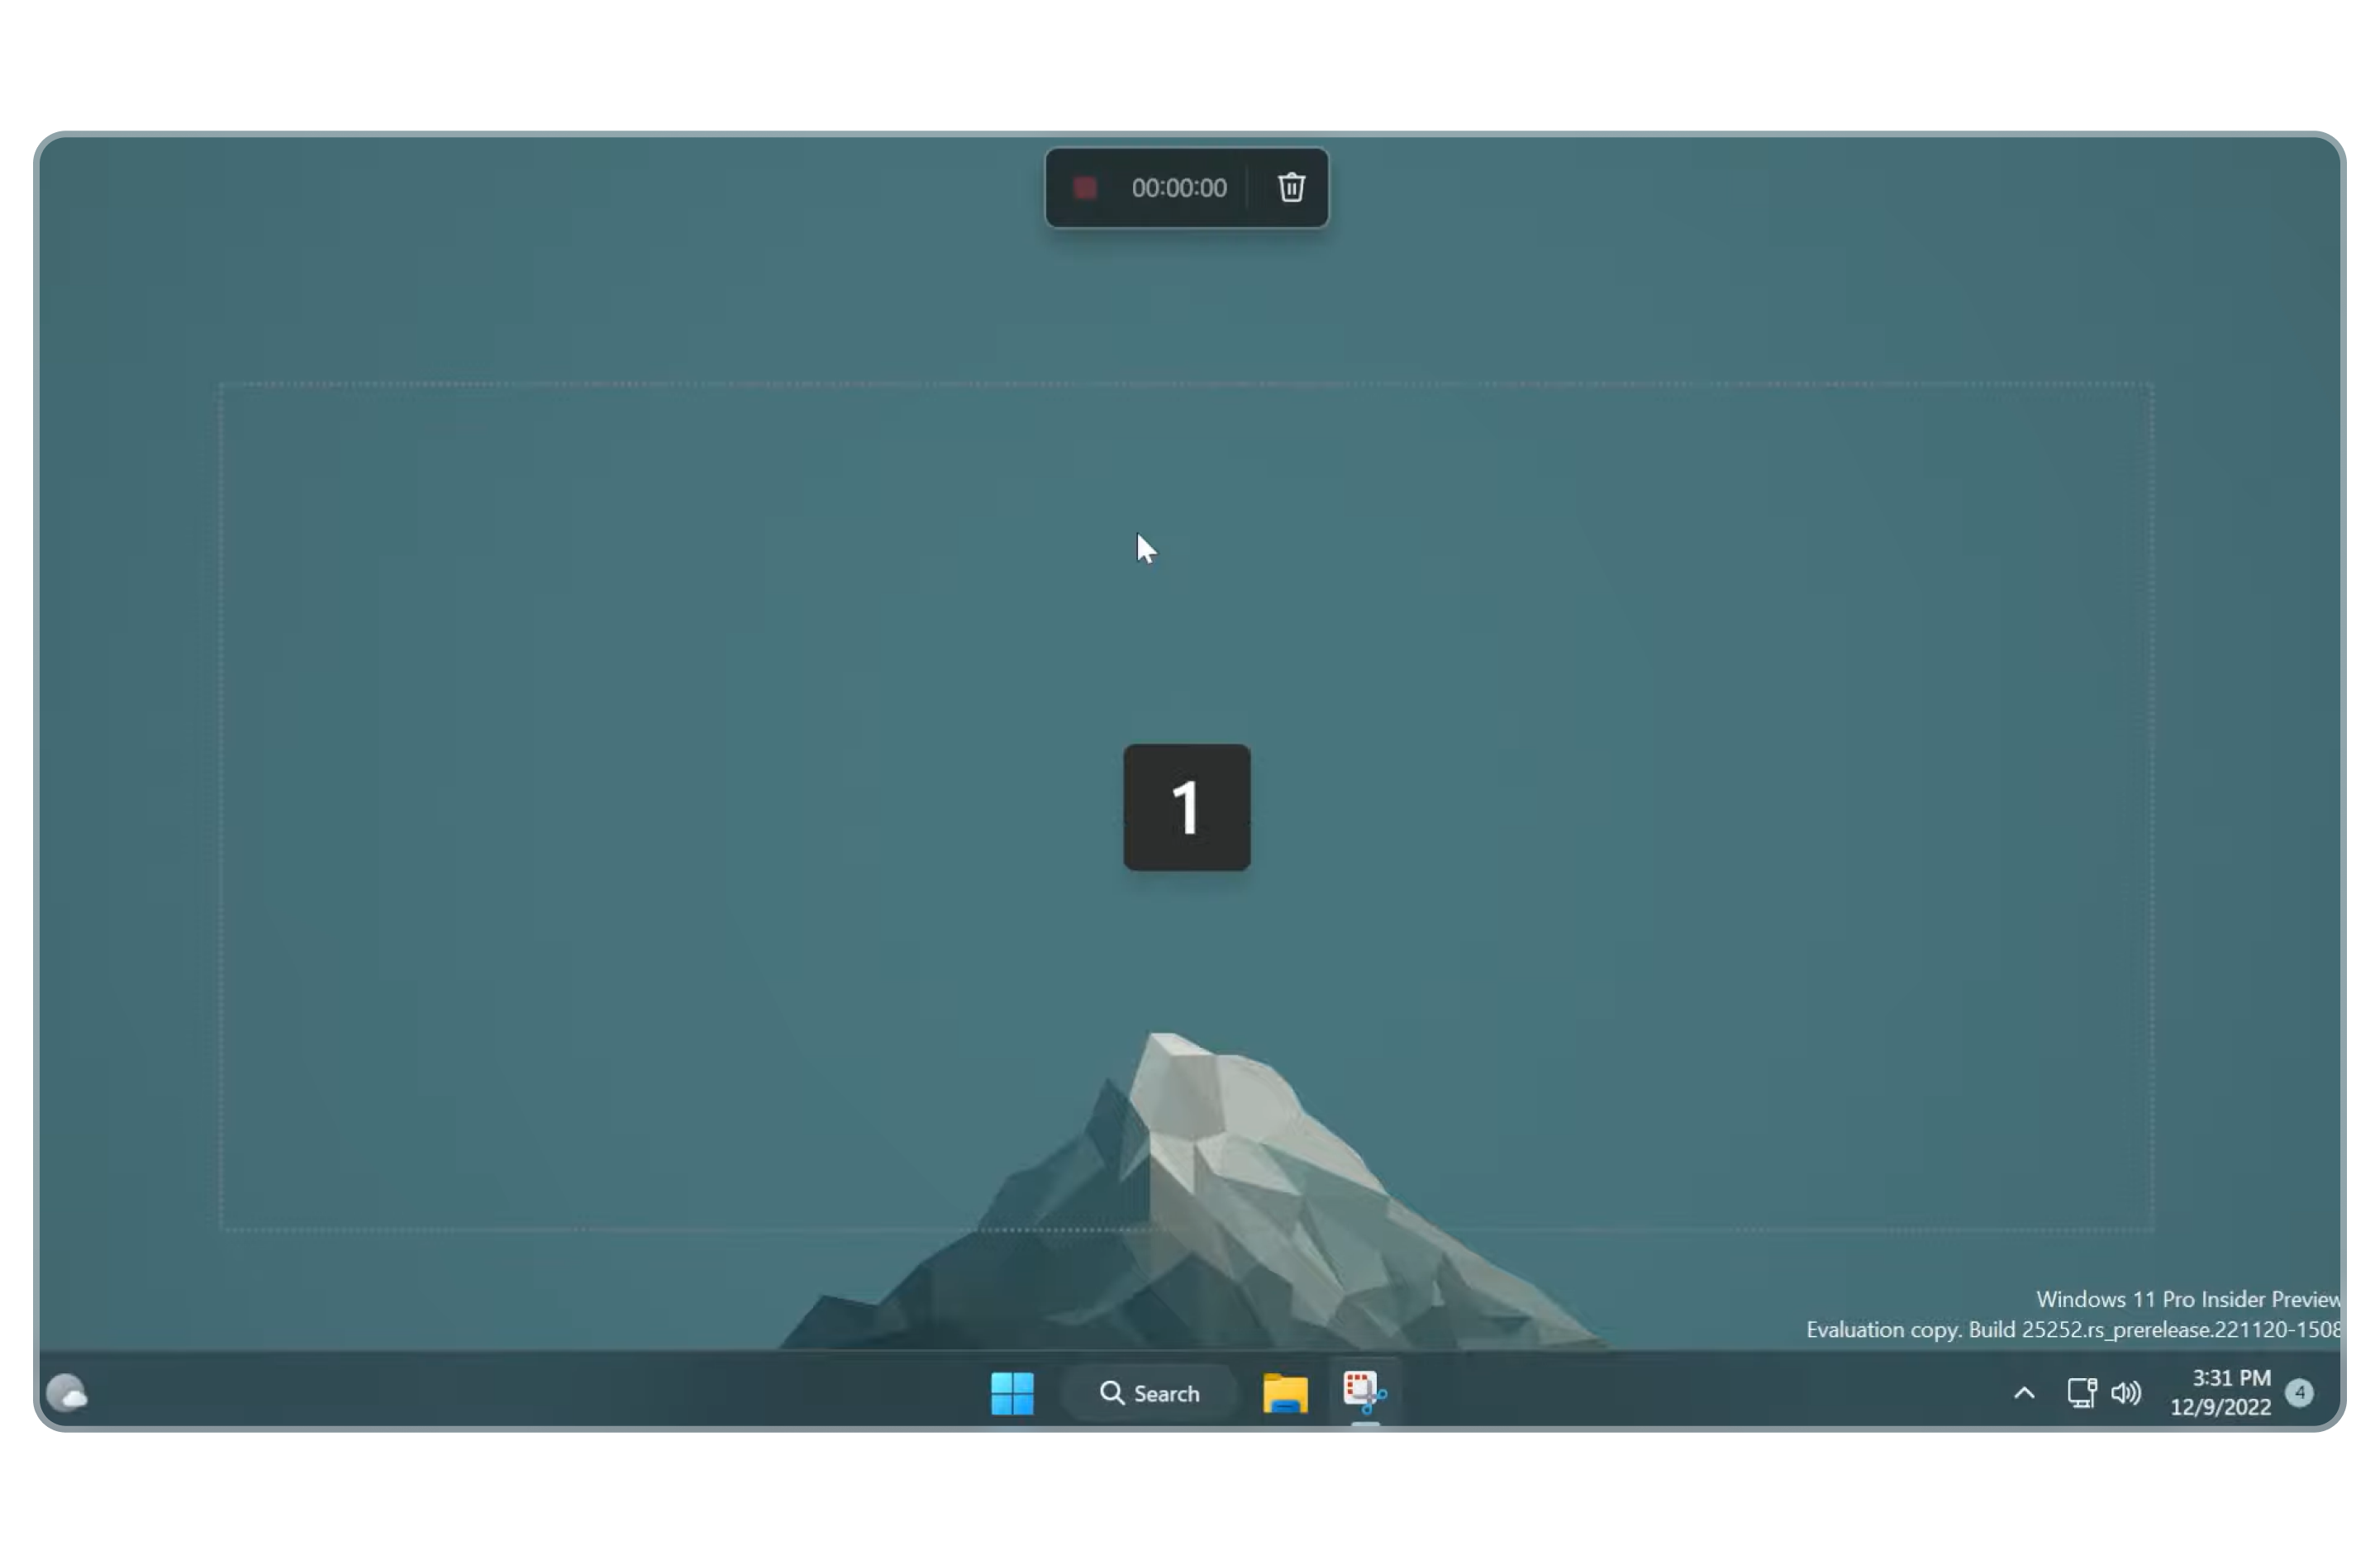
If you want to take a break, there’s a convenient pause button.
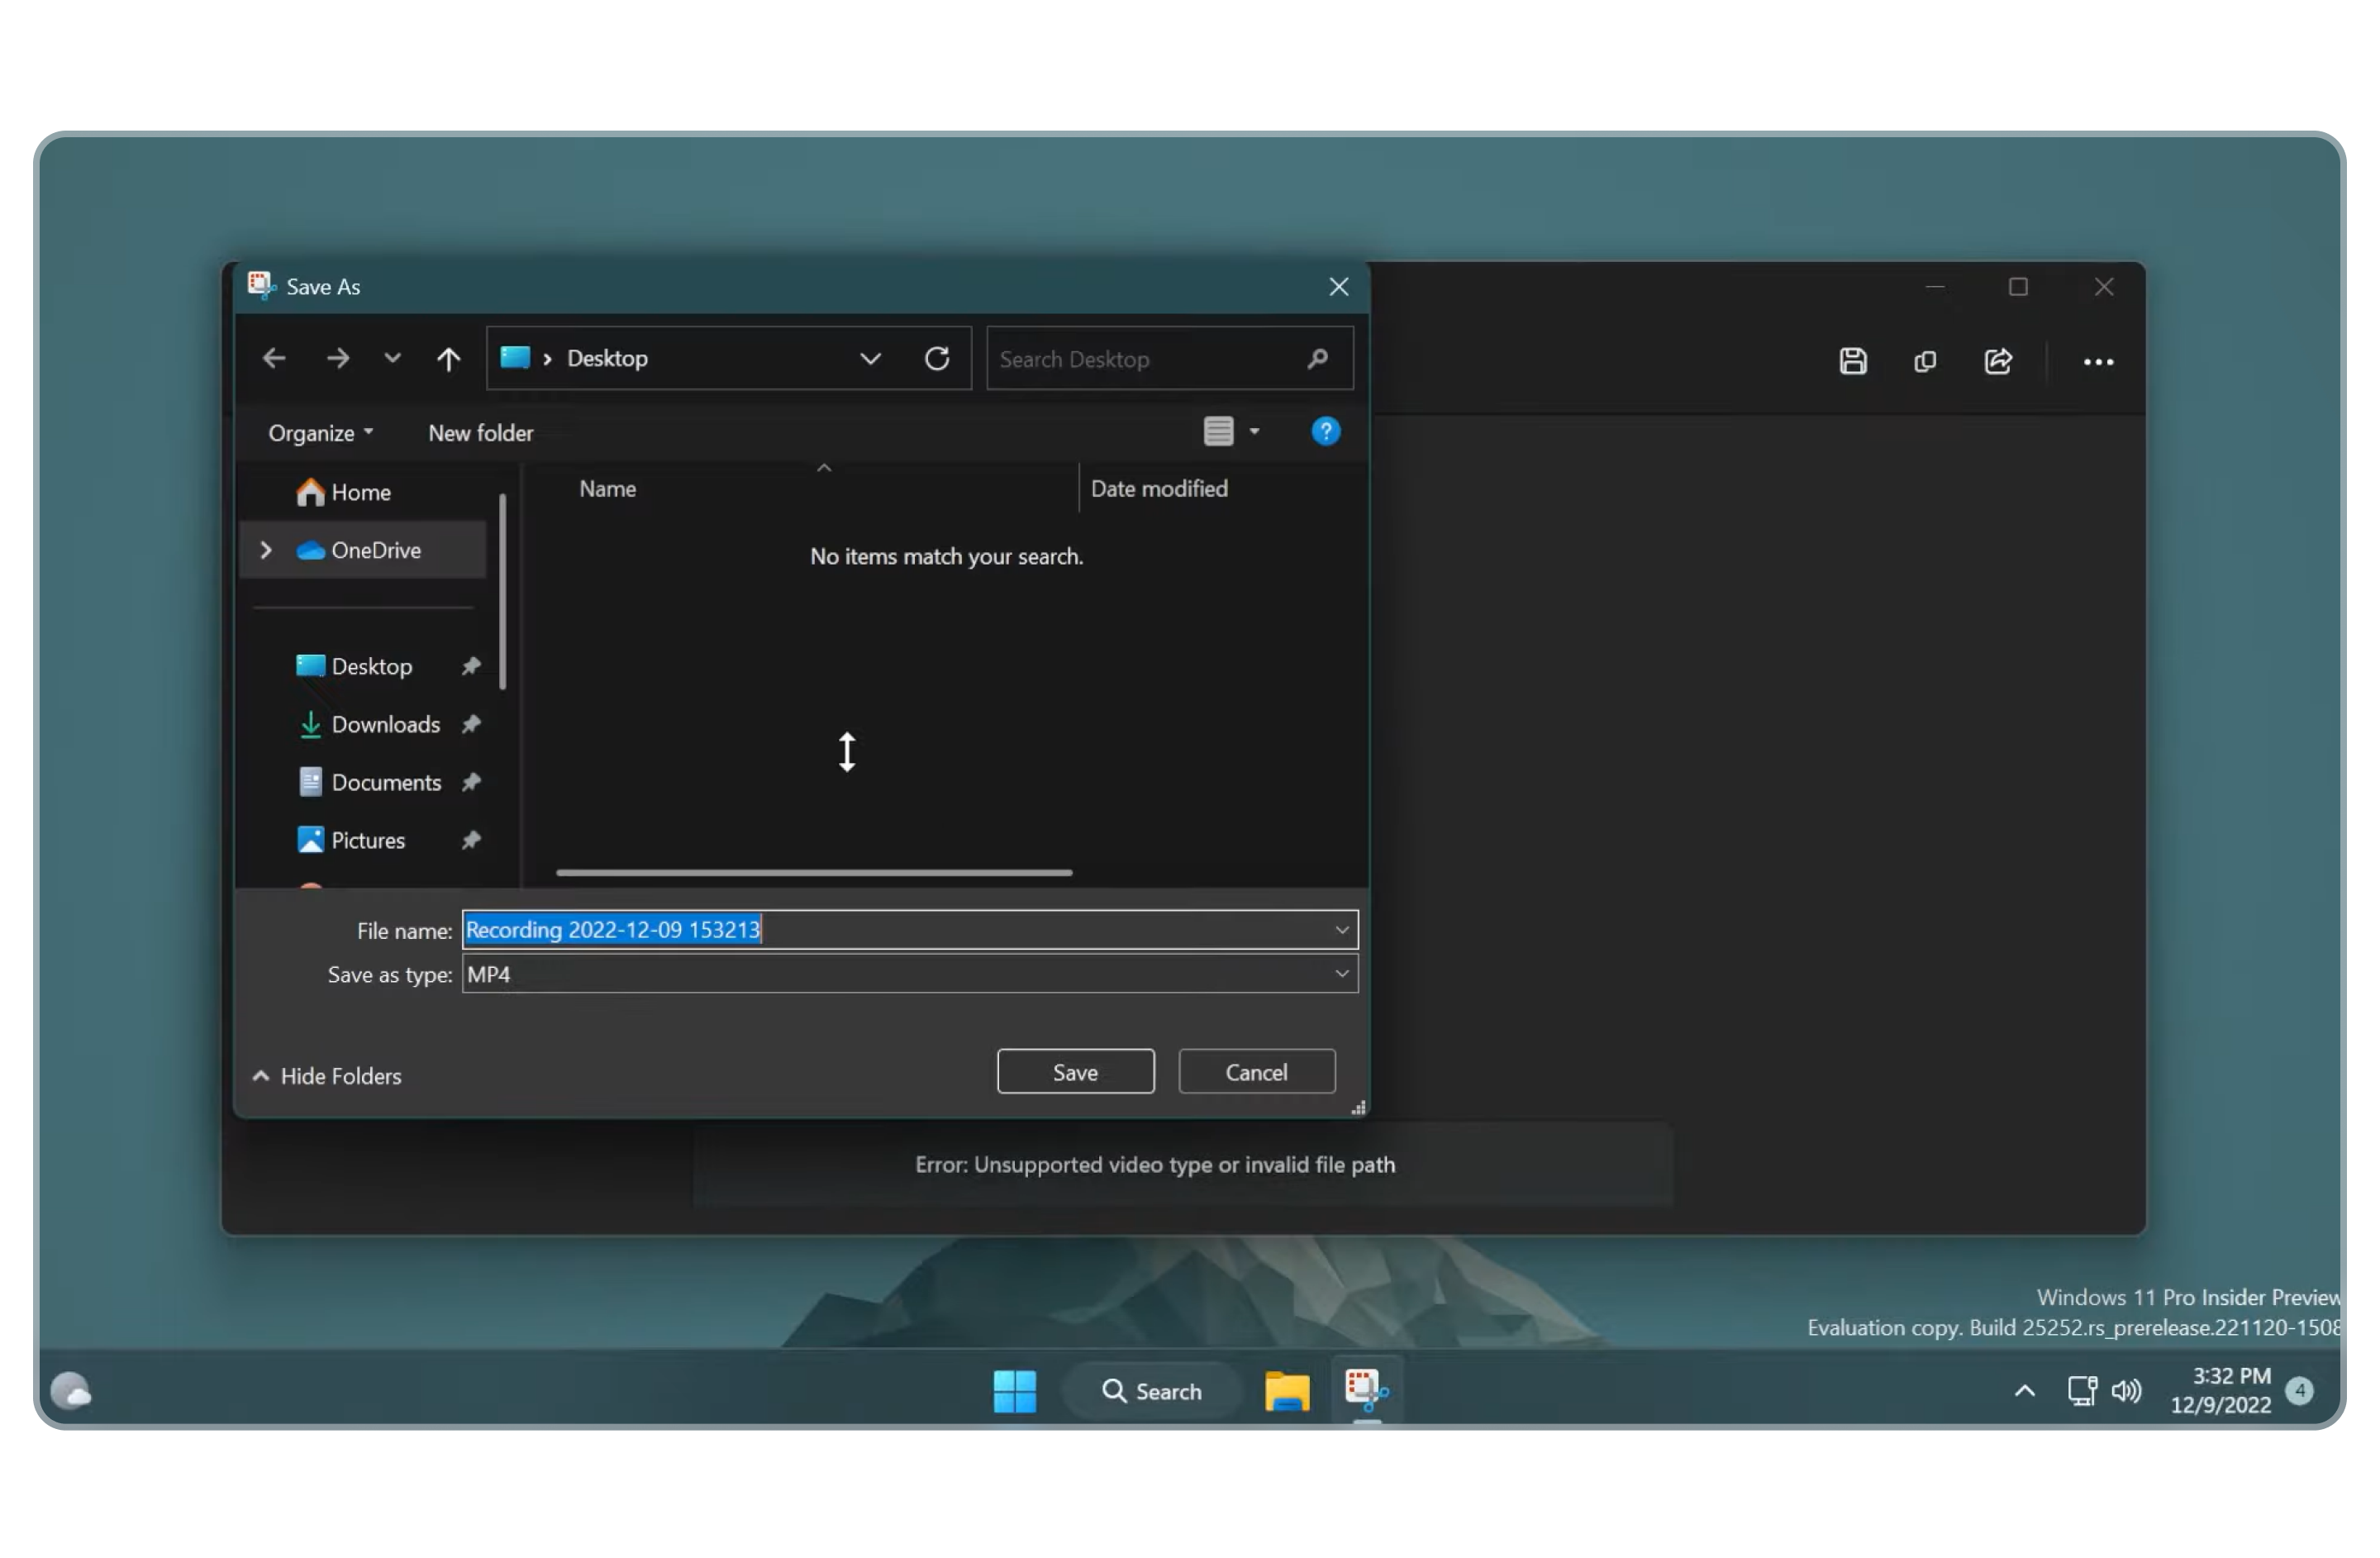
5. When you’re done recording, click Stop. You can then preview your video on the Snipping Tool menu before sharing it directly with your contacts. Or, you can save it first in your storage and use a video editor to make it more presentable later on.
To save the video recording, press Ctrl + S and type in your preferred video name. After that, choose the videos folder or any other folder as its save location. The recordings are saved as mp4 files.
The Snipping Tool screen recording functions are similar to the screenshot feature, in that you can copy the recording by clicking on the Copy button on the upper right corner of the interface. Then, you can paste it anywhere you want to, such as messaging apps and the like.
[#TOC2]How to Screen Record on Windows with the Xbox Game Bar[#TOC2]
Best for Windows users who need a free ultra-basic solution to screen record their gameplay
The Xbox Game Bar is a built-in, free video game recording software for Windows PCs. Although the game bar is designed for recording gameplays/game clips, you can use it to record any app from the Windows Store, Universal Windows Platform, or Microsoft Edge.
Here are some limits you’ll find with the Xbox Game Bar:
- You can’t screen record your desktop, File Explorer, and other utility programs.
- Videos are capped at 30 or 60 frames per second.
- You can only screen record one window at a time.
Here’s How You Can Screen Record Using Xbox Game Bar
If you’re still interested in using this tool, you can proceed with the simple steps below:
1. The Xbox Game Bar records the app that’s currently opened on your screen. So, go to the app you want to screen record.
Pro Tip: If you need to record your desktop or your entire screen, try out VEED’s free high-quality screen recorder.
2. Open the Xbox Game Bar by pressing the Windows key + G or the Xbox button. If this is your first time opening the game bar, you’ll get a dialog box that will look like the image below.

3. Tick the box next to "Yes, this is a game." to open the Game bar. Tick the box even if the app you want to record is not a game.
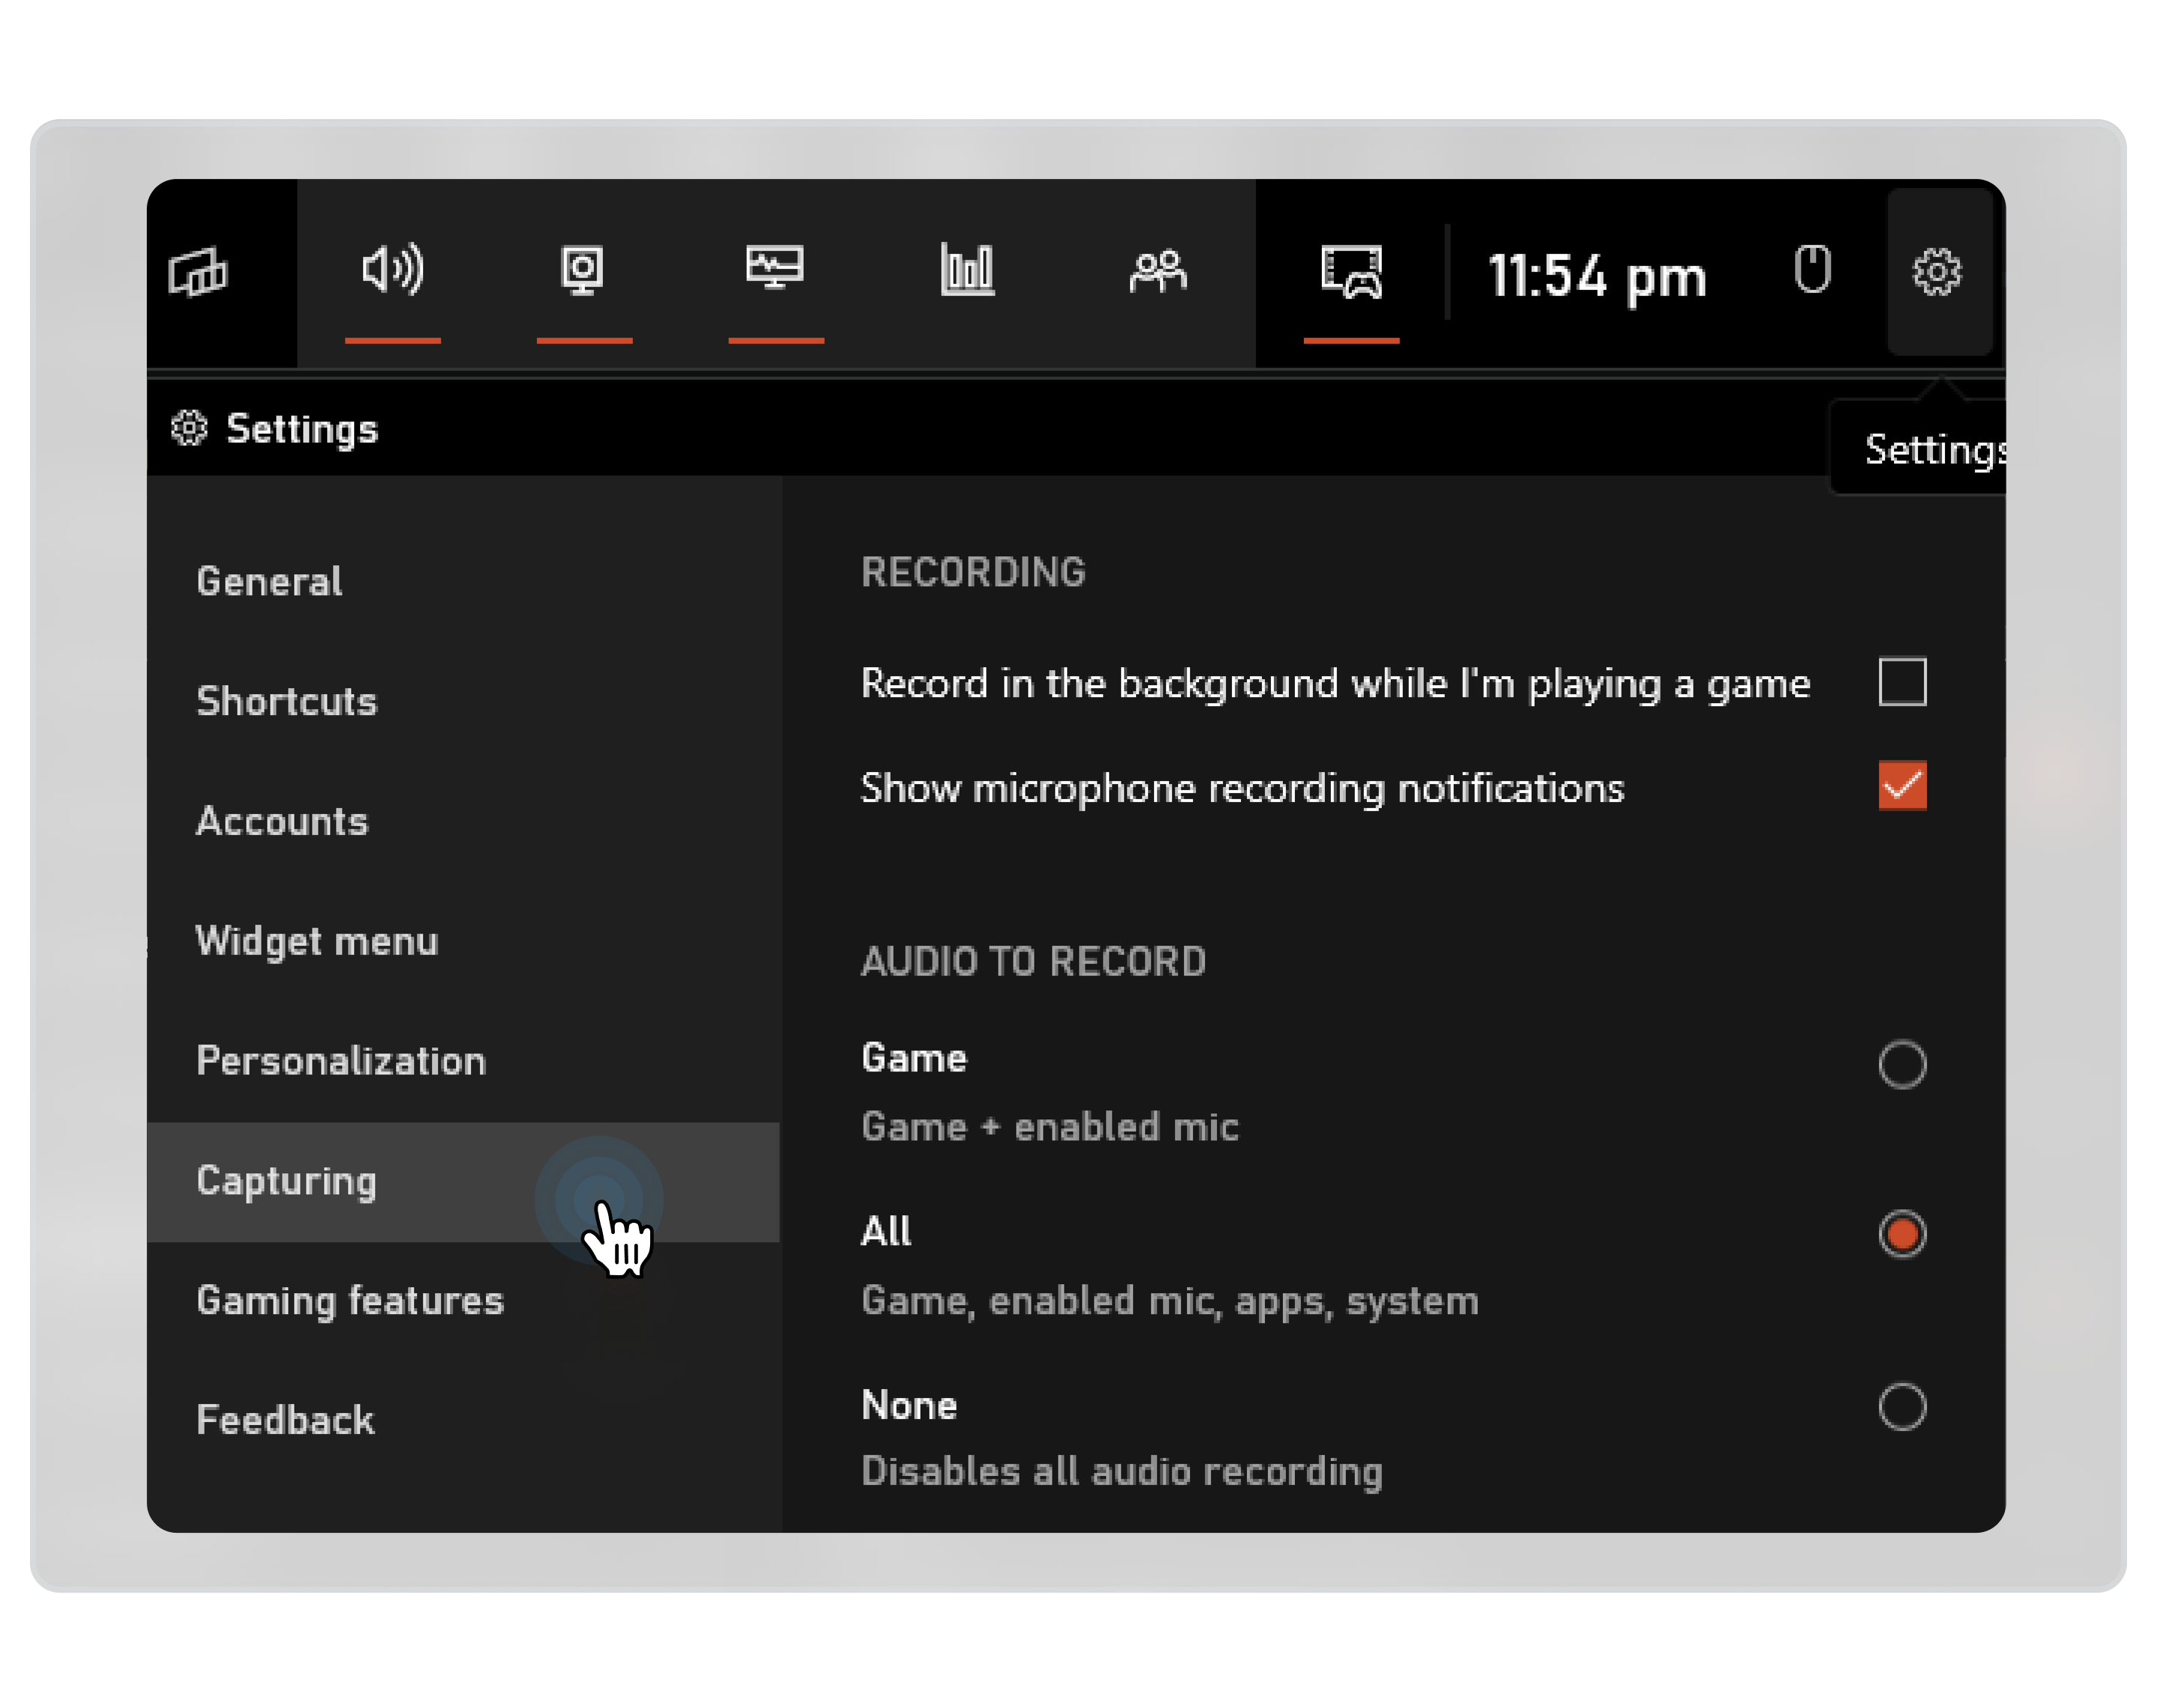
4. Go to Settings and navigate to Capturing.
5. From there, you can choose whether or not the game bar will record audio from your entire system, or just the sound from your app and microphone.
6. Hit the Start Recording button, or press the Win + Alt + R shortcut keys.
Note: You can directly press the Win + Alt + R shortcut keys to make the Xbox Game Bar start recording even without opening the app. But first, check your recording options to make sure the game bar is recording your voice.
7. After that, simply hit the Escape key or Win + G again to exit the Game bar and begin recording your screen.

An indicator showing the elapsed time will appear at the top-right corner of your screen when you start recording. You can stop the recording from there or mute your mic when necessary.
8. Click the Stop button to stop recording. If the Game bar disappears while in the middle of recording, you can do either of the following:
- press Win + Alt + R again as this also stops the recording
- bring the Game Bar back into view by pressing Win + G, then stop the recording from there
In the same Game Bar, you’ll find the option to “Show all captures” which allows you to locate and review your recordings. You can also just go to the Gaming folder on your Windows PC's File Explorer and open the Captures subfolder.
[#TOC3]How to Screen on Windows from Your Web Browser (with VEED)[#TOC3]
Best for anyone — Windows, Apple, or Linux user — who wants a powerful and free online screen recorder and editor with no duration limits
Tired of the limitations? Yeah, we get it. The drawbacks may seem small and simple, but they do add up. And anyone with a creative vision and limited time shouldn’t be held back by such minor inconveniences. Luckily, VEED is here to help.
VEED is a handy online video editor that takes all those minor inconveniences and throws them out the window. It is versatile and so easy to use that even beginners could make high-quality recordings and edit them to perfection within the same platform.
Here is what you can expect from VEED, an editor of many talents:
- VEED offers straightforward workflows to get the job done, be it recording, editing, or sharing videos. No need to look for your video files and edit them in a separate software.
- The new Scenes feature allows separate recording for different parts of a presentation and easily sews them all together in the video editing process!
- Say goodbye to cramped-up storage drives with VEED’s cloud drive! Save your work into your accounts and edit on-the-go.
Here’s How You Can Screen Record Using VEED
Follow these steps to record your screen on Windows with VEED:
1. Head to VEED and create an account through the Sign-Up option. You can quickly sign up with your Google Account.Once your VEED account has been created you will be redirected to your workspace.

2. On your VEED workspace, click on Record Video to get started.

You can also click on New Video on the left side of your screen and select Start Recording.
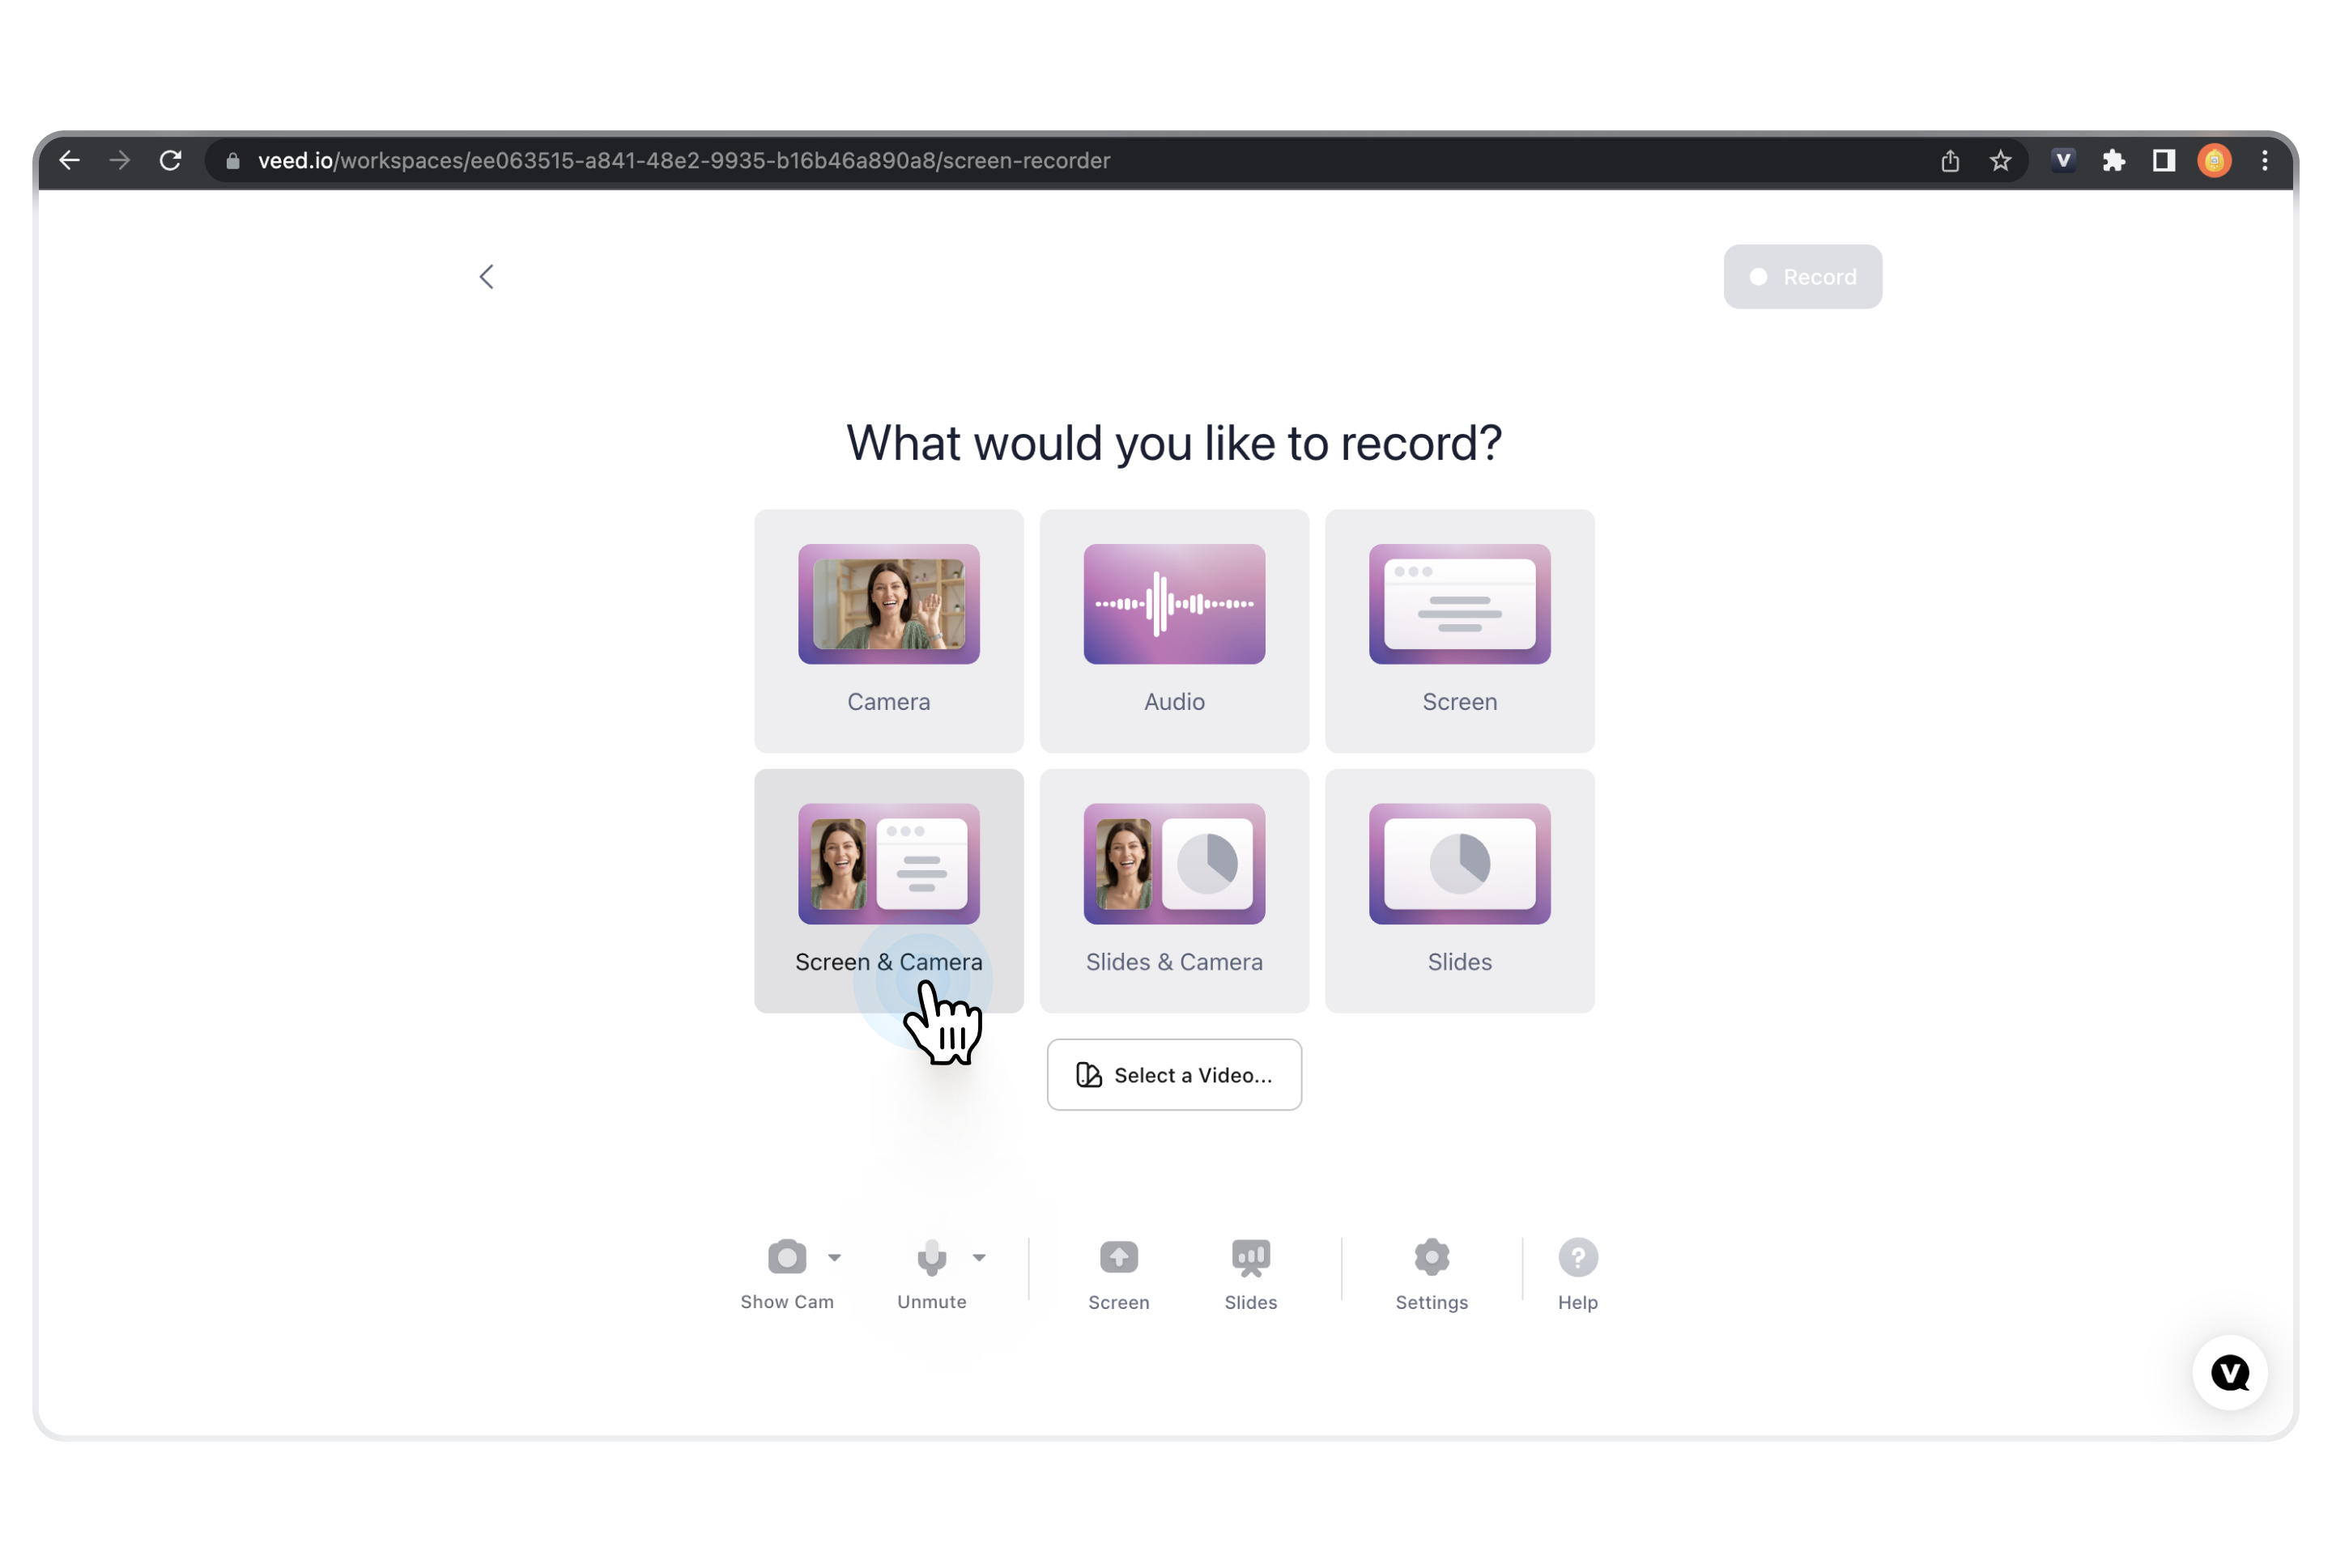
3. Choose between the various layout options shown in the middle of your screen. If you know exactly what type of video you want as the final output, you should already have a layout in mind. There are the six options for you to choose from:
- Camera only
- Audio only
- Screen only
- Screen & Camera
- Slides & Camera
- Slides only
Note: Once you reach this screen, there will be a prompt asking permission for camera and microphone access. Allow access if you want to record yourself along with the screen recording.
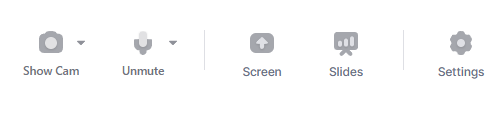
You’ll also find options at the bottom for your camera, microphone, and settings.
4. Next, you will be asked to select what to share with Screen Recorder. This can be either of these three options:
- A specific Chrome Tab
- A window
- Your entire screen

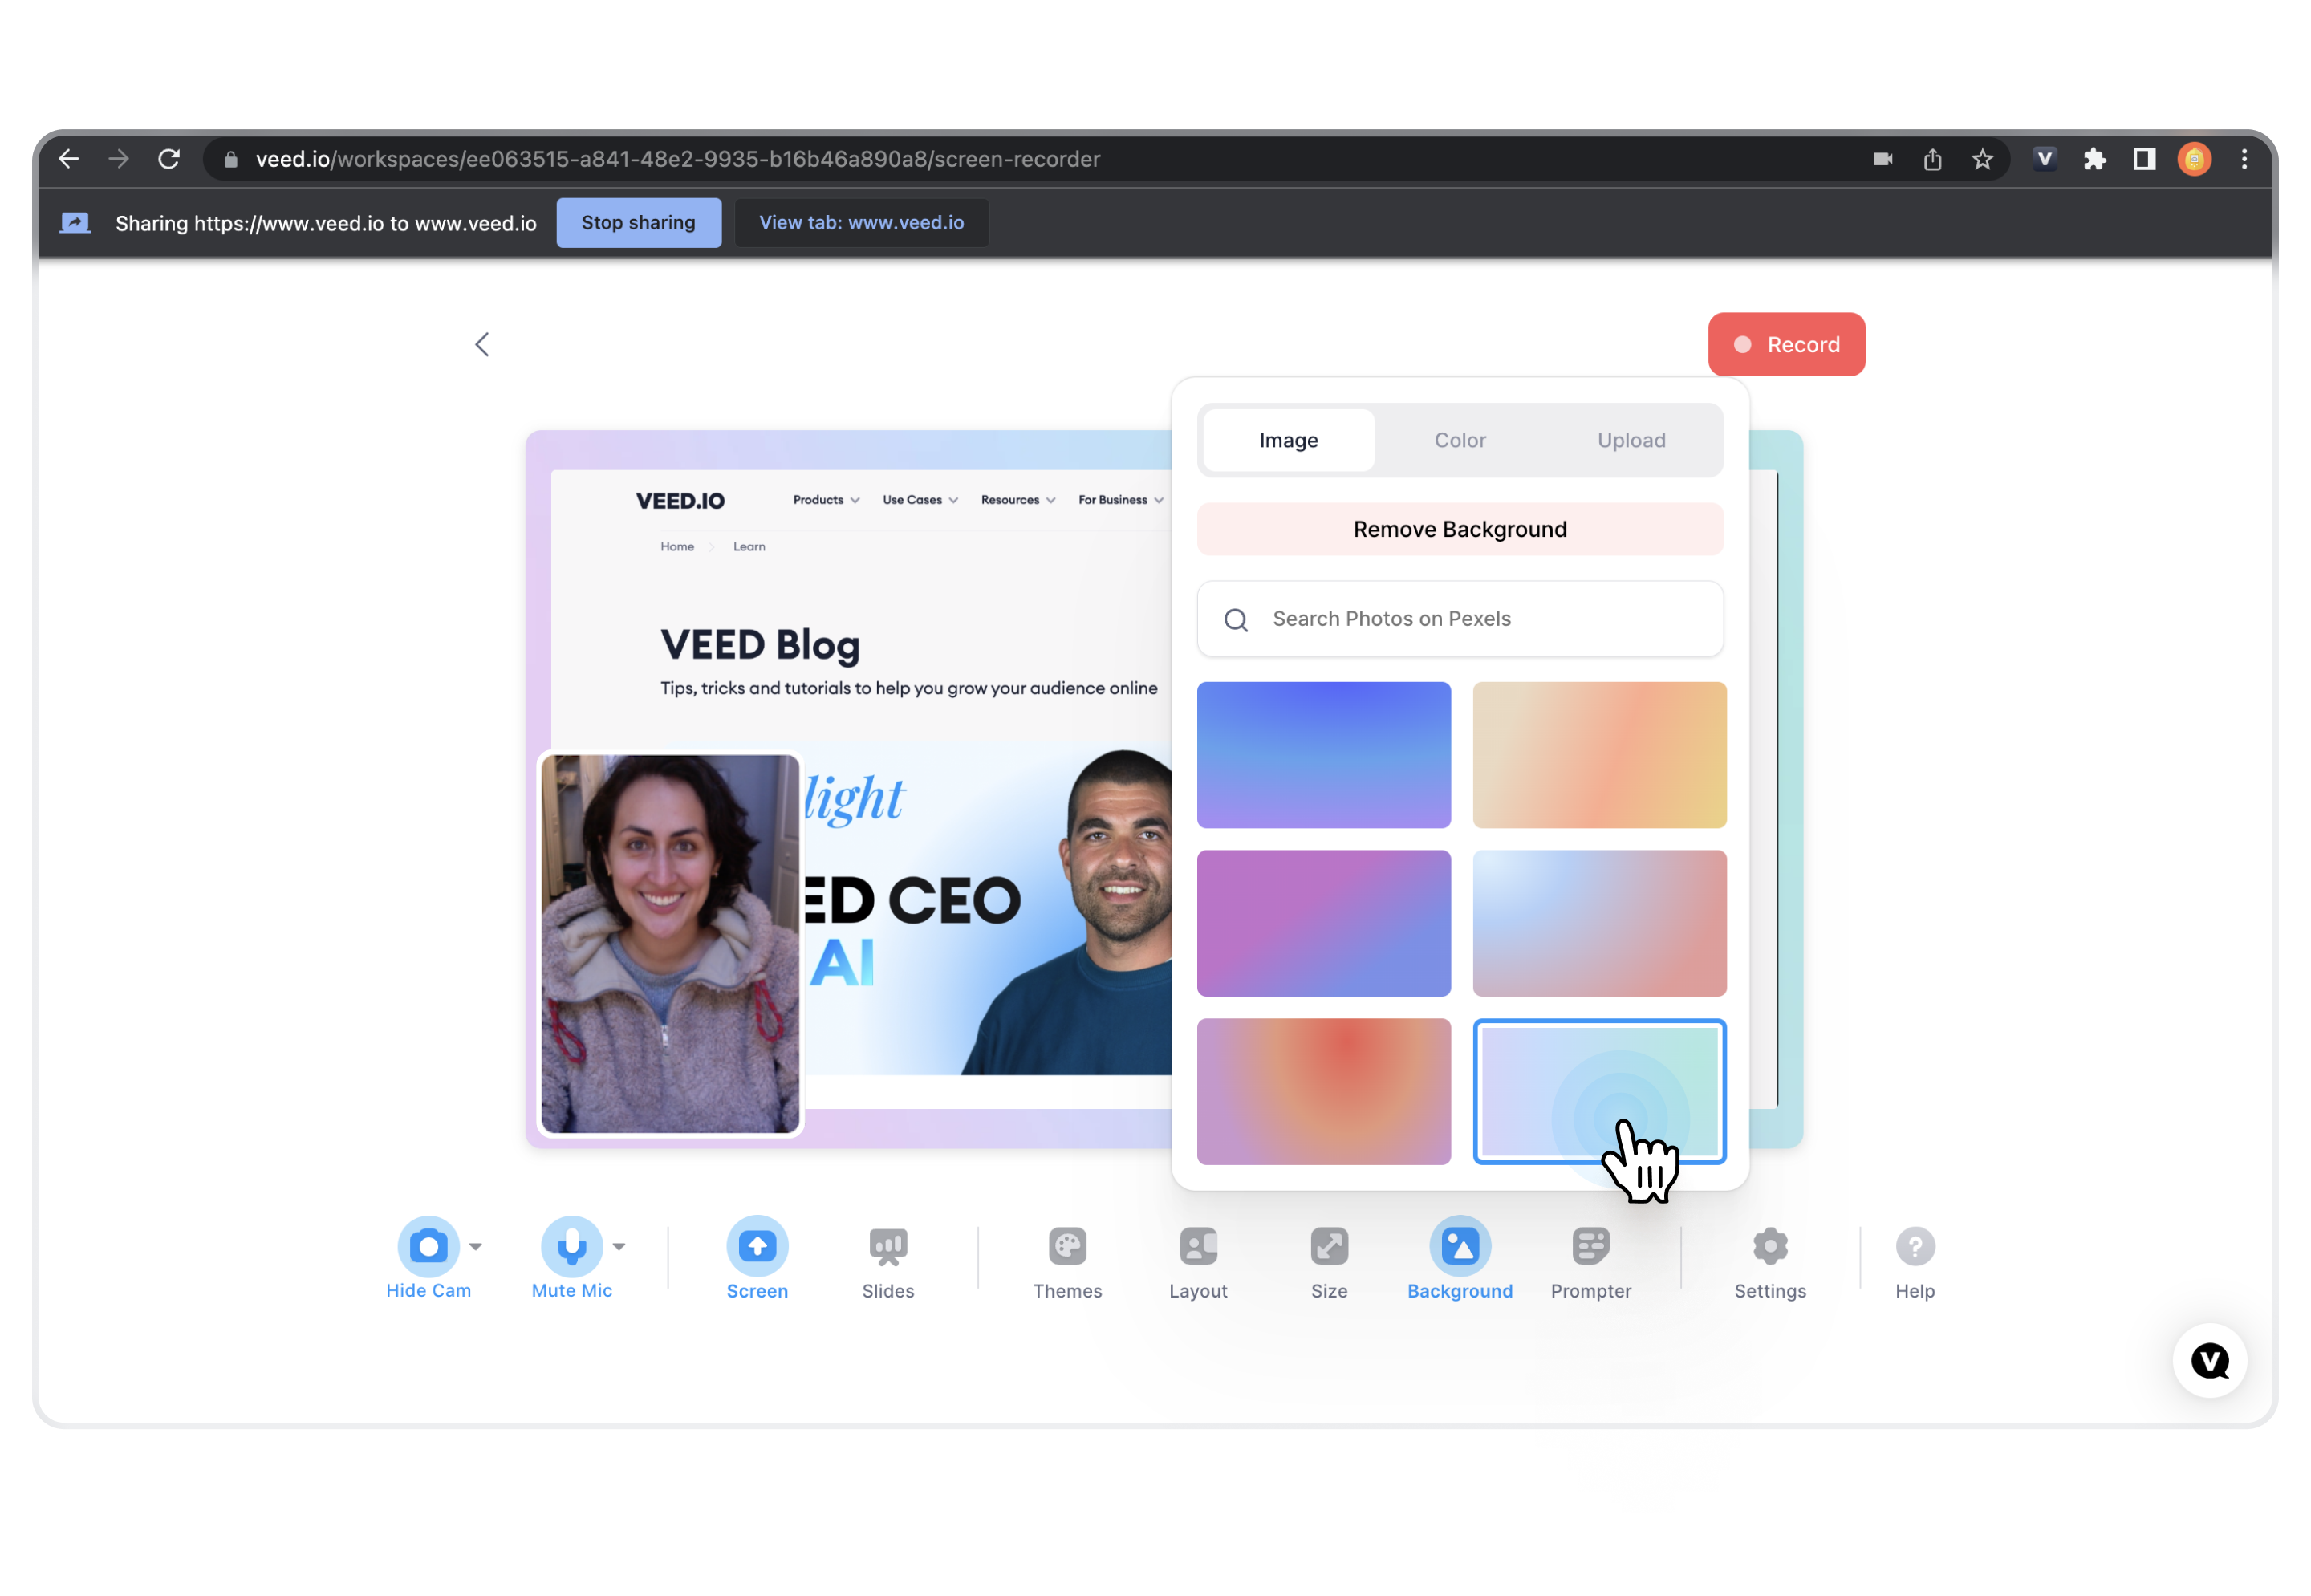
Pro Tip: Enhance your recording by adding themes, background changes, and more through the features at the lower portion of the recording interface. Have fun and get creative as you work towards your final product!
You can also choose whether or not to share your audio in both Chrome Tab and Entire Screen options. Once you’re satisfied with your settings, click on Share.
5. Now that you’ve picked which parts of your screen to share, it is time to record by clicking on the Record button. There is a 3-second countdown before the recording starts, so make sure everything is in order before sharing. Script, make-up, lucky charm — everything!
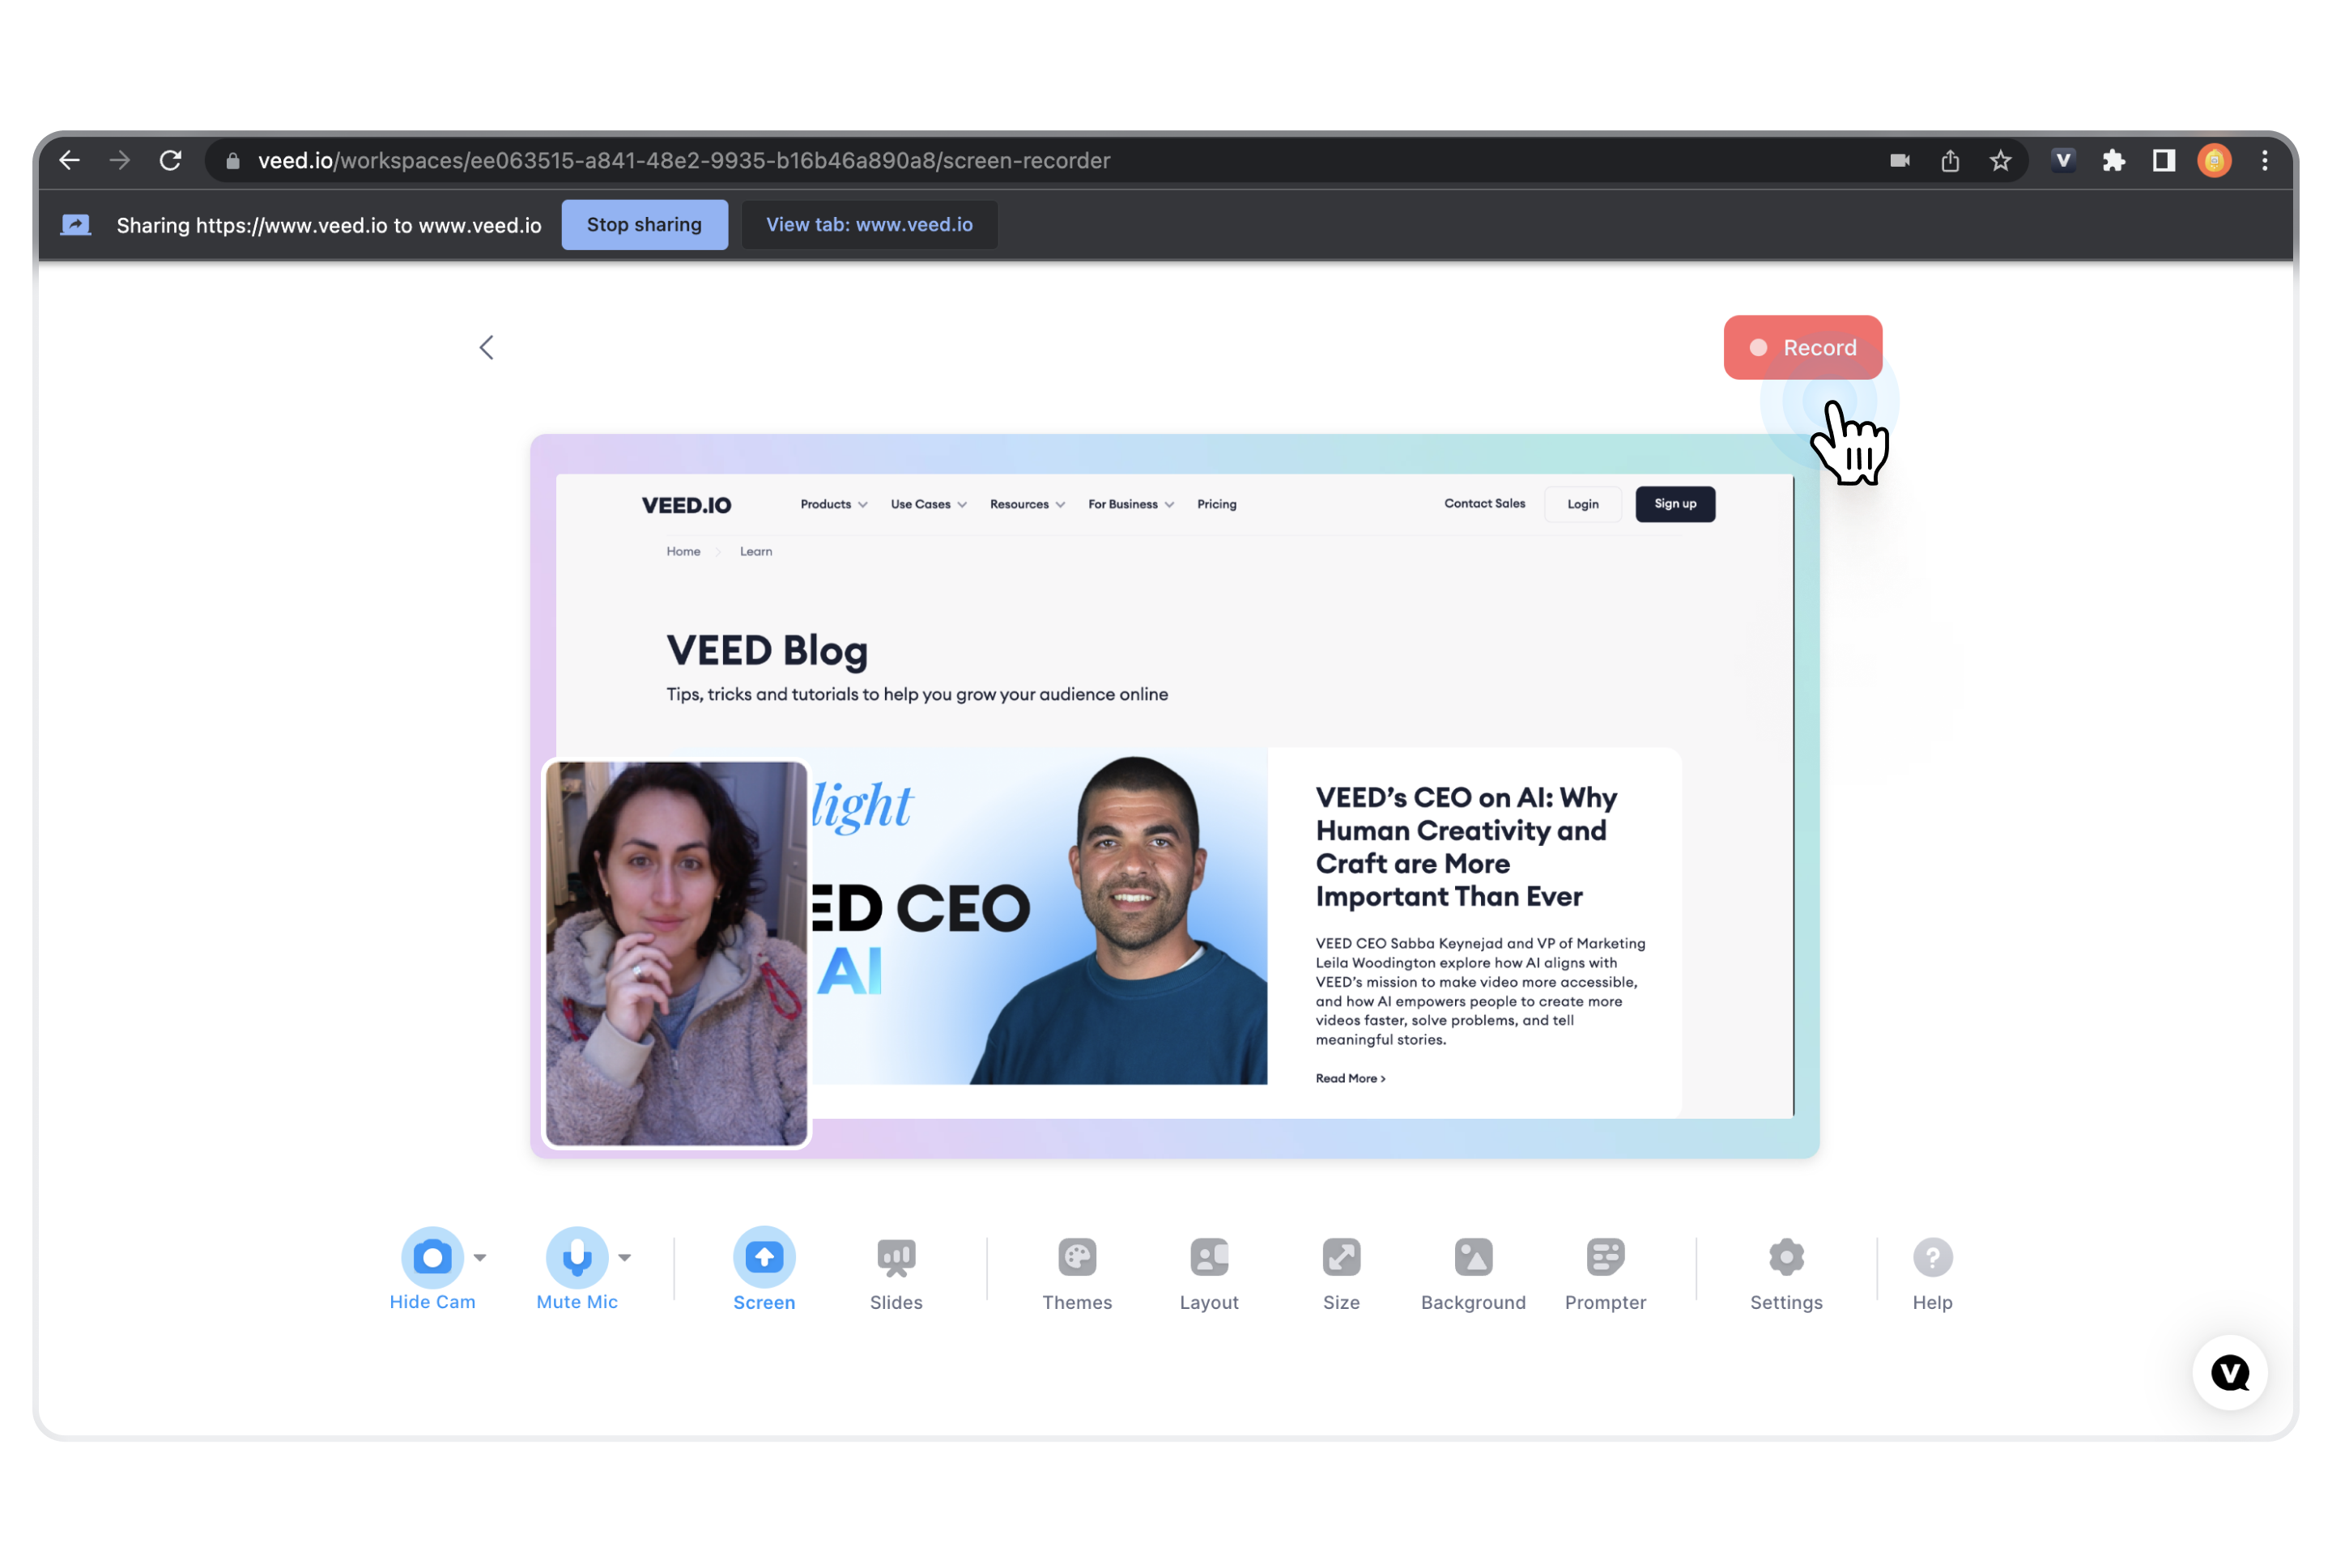
You can also choose to pause the recording, mute yourself, or start all over again through the buttons at the upper right-hand side of the interface. At the top center portion, you can see how much time has elapsed.
6. Hit the red button again to stop recording.
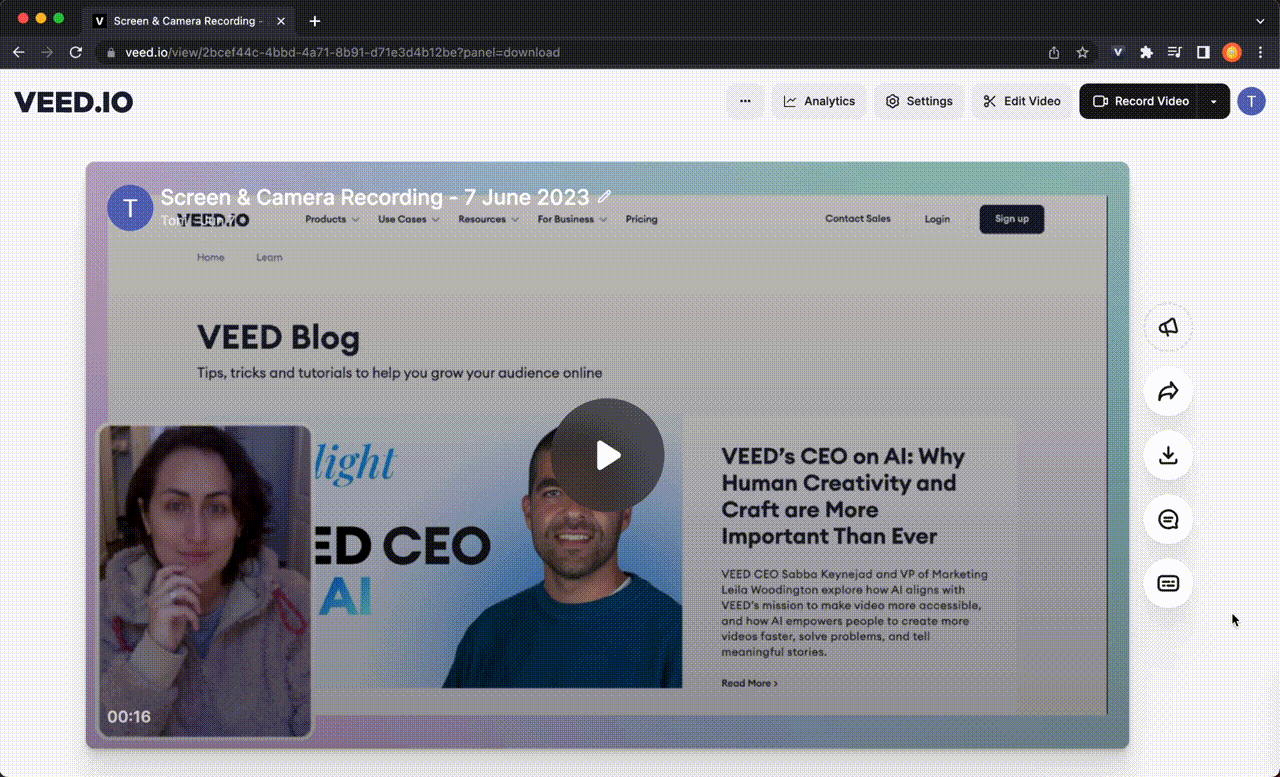
7. Afterward, VEED will redirect you to a page where you can see the rendering progress. Depending on the file size, it can take anywhere between a few seconds to several minutes to render.
From here on, you have two options. You can either continue and work with the video you’ve recorded, or record another one below (in the right panel). Once you’re ready to proceed, click on Add to Project in the upper-right corner.

You will be greeted with a variety of built-in tools such as transitions, filters, and more. We will dive deeper into this topic later on, so don’t switch tabs yet!
Remember, you can make unlimited recordings without any limits to the screen recording length. If you want to record more videos, VEED will automatically save recordings into your VEED account.
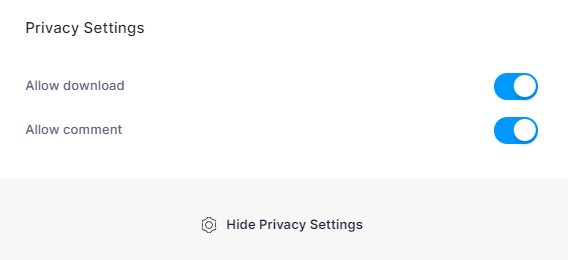
8. Once your video is ready, click on Done in the top-right corner and then select Export Video. In the next window, you’ll have the option between sharing your recording or downloading it.
Copying the link is the easiest way to share your video. You can also share it on your social media. Just get an Embed link, or send the video to an email address.
Bonus Tip: You can fiddle with the Privacy Settings to allow people to either comment on your video or even download it.
How to Turn Screen Recordings into Professional Videos in Minutes with VEED
If you want to take an extra minute to beautify your screen recording and turn it into a professional video, you can do so with VEED.
Here are the steps to turn your basic screen recordings into professional videos using VEED:
1. After recording your screen, click on the Add to Project button at the top-right corner of your screen. If you want to upload a screen recording, do so through the VEED workspace and edit through there.
2. Customize your video by adding subtitles, music, transitions, and more.
VEED has a lot of features you can use to make your screen recordings exciting. Here’s a quick list of some key features that you should watch out for and take advantage of!
- Magic Cut — like a magician, it can make outtakes, mistakes, repetitions, and other unwanted bits from your recording disappear in a single click!
- Eye Contact Correction — subtly readjusts your gaze when recording with a webcam for maximum engagement with your audience.
- Auto Subtitles — make your recordings easier to understand through automatically generated captions.
- Video Transitions — create dynamic switches from one section of your presentation to another.
- Elements — add progress bars, music visualizers, shapes, emojis, effects, logos (try a logo maker for design inspiration), and more to your video.
- Drawing — annotate using virtual pens and more on your video.
- Templates — not sure what to make? Choose from a variety of layout designs.
- Trim, Split, Crop, and Resize — you can trim, split, crop, and resize until you are satisfied with the final results of your recording.
If you’re frequently making video content and need on-brand videos, check out the Pro version of VEED to unlock more customization options like the brand kit. And for an even better solution for your team’s needs, go for the Enterprise plans.
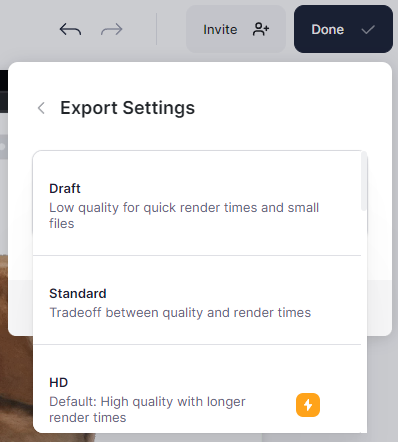
3. Once you’re finished editing, click on Done in the upper right corner of your screen. You will be asked to either export your video or save it as a template.

4. You are able to play with the quality as well. You can choose between Draft, Standard, HD, and a range of channel-specific quality options. The higher the quality, the longer it takes to render the whole video file.
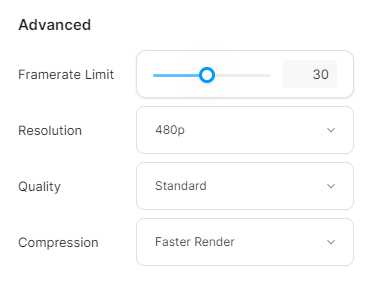
Below the video quality options tab, you can adjust the framerate (FPS) limit, resolution, and video compression. If you’re compressing a video for email purposes, you can learn how to do so through this article.
5. Once you’re all set, click on Export Video to render the final output. You can share your video through VEED by copying the link specific to your video and sharing that with your friends or colleagues. You can also download the video.
Wrapping It Up
The Xbox Game Bar and Snipping Tool are great built-in screen capture tools for sure. But they do have their share of downsides that make them inconvenient.
If you're looking for an all-in-one tool that's perfect for screen recordings and making videos, VEED is the one for you. It has advanced features like on-screen drawings, subtitles, and other special effects you can edit into your recording.
The cherry on top? VEED allows unlimited recordings in terms of duration and the number of recordings they make! Try VEED’s online screen recorder for free now.

![11 Easy Ways to Add Music to Video [Step-By-Step Guide] in 2026](https://cdn.prod.website-files.com/616e938268c8f0a92cb2b540/6a1009d112f8e10662c882f9_Hero_%2011%20Ways%20to%20Add%20Music%20to%20Video%20%5BStep%20by%20Step%20Guide%5D.png)

