You just compressed a video file, and what earlier looked like a 4K video with engaging visuals now looks like a blurry 240p clip. After all, video compression is a technical process that requires the right tool.
Figuring out how to compress a video file without losing quality doesn’t have to be a long and drawn-out process. In this guide, we’ll share six easy ways to compressing video files without losing quality so you can drive engagement, upload videos faster, and save disk storage.
Jump to a specific section
- How to Compress a Video with an Online Video Compressor
- How to Compress a Video on Mac
- How to Compress a Video on Windows or Linux
- How to Compress a Video into a Zip File
- How to Compress a Video by Trimming
- How to Share Videos Without Compression
.jpg)
[#TOC1]How to Compress a Video with VEED (An Online Video Compressor)[#TOC1]
VEED is an online video editor that offers a completely free, fast, and easy online video compressor. Because it’s an online tool, you don’t need a high-end computer to use it (or use up precious storage space since it’s cloud-based).
VEED is not only one of the fastest compressors, but also lets you create persuasive video content like a pro with ease.
Here’s how to compress video files using VEED:
Step 1: Go to the Online Video Compressor and Upload the Video You Wish to Compress
Go to VEED’s online video compressor. Click on the Compress a video button to upload your video file. You’ll then be redirected to the editor, where you’ll be prompted to upload your file. You can do this by either browsing to the file on your device, or dragging and dropping it directly to the editor.

VEED supports video files in these formats: MP4, MOV, MKV, AVI, WMV or FLV.
Step 2: Choose the Desired Quality and Resolution for Your Video
Once your video file is uploaded, select from either Low, Medium, or High setting. The lower the quality of your video, the more it will get compressed.
Similarly, pick a video resolution (the compressor will always set the original resolution by default).
At the bottom of the screen, you’ll be able to see how much you will save in terms of the video size post-compression. The tool will also tell you how much your compressed video will be in comparison to the original one. This information will change in real time as you adjust the quality settings and the video resolution.
(Optional Step): Click on Advanced Next to Compression Settings to Toggle CRF and Bitrate
If you’re an expert who dabbles with videos all the time, you may be familiar with the concepts of Constant Rate Factor (CRF) and Bitrate. To adjust these settings, click on Advanced. Once you’re in the advanced settings, you can toggle the CRF and the bitrate by clicking and dragging on their respective sliders.
Here’s a quick refresher on both CRF and bitrate:
- CRF: CRF is the ability to indicate the compression algorithm how much it can adjust the video’s bitrate to achieve a certain quality level. It typically ranges on a scale of 0 to 51, with lower values indicating higher quality and larger video file sizes, and higher values result in lower quality and smaller file sizes.
- Bitrate: Bitrate in video compression refers to the amount of data processed per unit of time in a video stream. It's typically measured in bits per second (bps) or kilobits per second (kbps). Bitrate directly affects video quality and file size, as a higher bitrate results in better quality but larger file sizes, while a lower bitrate sacrifices quality for smaller files. Adjusting the bitrate is a key control in video compression, allowing you to balance between file size and video quality according to your specific needs.
TL;DR for the above: The higher the CRF value, the more compression you’re going to get. However, a higher bitrate equals lower compression. Adjust accordingly.
Step 3: Click on Compress Video and Download
VEED will now begin to compress your video. Depending on how big your video is and your compression settings, it can take anywhere from some seconds to a few minutes.
Once done, click on Download file to download and save the compressed file on your device.
[#TOC2]How to Compress a Video on Mac (with QuickTime Player)[#TOC2]
As a Mac user, you will find Quicktime as a default installation on your device. It isn’t as feature-rich as the other tools in this guide, but it gets the job done. .
Here’s how to reduce video size on Mac:
Step 1: Open the Video File on the Software by Going to File Option.
Go to your Launchpad and search for Quicktime. It’ll launch a window with all your video files. Choose the one you want to compress and it’ll automatically open your video file in a new window.

Step 2: Go to File > Export as and Choose the Resolution
Toggle over to the upper-left side of the screen and click on File. Then, select the Export as option and choose the desired export video quality.
Here’s what the export as options mean:
- 4K: This gives you 3840 x 2160 resolution.
- 1080p: This generates an output file with 1920 x 1080 resolution.
- 720p: This generates an output file with 1280 x 720 resolution.
- 480p: This generates an output file with 640 x 480 resolution.

Step 3: Finally, Export Your Video
Once you’ve selected the video resolution, you can choose the file location, name, and add tags if required. Hit Save and the compressed video file will be saved to your selected destination.
[#TOC3]How to Compress a Video on Windows or Linux (with VLC)[#TOC3]
VLC is a free media player and video compressor. You can use it on Mac, Windows, and Linux systems. If you're working on Linux, using a Linux VPN can help maintain privacy when downloading and managing media files. If all you need to do is compress videos, this is the tool for you.
Here’s a step-by-step tutorial to reduce video file size using VLC:
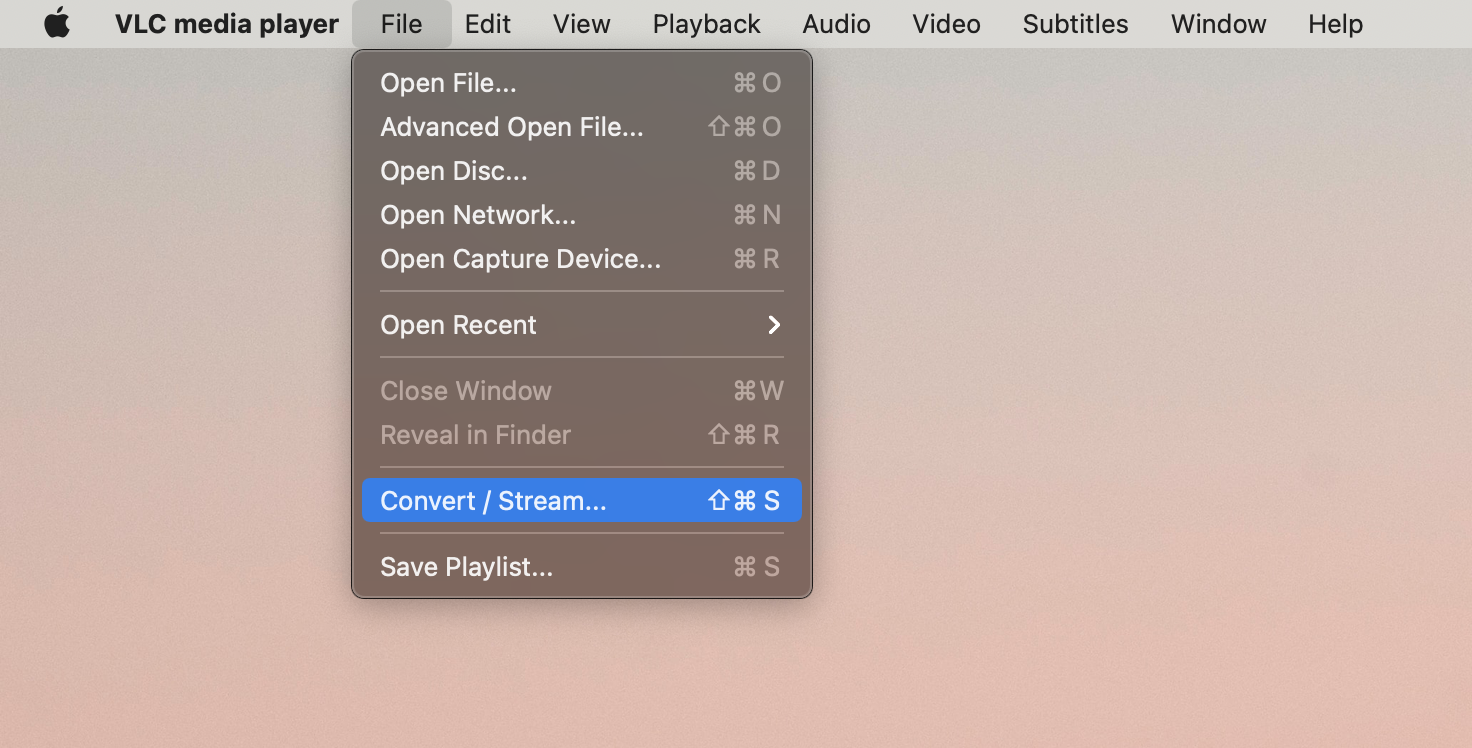
Step 1: Once You Install the Software, Go to File then Convert/Stream
Open VLC media player on your laptop and go to File. Then, click on the Convert / Stream option to compress your video file.
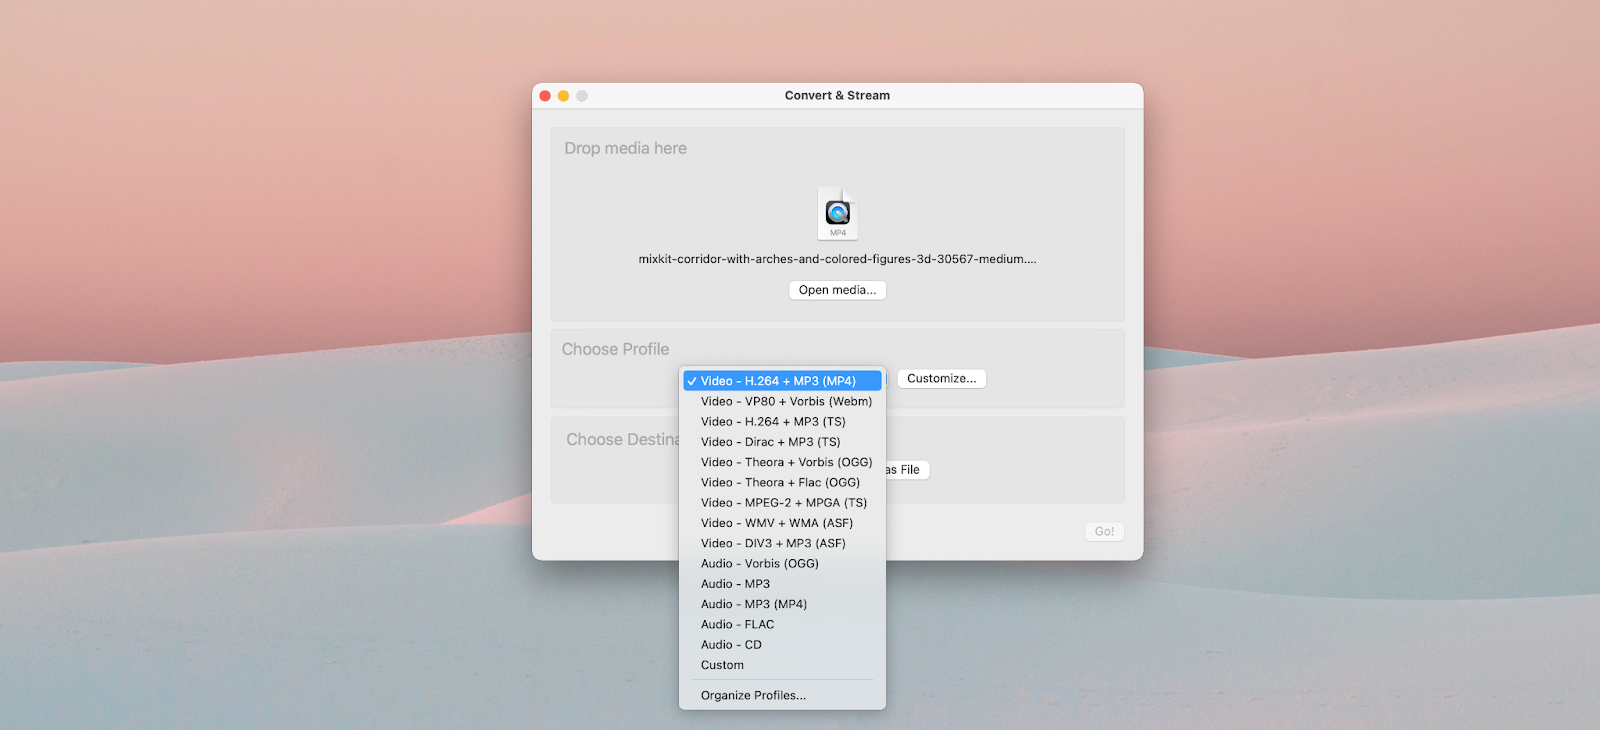
Step 2: Click Open Media and Select a Video File to Compress
Drag and drop your video file in the pop-up window or simply click on Open media and choose the video you want to compress.
Step 3: Once You Have Added the file Choose a Preset
Click on the blue button and scroll to select the desired preset.
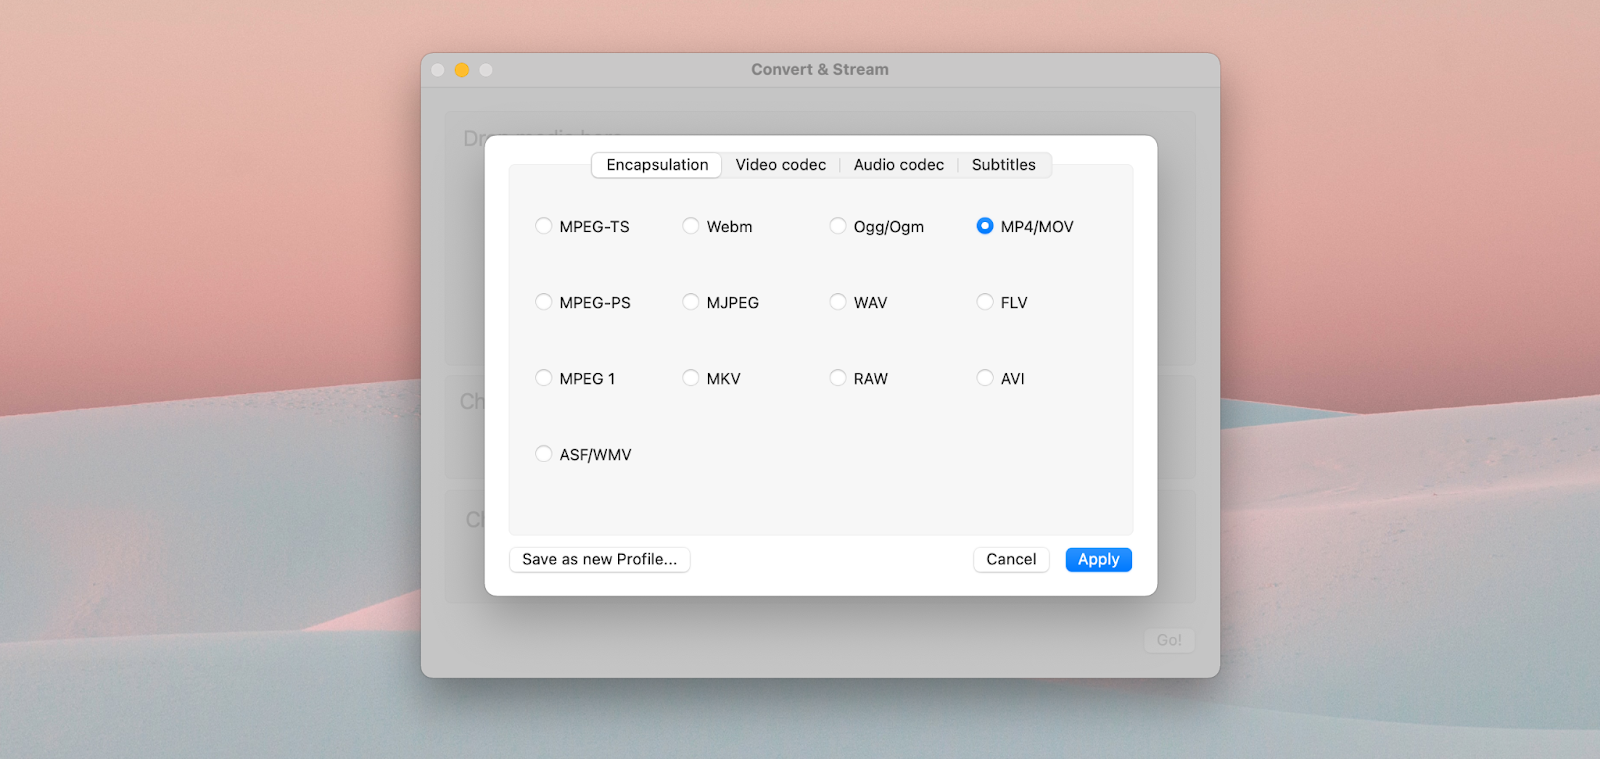
Step 4: Click Customize if You Want to Adjust the Bitrate on the Video Codec Page
Step 5: Click Save as file, Name the File, and Choose a Destination File for Your Compressed Video.How to Compress a Video into a Zip File

[#TOC4]How to Compress a Video into a Zip File[#TOC4]
Here’s how to compress a video into a zip file on Windows or Mac.
How to Compress a Video into a Zip File on Windows
Step 1: To compress several videos, put them all in one folder on your computer.
Step 2: Open the folder, select the videos you want to compress, right-click on any video, and select Send to > Compressed (zipped) folder.
Step 3: Windows will create a new archive and save it in the same folder as your videos.
How to Compress a Video into a Zip File on Mac
Step 1: Add videos into a folder
Step 2: Right click on the folder with the videos
Step 3: Click on the option to compress
Note: If you want to compress a single video file, you can follow the same steps as mentioned above.
[#TOC5]How to Compress a Video by Trimming[#TOC5]
Here’s how to compress a large video file by trimming:
Step 1: Go to VEED.IO on Your Browser, and Sign Up and/or Log In.
Head over to VEED. Click on the Sign up button to create a new account or log into an existing account by clicking on the Login button. If you’re always logged into your VEED account, simply head over to VEED.IO and you will be automatically redirected to your workspace.
Step 2: Upload Your Video to the Editor
Once you’re in the VEED workspace, click on Create Project. Then, click on Upload Video to import your raw footage from your device. You can also use a link to upload a clip directly to VEED.
Step 3: Click on Magic Cut to Automatically Trim Your Video
With your video loaded up on the editor, toggle to the upper right corner of your video timeline. Then, click on Magic Cut and let the magic happen!
The AI will now automatically detect video frames with silences, mistakes like a doorbell ring smack dab in the middle of your recording, or even the “Ums” and “Ahs”. Then, it’ll remove those parts, leaving you with the best takes of your video, effortlessly transitioning from one scene into another.
This could take anywhere from a few seconds to several minutes, depending on the length of your clip.
(Optional) Step 4: Edit Your Video Further to Your Desired Style
Once you’re done instantly cutting out the unwanted bits from your video, go ahead and add some final touches if needed. VEED gives you a powerful video editing suite to help you record, edit, and share videos in a single place.
Let’s take a quick look at some of the most popular VEED features:
- AI generated subtitles: Automatically generate subtitles for your videos with one click.
- Eye contact correction: Reading a prompter behind the camera? Got distracted for a hot second? Fix your gaze to look straight into the camera in your video with VEED.
- Recorder: Want to record a video on the go or add a snippet in an existing one for a better transition?
- Audio cleaner: Automatically remove unwanted background sounds and noises so your final video has studio production audio quality.
- AI Avatars: Making a work presentation, sales deck, or outreach message, but feeling camera shy? Choose from our AI avatars and create realistic talking videos without actually recording yourself.
- AI Background remover: Change your video’s background with a single click and replace it with a new one from our library of backgrounds or upload a custom one.
Step 5: Download Your Video
Once you’re happy with your video’s final edits, hit on Done at the top right corner of your VEED workspace. Choose the export settings like the resolution of your video and hit Export Video.
After your video is done rendering, you can download it in multiple file formats: MP4, MP3 and GIF. Or, you can share it as a link or send it as an email attachment.
[#TOC6]Bonus: How to Share Videos Without Compression[#TOC6]
Step 1: Upload your video to VEED
Go to VEED and upload your video.
Step 2: (Optional) Edit your video to Your Desired Style
Once your video is loaded into the editor, you can experiment around different editing options and make adjustments as you go.
Since VEED is a comprehensive video editing software, you can pretty much start a video from scratch i.e record it within the platform and take it to the final publishing stage i.e share it with your friends or download it to later upload on your social media profiles.
Step 3: Hit Done and Export your video
After you’re done editing your video, click on Done at the upper right corner of your VEED editor. Then, select the resolution of your video and hit Export Video. Once your video is ready, you can download it in multiple file formats such as MP4, MP3 and GIF.
Step 4: Once Rendered, Click on the Share the link Option
If you want to send a large video file without compression, click on the Share the link option and send it to your colleagues, friends or family. You can also create a digital flipbook that includes your video, and share it in a more engaging and interactive way.
Final Verdict: What’s the Best Way to Compress Videos?
If you work on a Mac and want something that’s already built in then Quicktime is your best choice. If you’re on Windows or Linux then downloading VLC is your best option.
If you like the idea of not dealing with taking up precious disk space and overly complex compression tools then the best overall video compressor is VEED. You can compress videos online regardless of what desktop or laptop you own.
VEED was designed to be simple and accessible to everyone regardless of whether they have a $200 or $5,000 computer. And if you’re also making video content quite often, VEED is also a screen recorder and video editing tool.