Most viewers are watching your video without sound. They're on the train, in an open-plan office, or scrolling through a feed at 11pm. If your video can't be understood on mute, it gets skipped — and on social, the scroll is brutal.
Subtitles fix that. They keep viewers watching, lift comprehension, and help your videos perform on every platform from TikTok to YouTube. The good news: you don't need a separate transcription service, a freelance editor, or hours of manual timing to add them. VEED auto-generates subtitles in one click, then lets you brand, translate, and export them in the same workflow.
This guide walks through the full process — from uploading your video to downloading a translated SRT file — so you can ship subtitled video that looks like your brand made it, not AI.
Key takeaways
- VEED auto-generates subtitles in one click. Upload your video, click Subtitles, select Auto Subtitle, and choose your language.
- Auto-subtitles hit up to 99.9% accuracy with a low-confidence word feature that flags any words to double-check.
- You can customize subtitles in the Styles menu — font, size, color, background, animation, spacing, alignment, and capitalization.
- To translate, open the Subtitles menu, click Add Language, then choose Translate Automatically. VEED supports 125+ languages.
- SRT, VTT, and TXT files can be downloaded from Options > Download Subtitles. Subtitle file downloads are available on paid plans.
Why subtitles make your videos perform better
Adding subtitles isn't a nice-to-have. It's one of the highest-leverage things you can do to improve a video's performance, especially on social. Here's why:
- Subtitles get you more viewers. Facebook found that captioned video ads were watched 12% longer on average than ads without captions. Subtitles also help search engines crawl your video content, which can boost organic discovery.
- Subtitles make video accessible. Around 1.5 billion people globally have some level of hearing loss. Subtitling opens your content to all of them.
- Subtitles improve learning and retention. Research shows captions help non-native speakers and able, literate adults better absorb and retain information. Practicing English with AI through interactive conversations and real-time feedback takes language learning beyond passive watching.
- Subtitles improve focus. A University of South Florida study found that 42% of students use captions to maintain focus on the video they're watching.
If you're producing video for social, subtitles are non-negotiable. Most platforms autoplay on mute, which means the first impression of your video happens silently.
The short version: subtitles transcribe spoken dialogue, while closed captions transcribe everything audible — including sound effects, music cues, and speaker identification.
Subtitles help viewers who can read along but can't easily understand the audio (different language, strong accent, sound off). Closed captions go further and serve viewers who can't hear the audio at all. For a deeper breakdown, our guide on closed captioning vs subtitles walks through every difference and when to use which.
Here's the fastest way to caption a video, step by step.
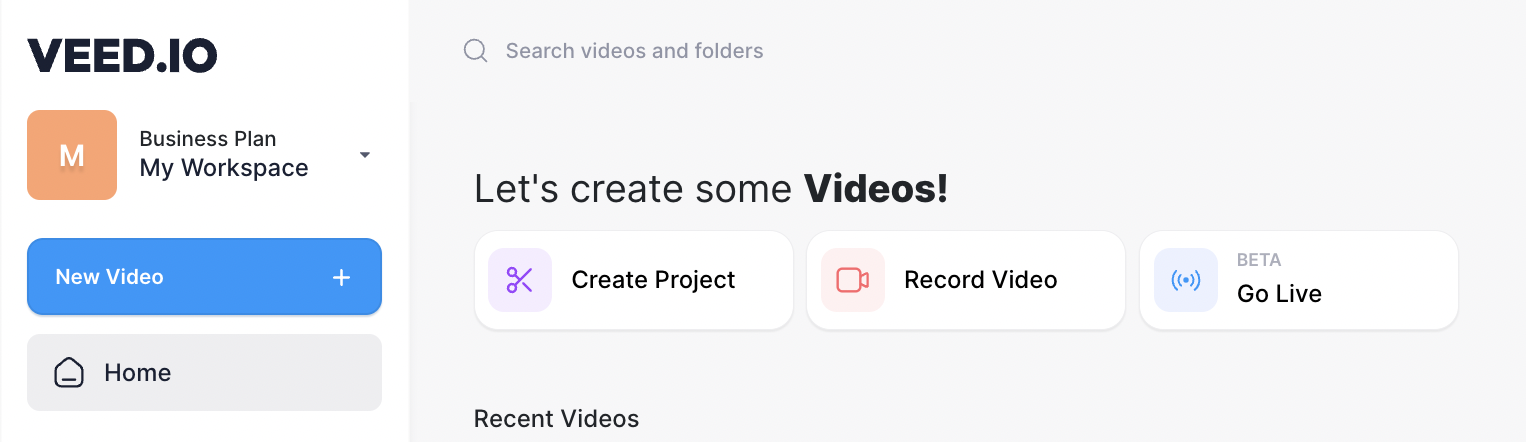
Log in to VEED (no download required) and select Create Project.
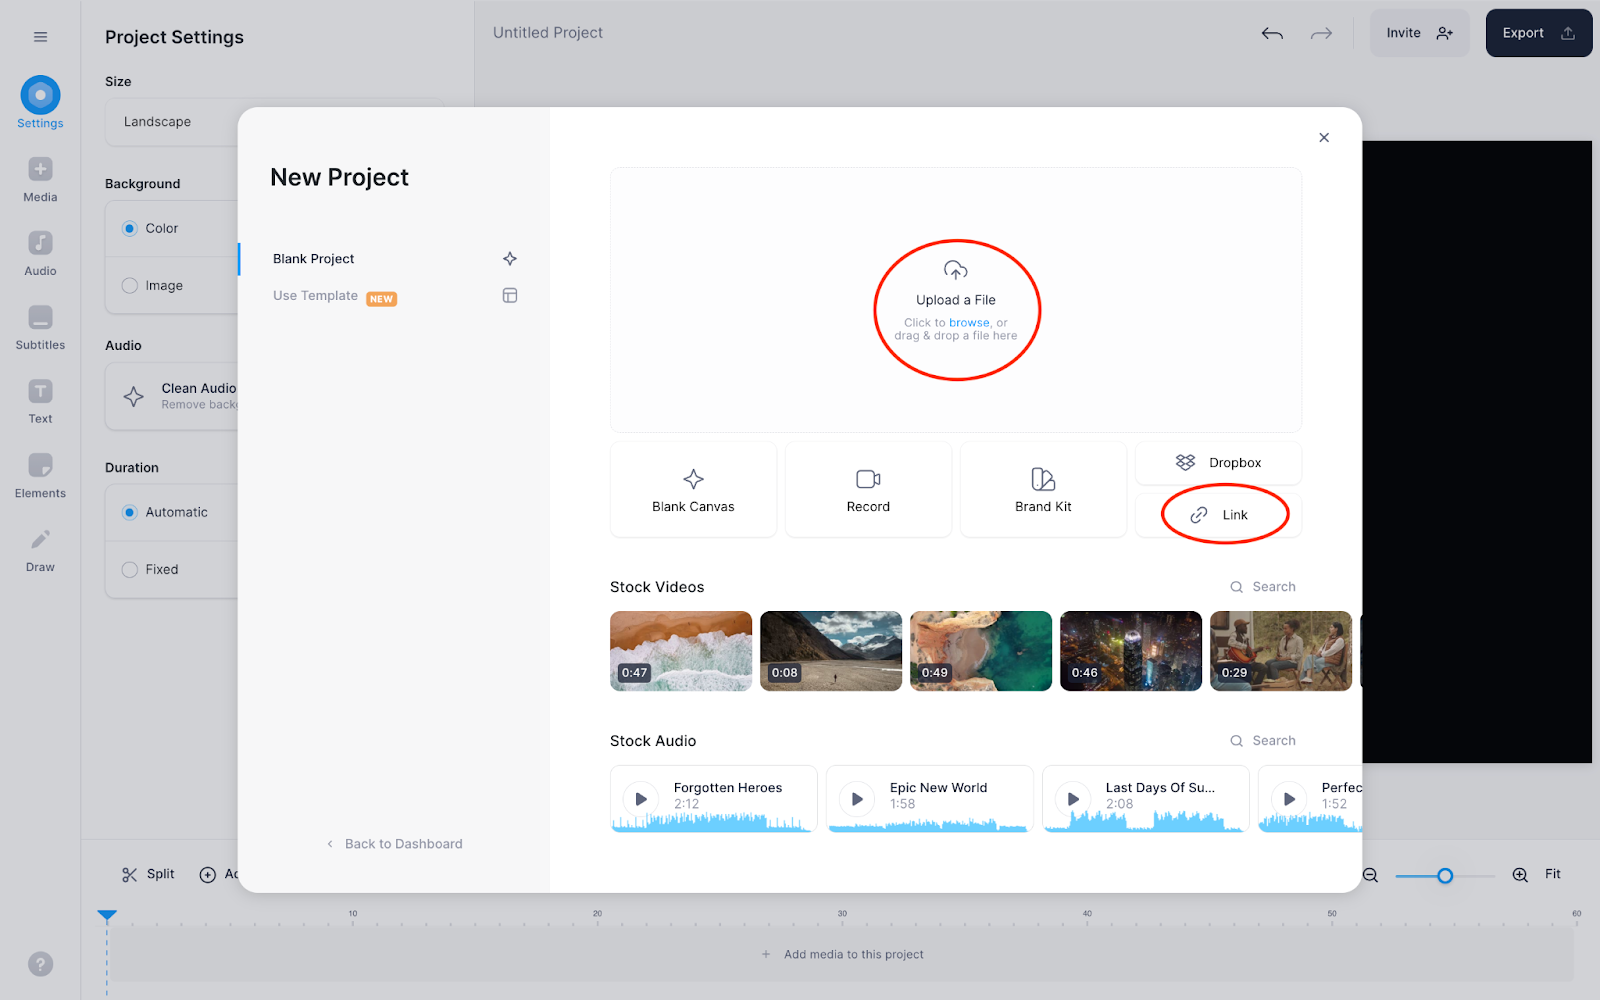
If your video is already saved on your desktop, drag and drop it into the editor or pick Upload a File.
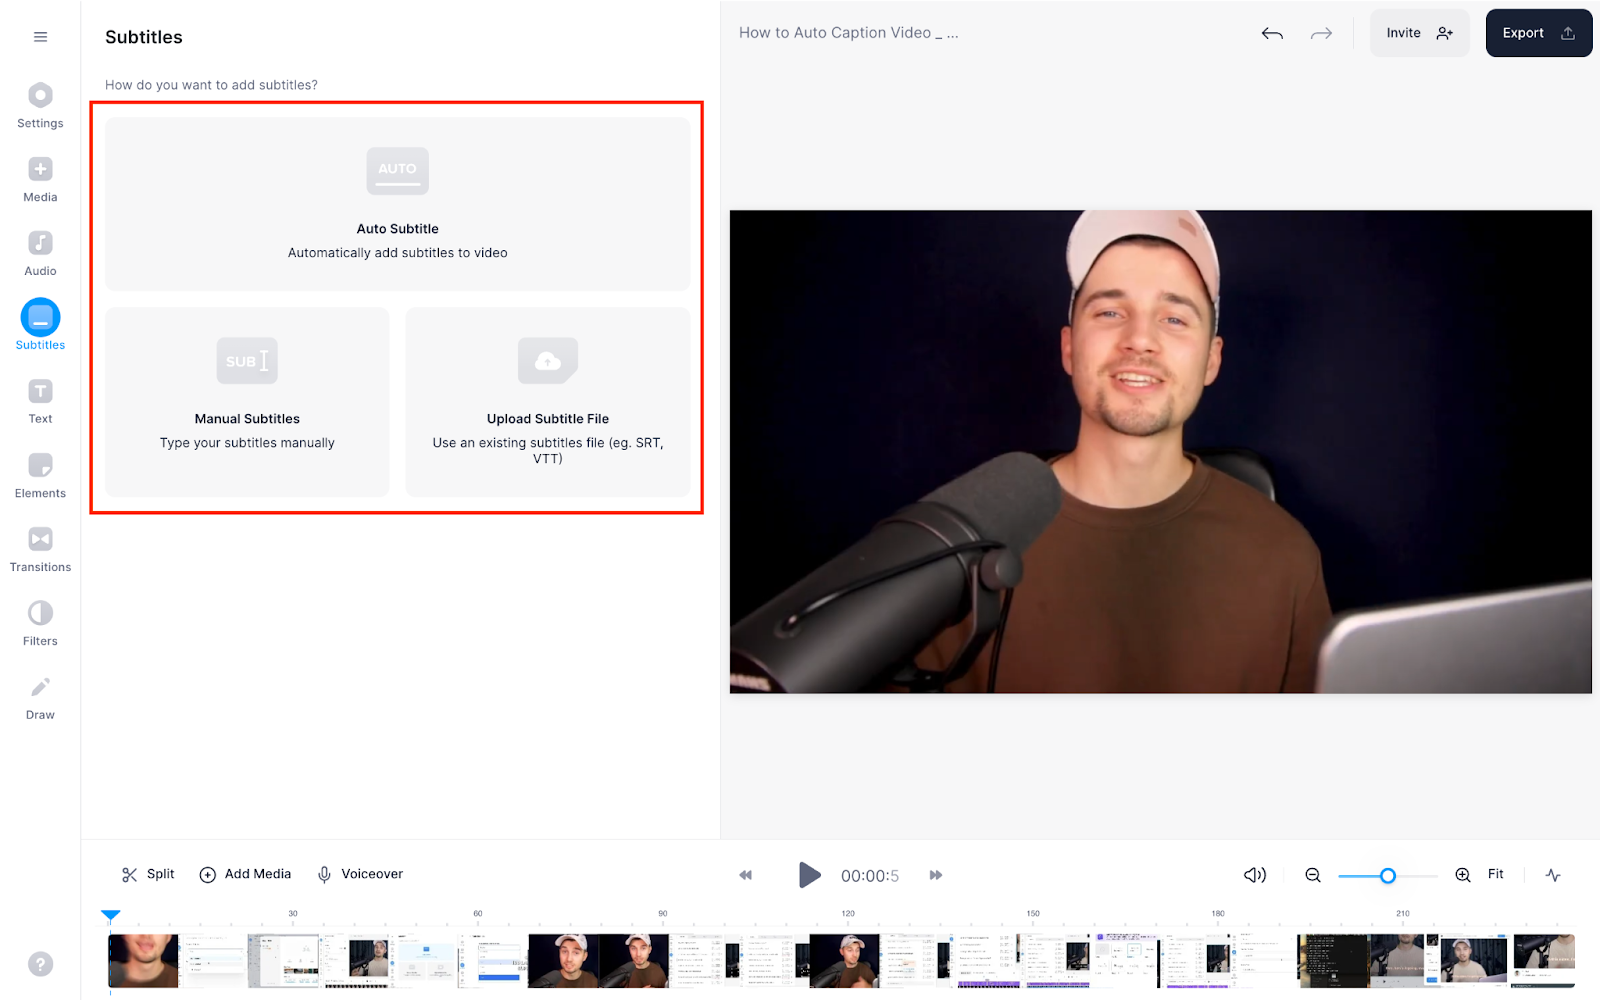
Once your video is in the editor, click Subtitles on the left toolbar. You'll see three options:
- Auto Subtitle — fastest, AI-generated
- Manual Subtitles — type them yourself
- Upload Subtitle File — bring your own SRT, VTT, or TXT
.jpg)
What’s the difference between subtitles and closed captions?
Briefly, subtitles are added to help viewers understand the narrative — for example in cases where they can’t understand the language, can’t keep up with the narrator’s accent, or are watching the content on mute.
On the other hand, captions are included for viewers who can’t understand the entire audio content (they can’t hear the background sounds and can’t distinguish between speakers’ voices, for example).
Here’s a full breakdown of how subtitles and closed captions compare with a quick summary below:
[#TOC1]How to automatically add subtitles to a video with VEED[#TOC1]
On to the meaty bit now: the easiest way to add subtitles to a video:
1. Go to VEED.io and click Create Project to upload the video
Log in to VEED (doesn’t require downloading) and select Create Project.
If the video you want to caption is already saved on your desktop, choose the Upload a File option instead.
2. Select Subtitles from the left side of your video dashboard
After you’ve added your target video to the editing dashboard, click on Subtitles.
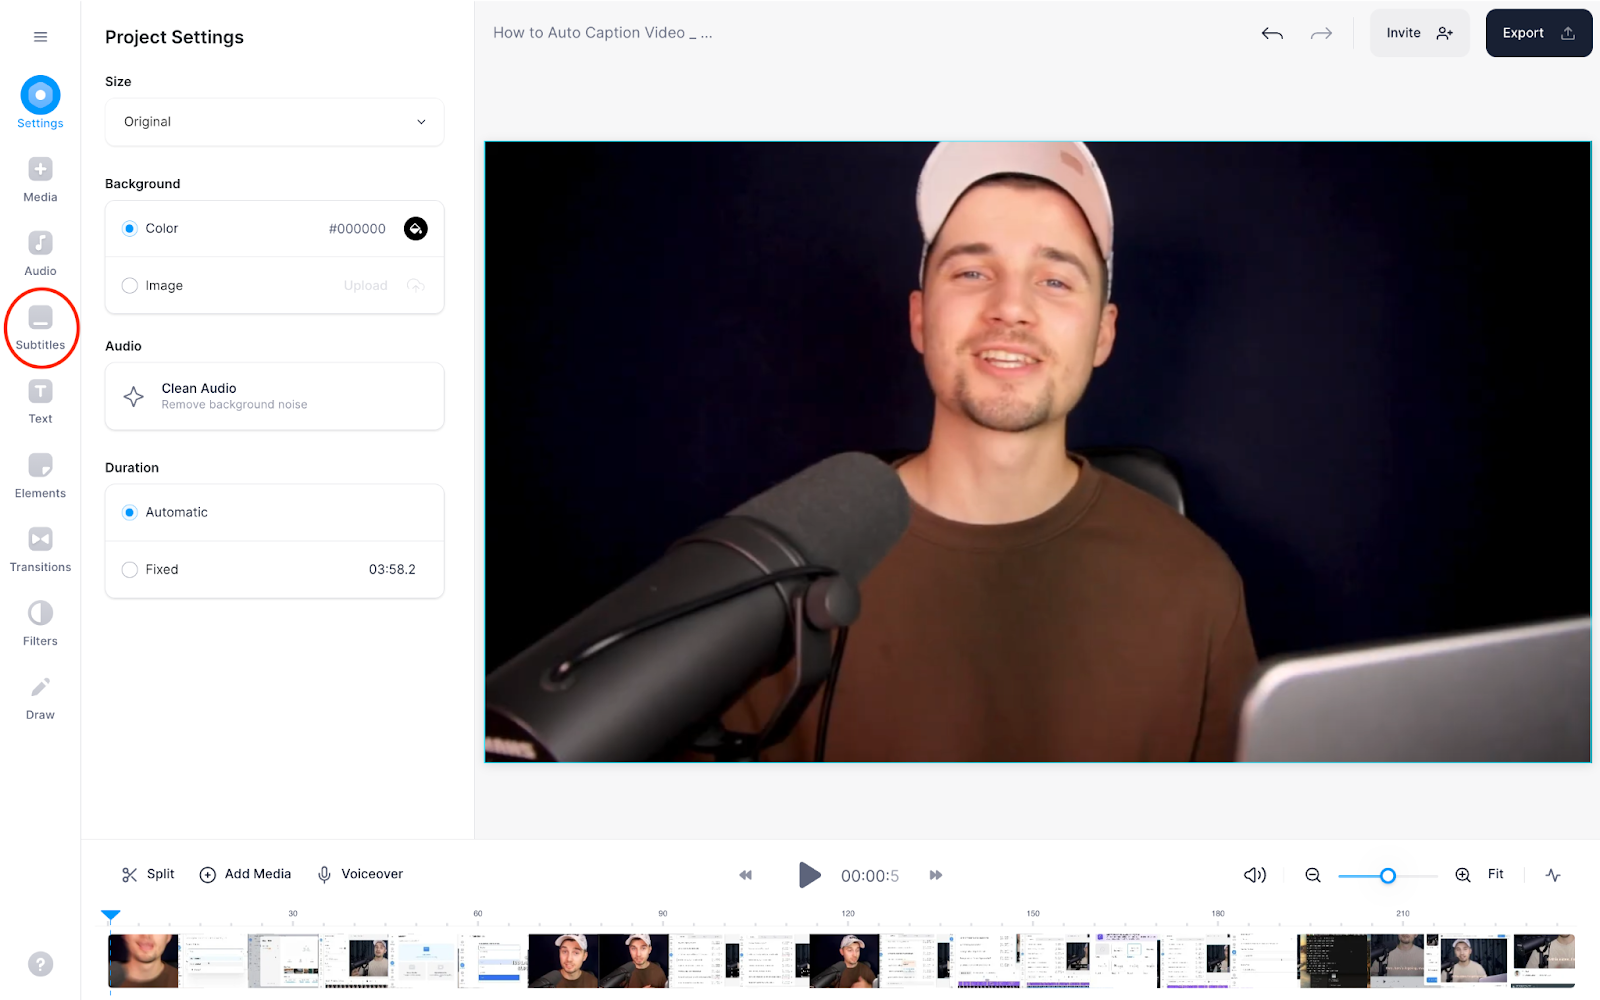
This will give you three options:
- Auto Subtitle
- Manual Subtitles
- Upload Subtitle File
Auto subtitle is the fastest and easiest way to add subtitles to a video. After you click Subtitles, select the language you want to add the captions in, and boom — a few seconds later you’ll have a subtitled video ready.
The best part? VEED’s auto subtitles are as accurate as AI can get.
With most cases other tools, you’ll get less than 75% of the subtitles correct. With VEED though, about 95% of the auto-generated subtitles are spot-on. The cherry on top? We’ve a low-confidence word feature that highlights words that may be auto-transcribed wrong. This makes proofreading your subtitles a walk in the park as the editor points out words that need your attention the most.
If you prefer adding video captions yourself, choose Manual Subtitles. In case you already have a subtitle file ready to use, select Upload Subtitle File.
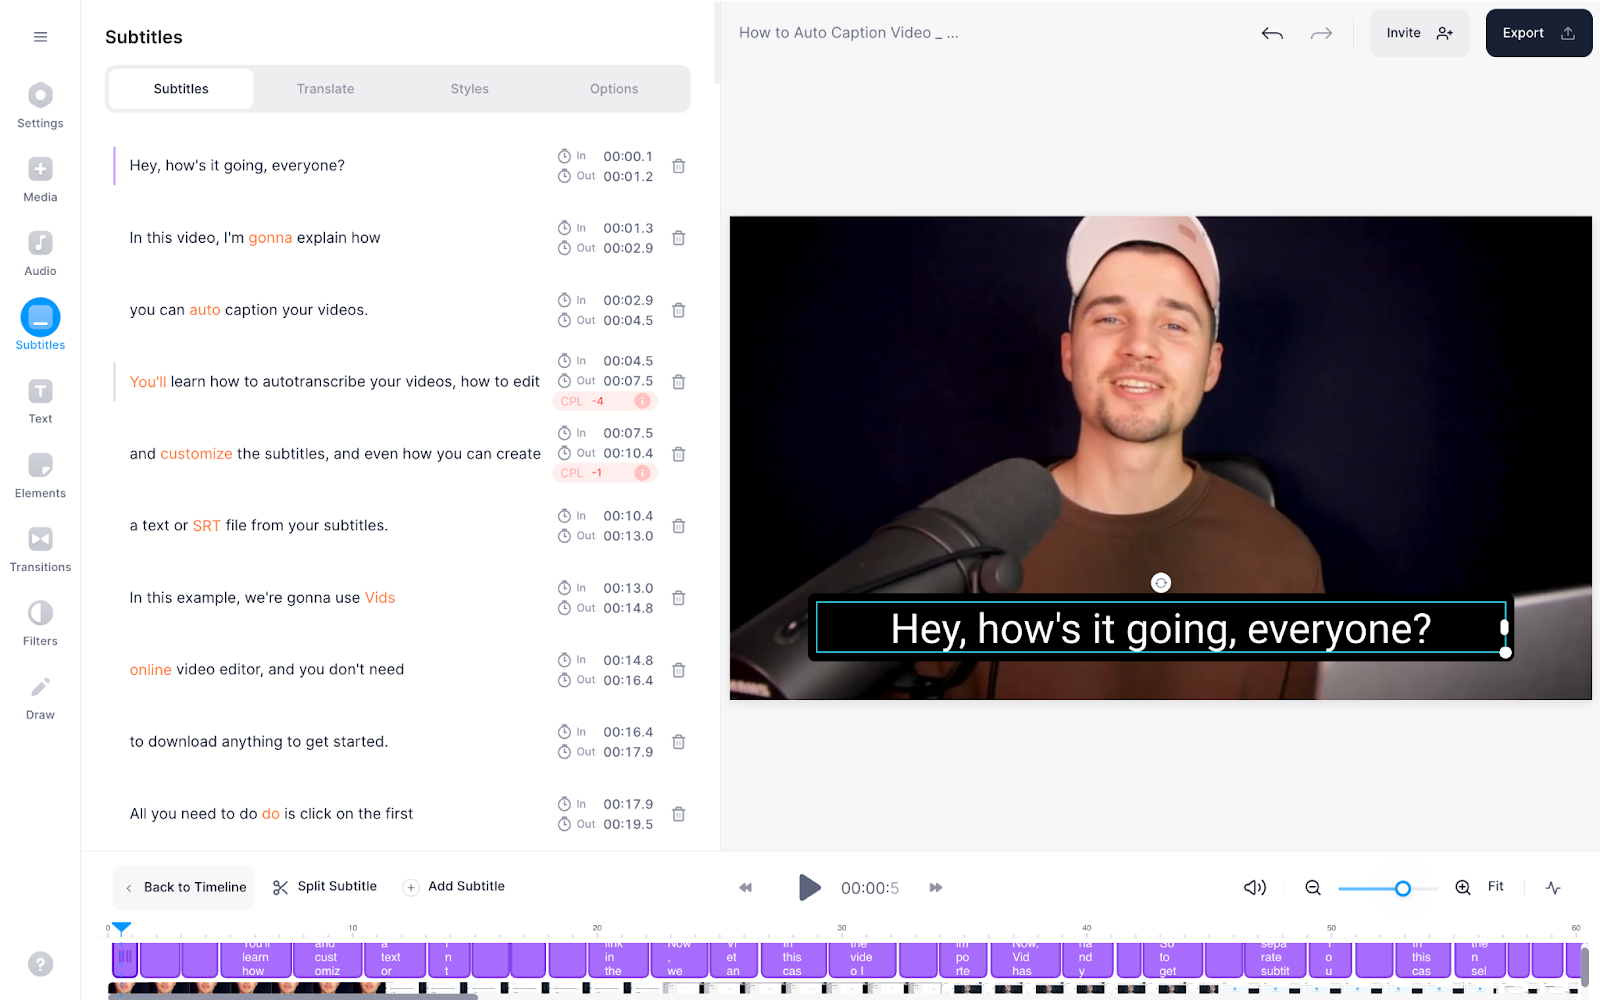
3. Review your subtitles
Last step: after you’ve manually or automatically added your subtitles, read through them for any inaccuracies or mistakes.
Also, review how they’re displayed in the video preview screen on the right side. Make sure the subtitle text isn’t running into long sentences as those can be hard to read. If it is, split the sentence(s) to make it easy to read and keep up with.
To do so, simply go to the long sentence in the text editor on the left and hit enter where you want to split the text.

If needed, you can also combine two short lines by hovering between them and clicking on Merge.

[#TOC2]How to customize subtitles to match your brand[#TOC2]
You’re good to go after you automatically subtitle your video with VEED. But if you want to personalize the subtitle text to improve viewers’ experience further — say by changing their style or using your branded font, then this section is for you.
Before we move on though, keep in mind that your aim should always be to make subtitles easy to read.
Not paying attention to the text’s readability can negatively impact viewers’ experience with your content. For example, long sentences are challenging to read. Similarly, if your video subtitles’ color blends in with the content’s background, they won’t be of any help to viewers.
With that out of the way, here’s how you can customize your video captions with the VEED video editor:
How to change your subtitle font
VEED auto-generates subtitles in a readable font (Roboto).
If it’s not your style and you want to switch to a more readable subtitle font like Open Sans, Lato, Poppins, or Rubik, go to Styles in the top main menu of the subtitle board.
Now change the font from under the Customize menu.
Want to personalize your video content by adding a custom brand font? You can easily do so by selecting Upload a font from the font list drop-down menu.
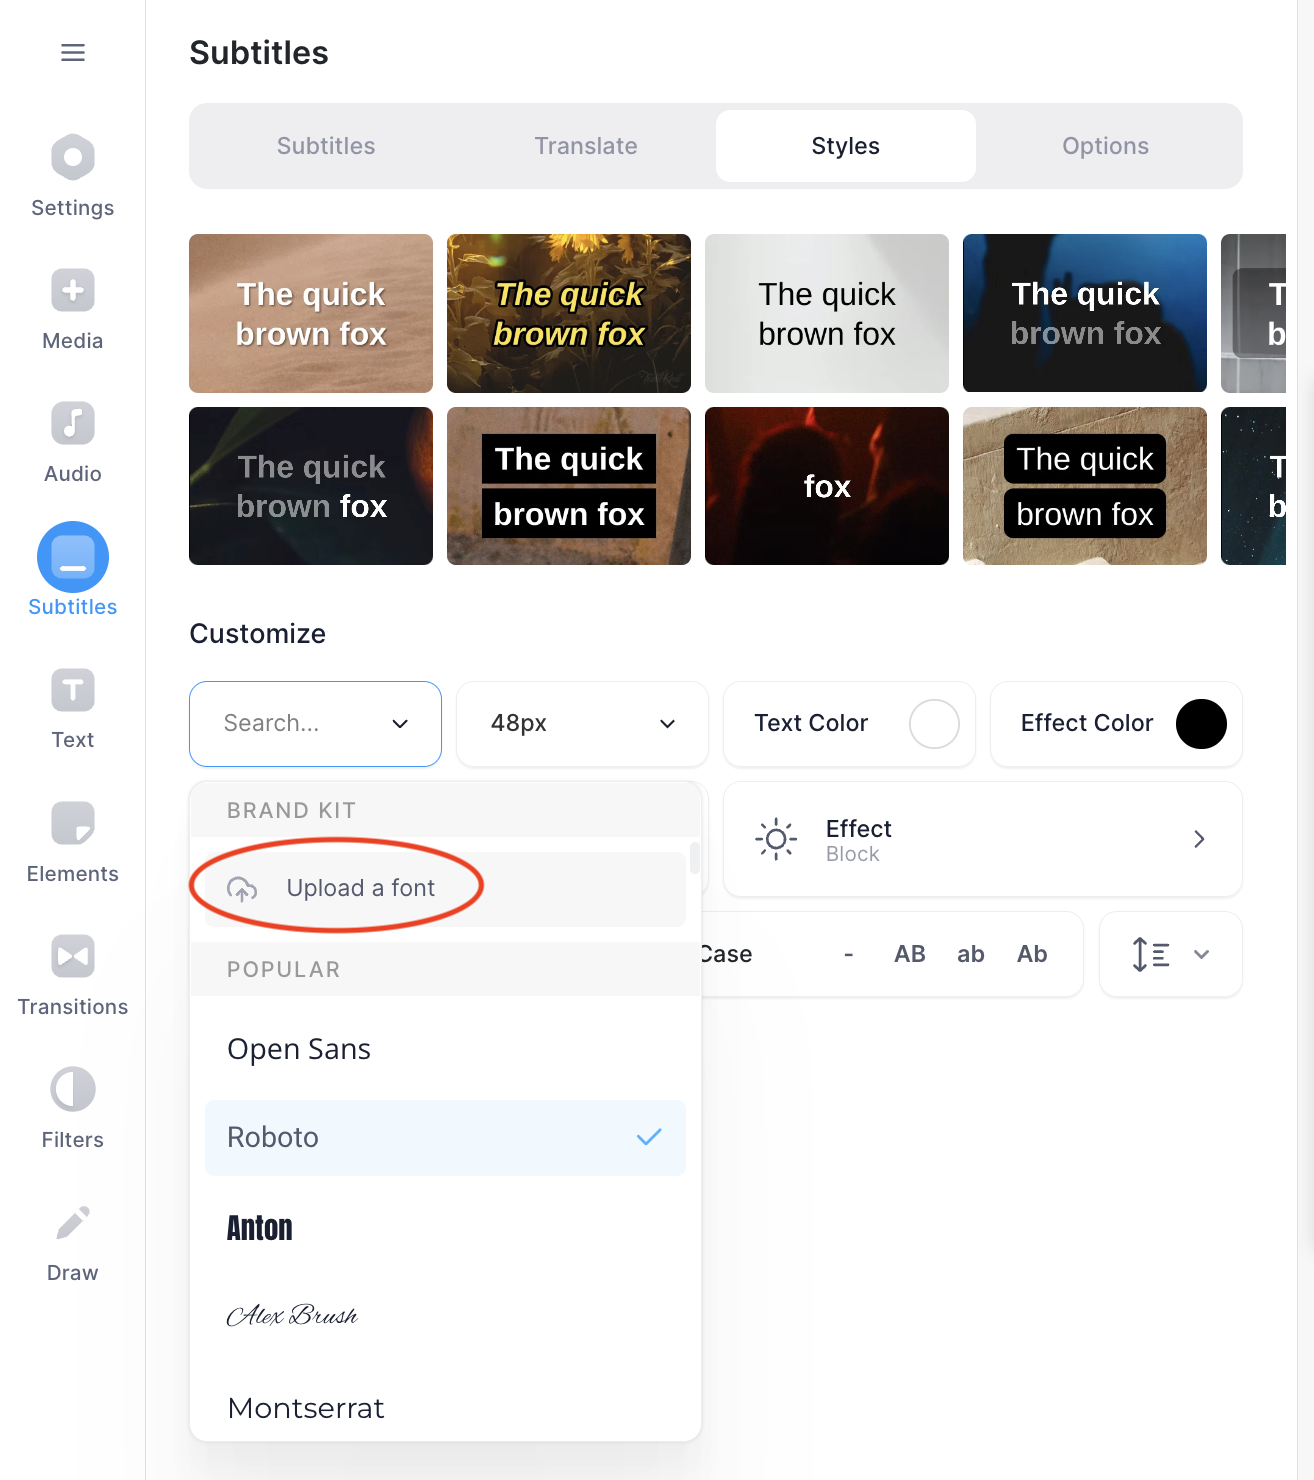
Once you’ve added your custom font, it’ll start showing in the font list menu when you reopen it. Select your branded font from here and you’ll see the on-brand subtitles in the preview window.
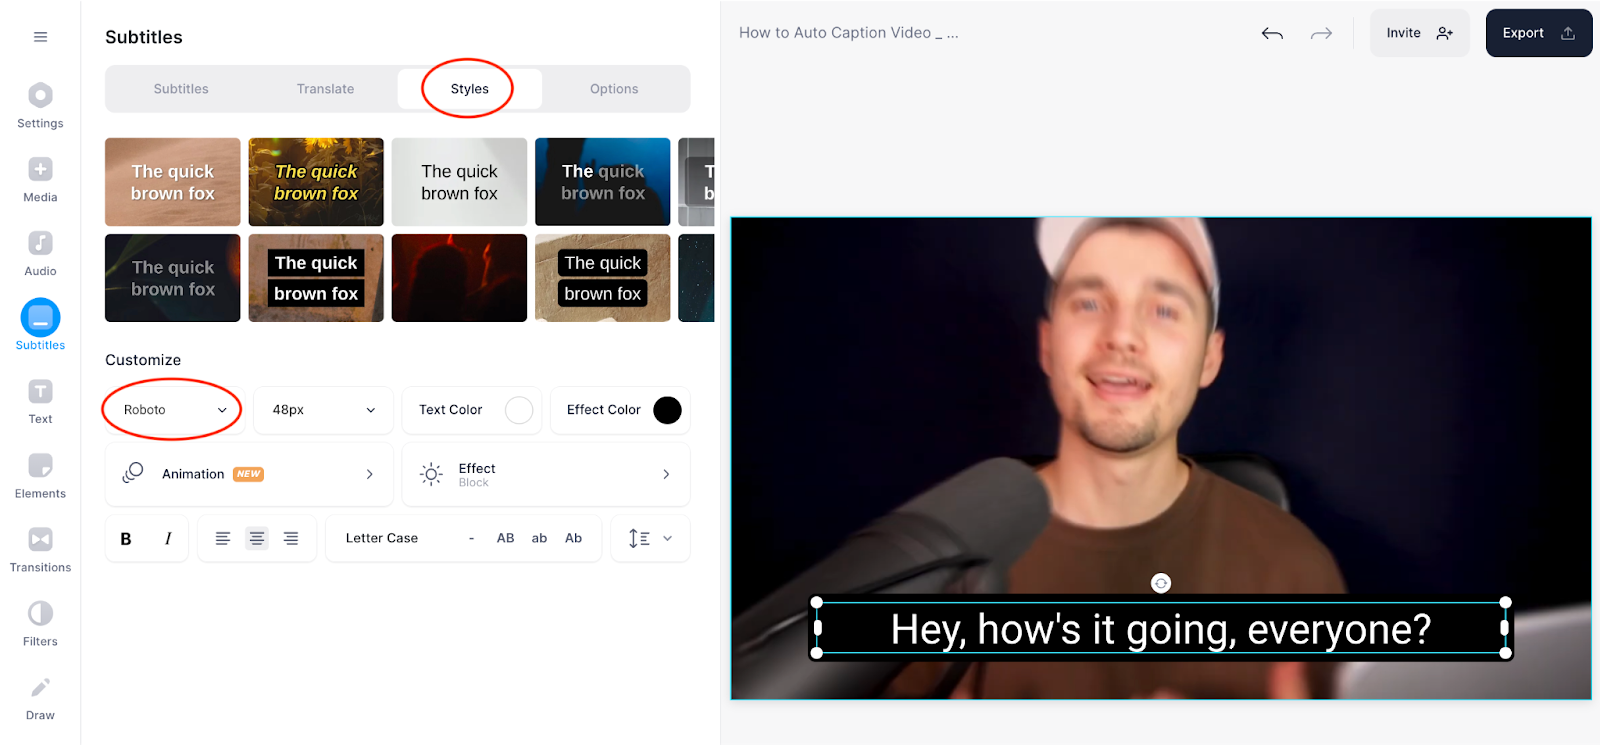
How to change your subtitle’s style
To add more personality to your subtitles, play with the bunch of options available in the Styles menu.
Start with choosing from the available Effects. Select the one you like the most and preview it on the right side to pick the best one.

You can also change the subtitles’ size and text and effect colors from under the Customize corner.
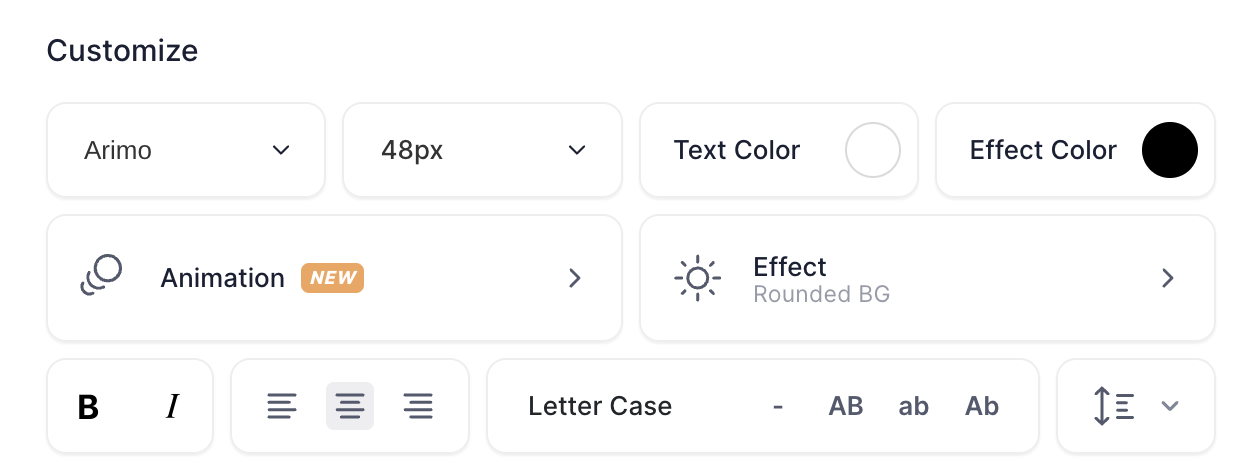
When tweaking the font size, always keep readability in mind.
Don’t go with anything that’s too small that it becomes hard to read. Similarly, avoid going with large text that takes up most of the screen space. 22-28 pt font size is an ideal size to choose from.
That said, the Text Color font lets you change the subtitle text’s color.

Choose any color from your brand colors to the standard white and black — just be sure to take color contrast into account. Meaning: your subtitle font color shouldn’t blend in with the video as that makes them challenging to read.
Keep accessibility in mind as you pick your font’s color by using WebAIM for checking the color contrast.
As for the Effect Color box, it lets you change the color of the subtitles background box.

Again, keep color contrast and readability in mind. Use the preview window to see how the subtitle font color goes with its background color.
If you want to eliminate the text background effect altogether, select a style that removes it.
There are a few more customization options as well. These are:
- Use the Effect option to tweak the subtitle background. For instance, by choosing Rounded BG, you can achieve a text background with rounded corners.
- Use Animation to change the way subtitles display when your video plays. For example, selecting the Karoke style means each word in the subtitle sentence lights up as the speaker says it.
Should we add GIFs to these??
How to change the size, spacing, alignment, and capitalization of your subtitles
Finally, you can also change your video subtitles’ spacing, capitalization, and alignment. All these options are available in the last bar in the Styles corner.
Change the text’s alignment using the alignment option beside the option to italicize your subtitles.
Pick from the options to use all caps, lower case, and letter case options from the AB, ab, and Ab buttons, respectively.
As for changing the text’s line height and letter spacing, use the last button in the bar.

[#TOC3]How to translate subtitles with VEED[#TOC3]
VEED video editor helps auto-translate subtitles too. This is perfect for creators targeting audiences in different countries using the same video but with different language captions.
Simply select Translate from the Subtitles main menu on the extreme left of the dashboard.
Now click on + Add language and choose from the three options that show:
- Translate automatically
- Manually translate
- Upload

As with auto-generating subtitles for videos with VEED, you can simply pick Translate automatically to let the video editing software do the heavy lifting for you.
When you select this option, you’ll see a drop-down menu asking for a language you want to translate your subtitles in. Choose and hit Translate to [language]:
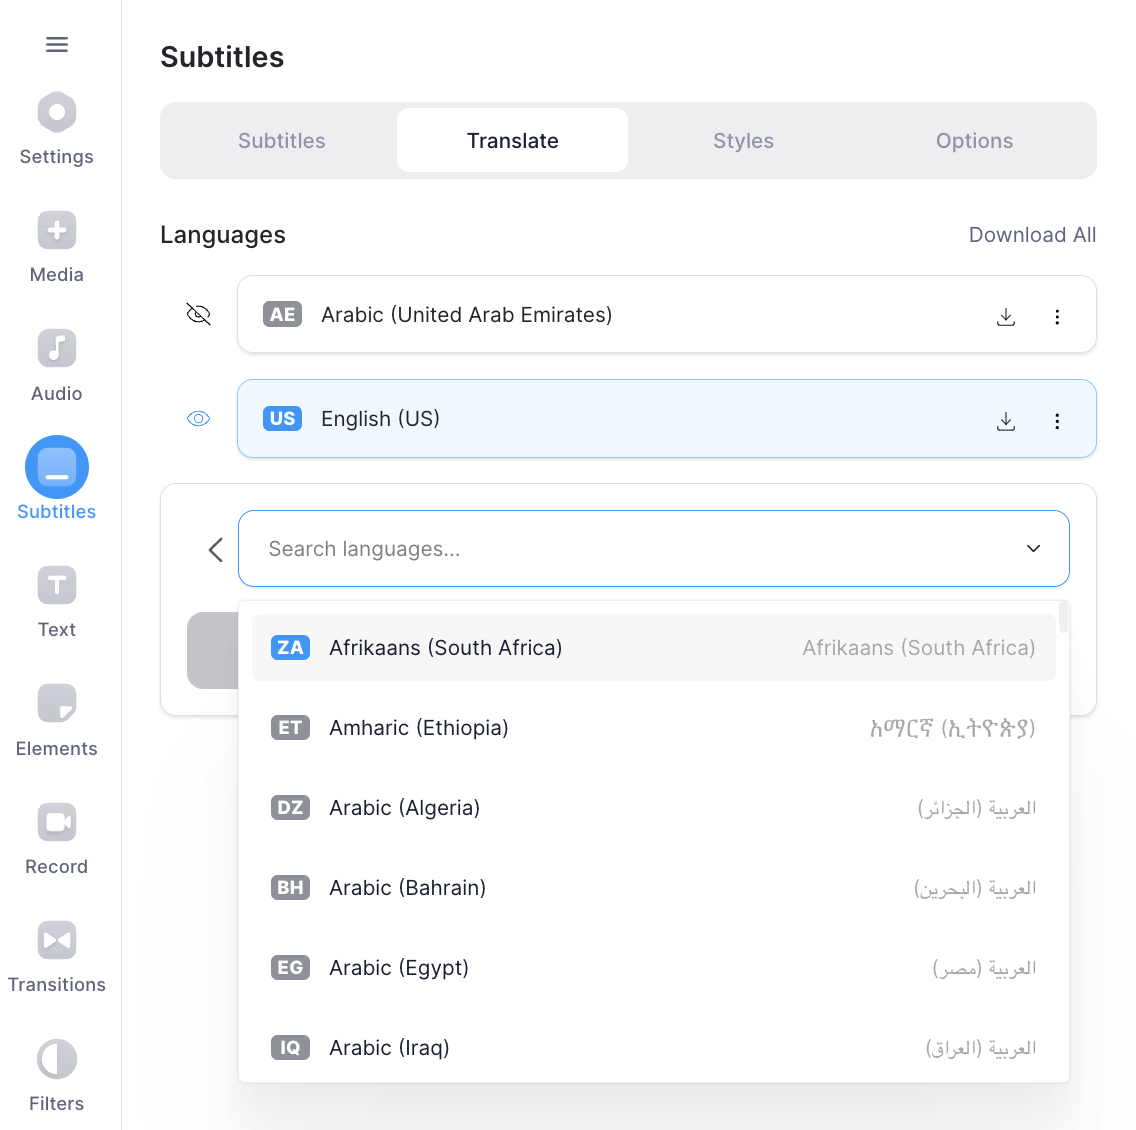
VEED then translates the subtitles for you. Select Subtitles beside the Translate option in the menu and review the entire translated text for correcting any errors.
If you prefer manually adding subtitles, select the Manually translate option. Or pick Upload if you’ve a translated subtitle file ready to use.
[#TOC4]How to download a subtitle SRT file with VEED[#TOC4]
To download the auto-generated subtitles as an SRT file, go to Options from the menu on the top.
Go to Download Subtitles next and pick a file format from the drop-down menu.

Once down, click on the download tray icon beside the dropdown menu and your download will start. You’ll likely find the downloaded file in your downloads. That’s all. Easy-peasy.
Why creators stick with VEED for subtitles
Most subtitle tools stop at generate. VEED keeps going — letting you brand, translate, edit, and export inside one workflow.
Here's what to remember:
- One-click auto-subtitles with up to 99.9% accuracy. No setup, no manual timing.
- Low-confidence flagging so you can spot-check the words most likely to need a fix.
- Full style control to match your brand — fonts, colors, effects, animations.
- 125+ language translation built in. Generate once, localize for every region.
- Multiple export formats including SRT, VTT, TXT, or hardcoded into your video.
VEED is the AI video creation platform built for social. You can record, generate, edit, brand, and translate video in one place — without stitching together five different tools or downloading software. Whether you're producing screen recordings, social ads, or how-to content, your subtitles ship with the rest of the project.
Next step: Try VEED's auto subtitle generator and add captions to your next video in under a minute.
Here’s what Chris says:
“Veed allows for subtitling, editing, effect/text encoding, and many more advanced features that other editors just can't compete with. The free version is wonderful, but the Pro version is beyond perfect.”
And Christian wrote:
“VEED quickly and accurately analyzes videos to create subtitles, with minimum errors. The website is mobile friendly and text styles are customizable using known fonts and colors. You can also choose video size based on the application you will be uploading to.”