
Figuring out how to combine videos isn’t as hard as it was back in the late 2000s. There are dozens of easy ways to merge videos together. You can do this from the ease of merging videos on your iPhone, or combining clips on your Windows 10 computer.
Today, we’ll be going over 9 easy web, mobile, and desktop ways to combine multiple videos into one. Android, iOS, Windows, Mac, and Linux—we’ll cover everything.
These programs are easy to use and powerful. Plus, they’re also free and relatively light on storage. So, get your video clips ready and let’s start combining videos together!
Web-Based Video Editing Tools
First off, here’s a quick breakdown of all the tools we’ll be using today. Starting with web-based video editing tools, you can find these programs quick and easy on your browser. This option is best if you don’t want to download a dedicated video editing app.
- VEED — No account needed and combining videos is straightforward and simple. This is the fastest option among the nine easy ways.
- Adobe Spark — Adobe’s online entry to creating professional graphics and videos.
Mobile Video Editing Apps (iOS and Android)
Combining two videos on your iPhone or Android has never been easier. We’ve listed three iOS and Android apps to put your videos together. These are available for both phone operating systems in the Play Store and App Store, respectively.
- InShot — One of the oldest mobile video editing apps from China. InShot has been used by millions and comes lightly at around 40 MB of space.
- Adobe Premiere Rush — Powerful mobile editing application. Offers more than just combining multiple videos and works like a mini Adobe Premiere Pro. Takes 150 MB of space.
- Quik — A video editor developed by GoPro that works both on mobile and desktop. Quik is simple, effective, and quick. Space varies with device.
Desktop Video Editing Software
Desktop video editors, without a doubt, have the most powerful editing software in the business. We’ve compiled three light but capable editors that you can try down below.
- Filmora (Mac, Windows) — A classic light video editor. Easy to use, but the free version has a watermark when you’re done.
- Shotcut (Windows, Mac, Linux) — Perfect for beginners and works with all three major computer operating systems.
- iMovie (Mac) — If you have a Mac, then the iMovie is a great free choice to combine multiple videos into one.
2 Ways to Merge Videos Online
Online video editors save you time and space on your computer. Editors like VEED don’t even require you to have an account to edit videos—which is as convenient as it can get.
If you want to save some time, definitely try the first online editor on this list. Similarly, these editors don’t cram you with features that you might not need, too. Since all you want to do is put videos together. Well, let’s show you how to do that.
VEED
VEED is built to be the one-stop destination for online video editing. It’s equipped to handle everything from simple tasks like combining videos together or trimming clips. My favorite part about VEED is that you don’t have to make an account to use the program. It’s completely free, intuitive, and lets you edit videos in a flash!
Note: The free plan does include a simple watermark and only up to 720p of export footage. If you purchase a VEED payment plan, you can easily export 1080p and 4k footage.
Some key benefits and features from VEED include:
- Unlimited projects and downloads
- Free 2GB of storage (20 GB and 100 GB for paid plans)
- Accurate auto subtitles (supports video translation up to 50 languages with paid plans)
- Intuitive and powerful interface
Here’s how you can combine multiple videos into one with VEED:
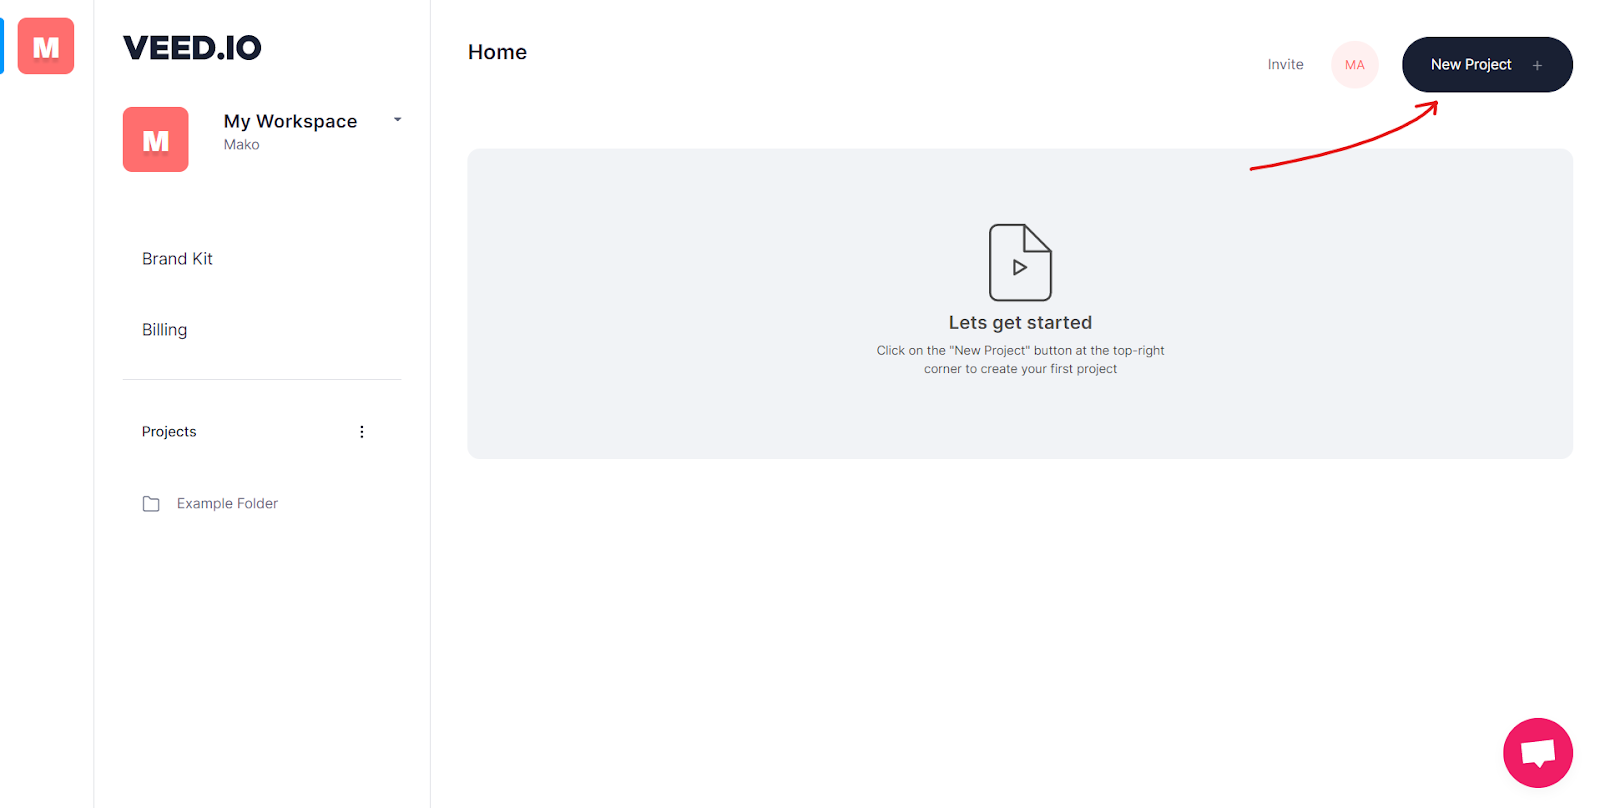
- First, go to veed.io and click on the Upload a Video button on the homepage. If you want to create a free account, then click on Signup at the top right corner of your screen.

For those of you who signed up, you’ll be sent a magic link to sign you into your account via the email provided. Once you open that link, you’ll find yourself on your personal dashboard. Click on New Project + at the top-right to edit your first video.
- You should be in the project editor by now. Here, you’ll want to upload the videos that you want to combine.
One of the unique features of VEED is that it offers a lot of options for you to upload your video and audio files. You can either:
- Manually upload a file from your computer
- Directly record a clip through your device
- Provide a YouTube link to get your footage

For this tutorial, I’m just going to be uploading two videos that I downloaded from my computer. Sometimes VEED will directly upload your video clip without waiting for your second file. To add more videos, just click the Add Video button at the bottom left corner of your screen.

Note: You can’t add new video clips while you’re uploading video clips. The Add Video button will be greyed out.
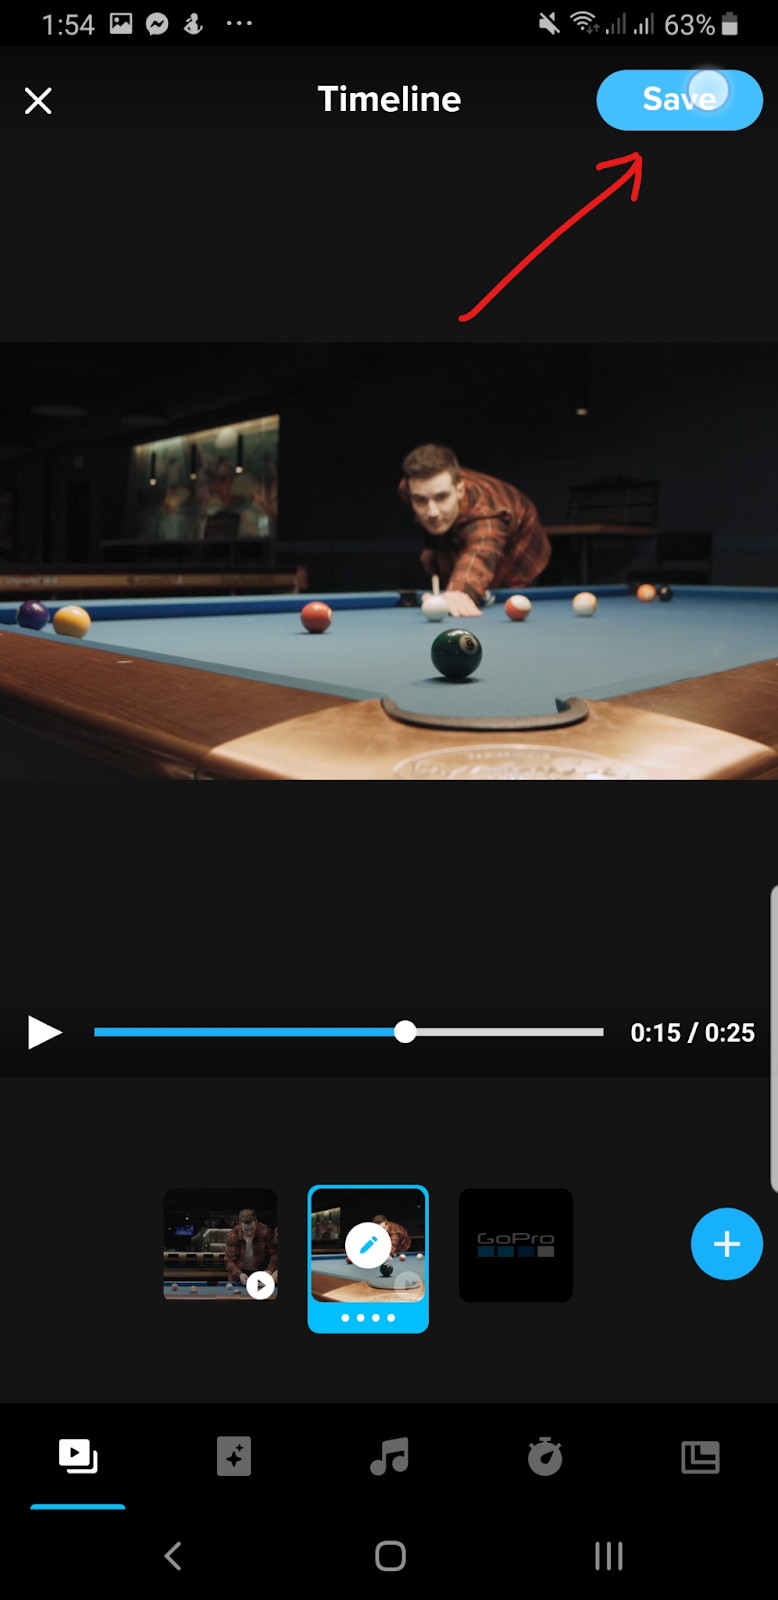
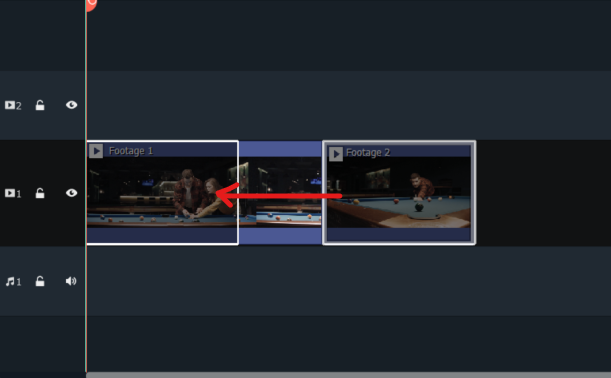
- Your two video clips should automatically be right next to each other. If you uploaded the clips in the wrong order, simply left-click your video in the timeline and drag it to the proper place.
When you’re satisfied with the arrangement of the clips, simply click on the Export button at the top-right corner of your screen.
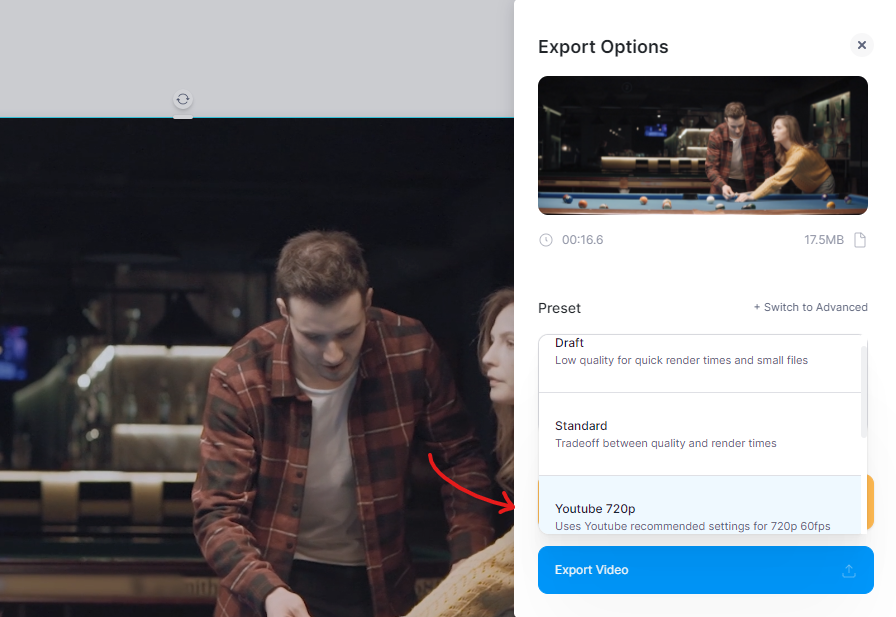
From there, select the Preset that you want. Alternatively, you can also click on Switch to Advanced and have more control on the finished render of your video clips.

The free version of VEED only supports up to 1280x720 pixels and has a watermark. Once you’re happy with your render settings, click on Export Video.
- VEED will render your video and prepare it for download. This should take a couple of seconds to several minutes, depending on the length of your video.
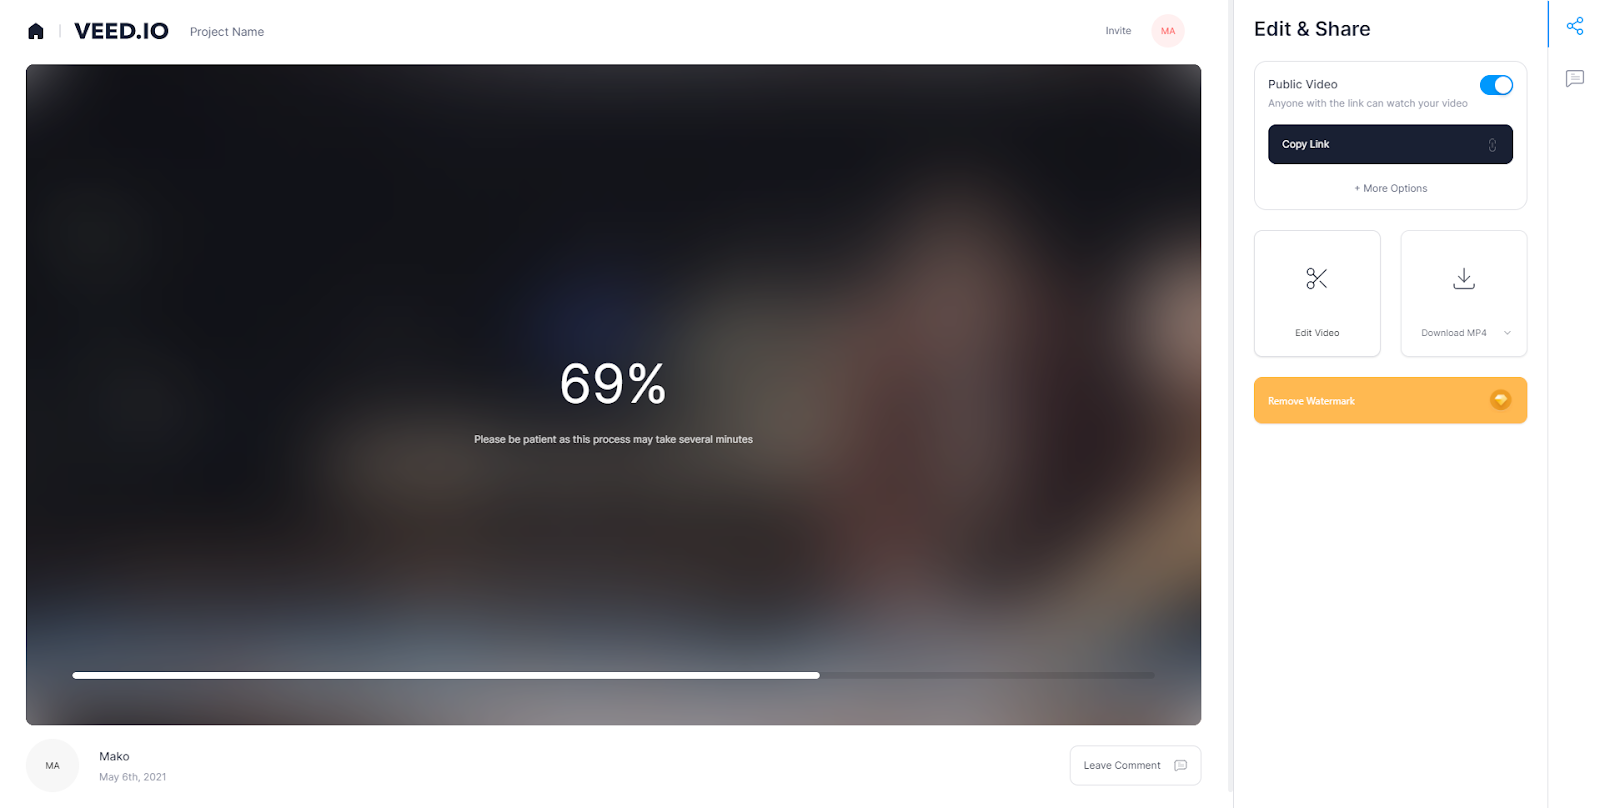
Once that’s done, you can take a look at the finished product of your video before directly downloading it.
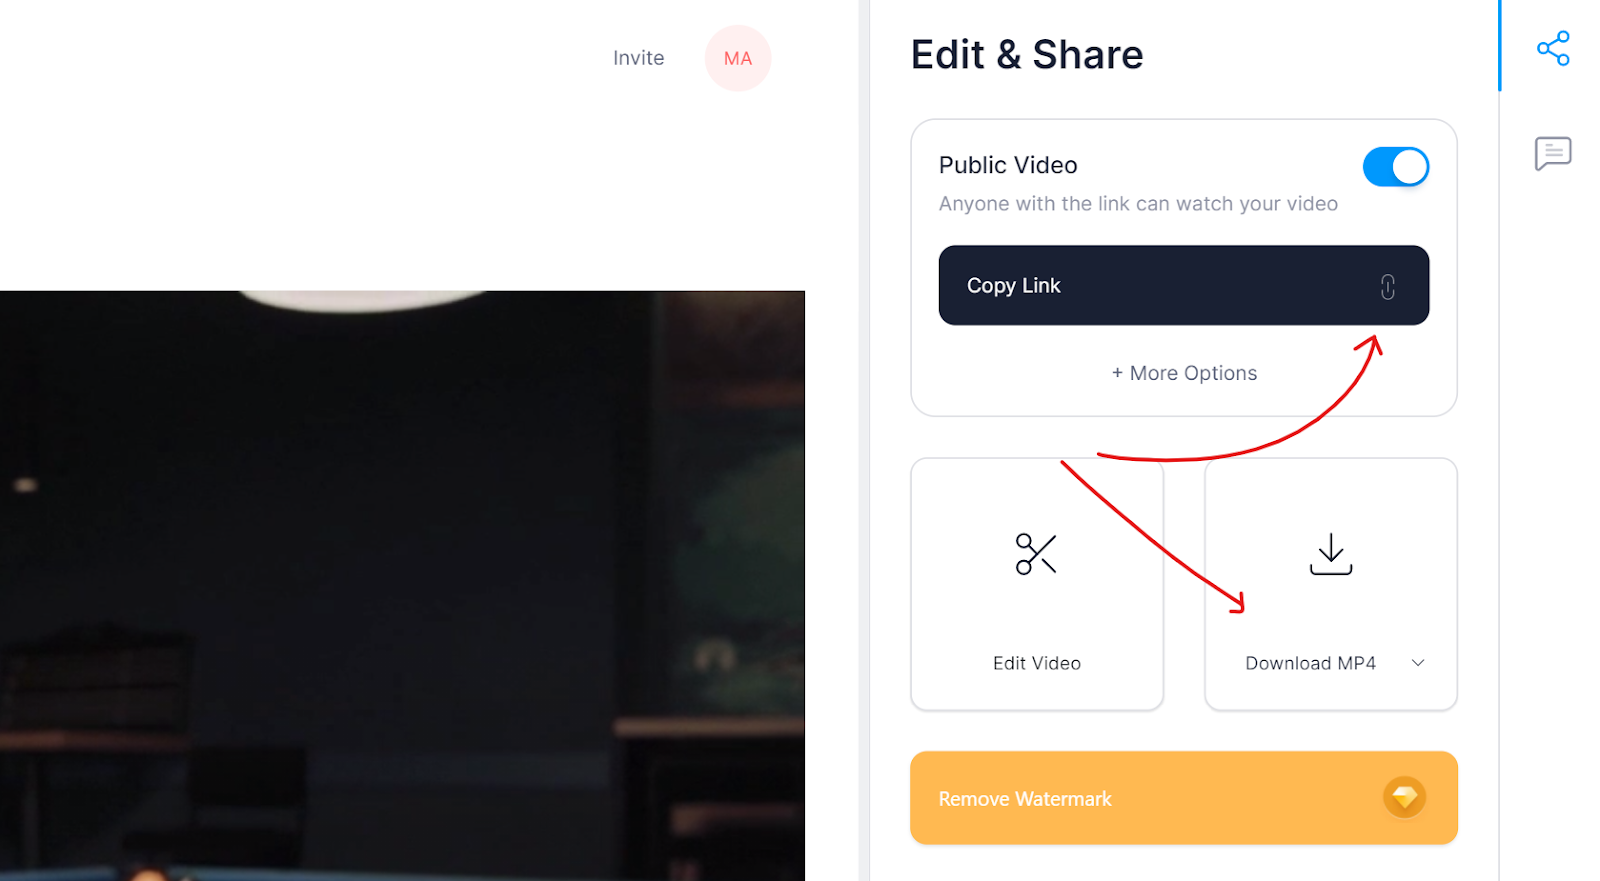
You can download the video as an MP4 or GIF file, as well as send it to someone through a link by clicking on Copy Link. And that’s about it!
Take a look at the final result. The footage I used had no music by default.
Plans and Pricing
VEED has a generous pricing plan.
- FREE — Watermark, 10-minute videos, unlimited projects, 2GB of storage, unlimited downloads, and up to 720p export quality.
- BASIC — $12/month annual plan or $18/month — Everything above including 25-minute videos, 20GB storage, 1080p export quality, chat support, and no watermark.
- PRO — $24/month annual or $30/month — Everything above including 2 hours of videos, 100GB storage, and 4k video quality.
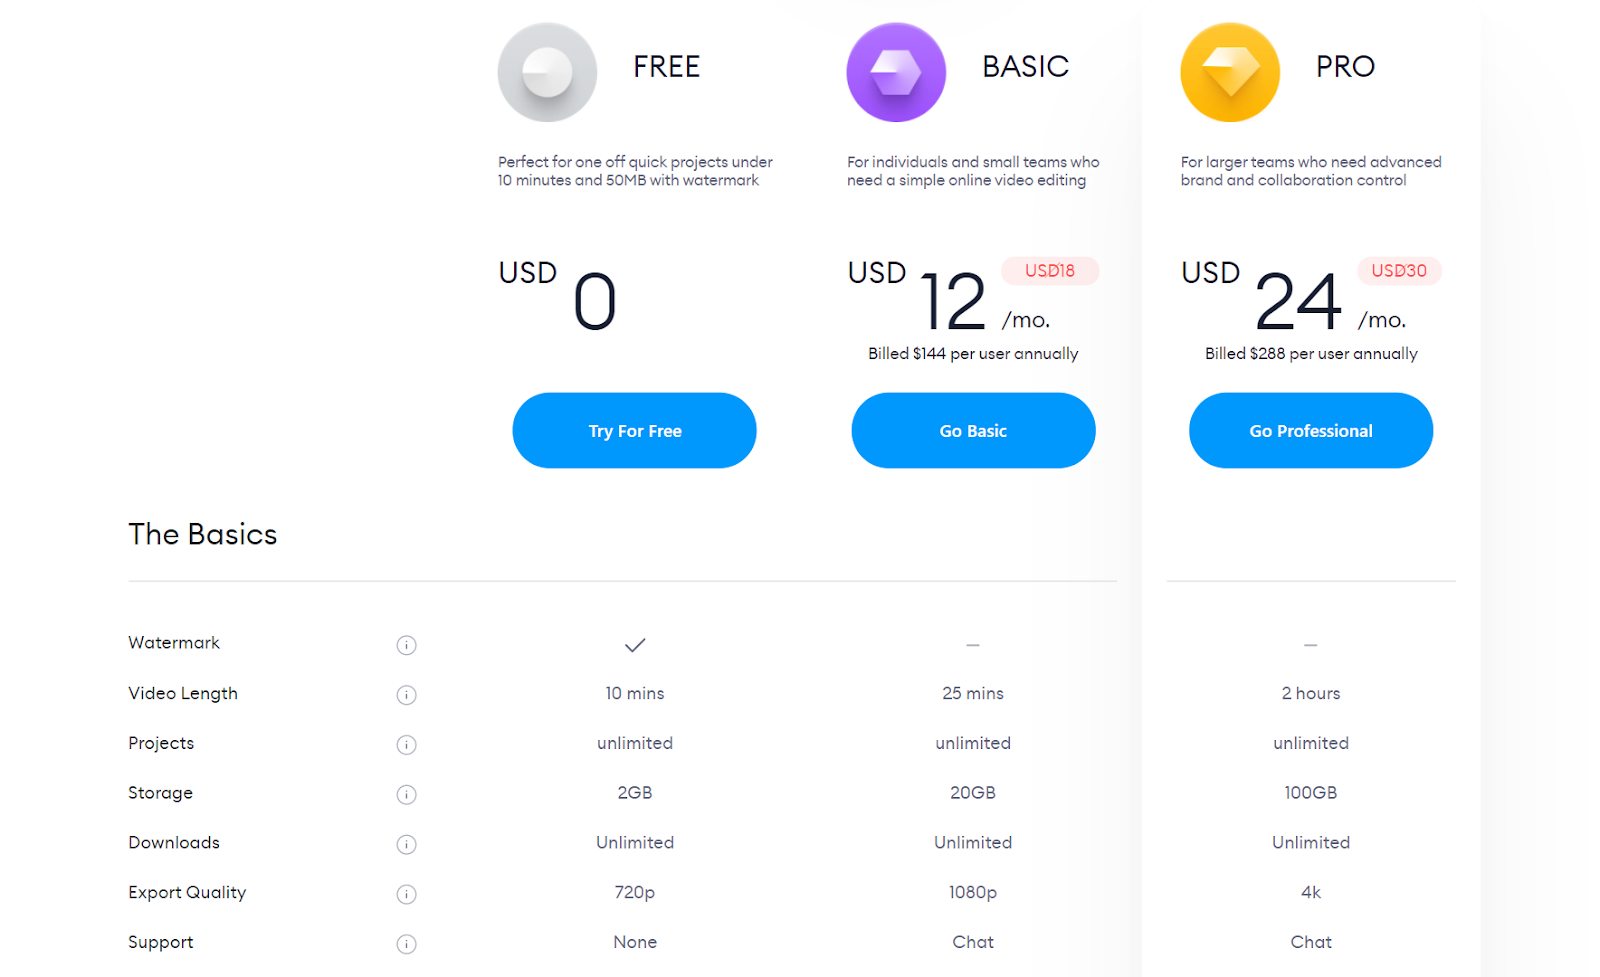
All in all, VEED is a solid choice and the easiest ways to combine two videos with each other.
Adobe Spark
Adobe is a major player in the creatives industry and Spark is their entry model for web-based editing. Spark lets you make quick social graphics, webpage designs, and video editing all on your browser. It’s another free video editing website, but you’ll need an Adobe account to use Spark.
Note: The free plan includes a watermark and a 2-second outro at the end of your video.
Features from Adobe Spark:
- Basic tools for video editing
- Transitions
- Themes
Merging videos with Adobe Spark:
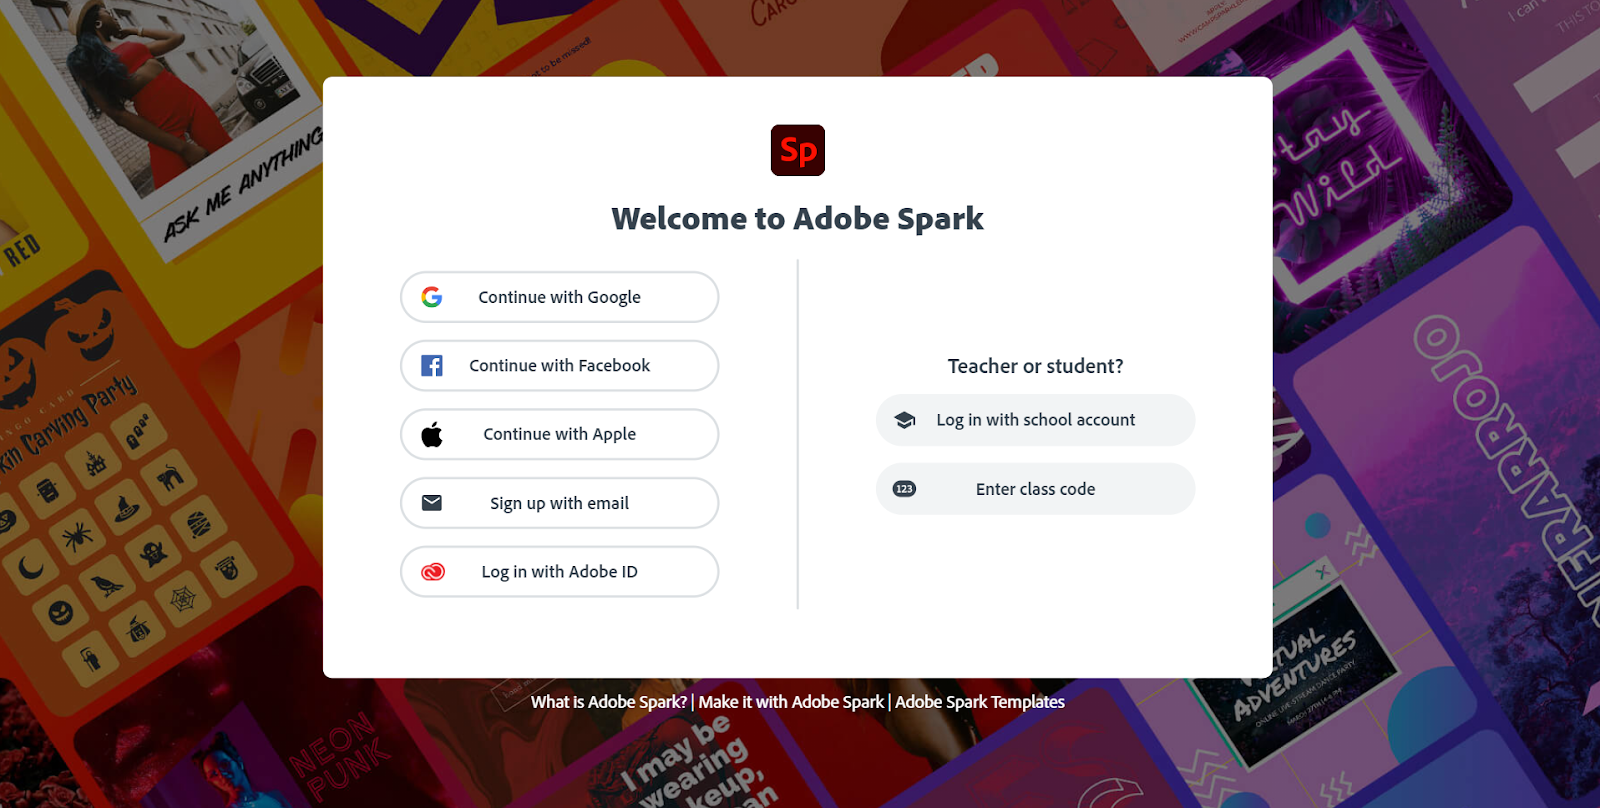
- Go to the Adobe Spark website and sign in. Student and teacher accounts have discounts when purchasing Adobe products.
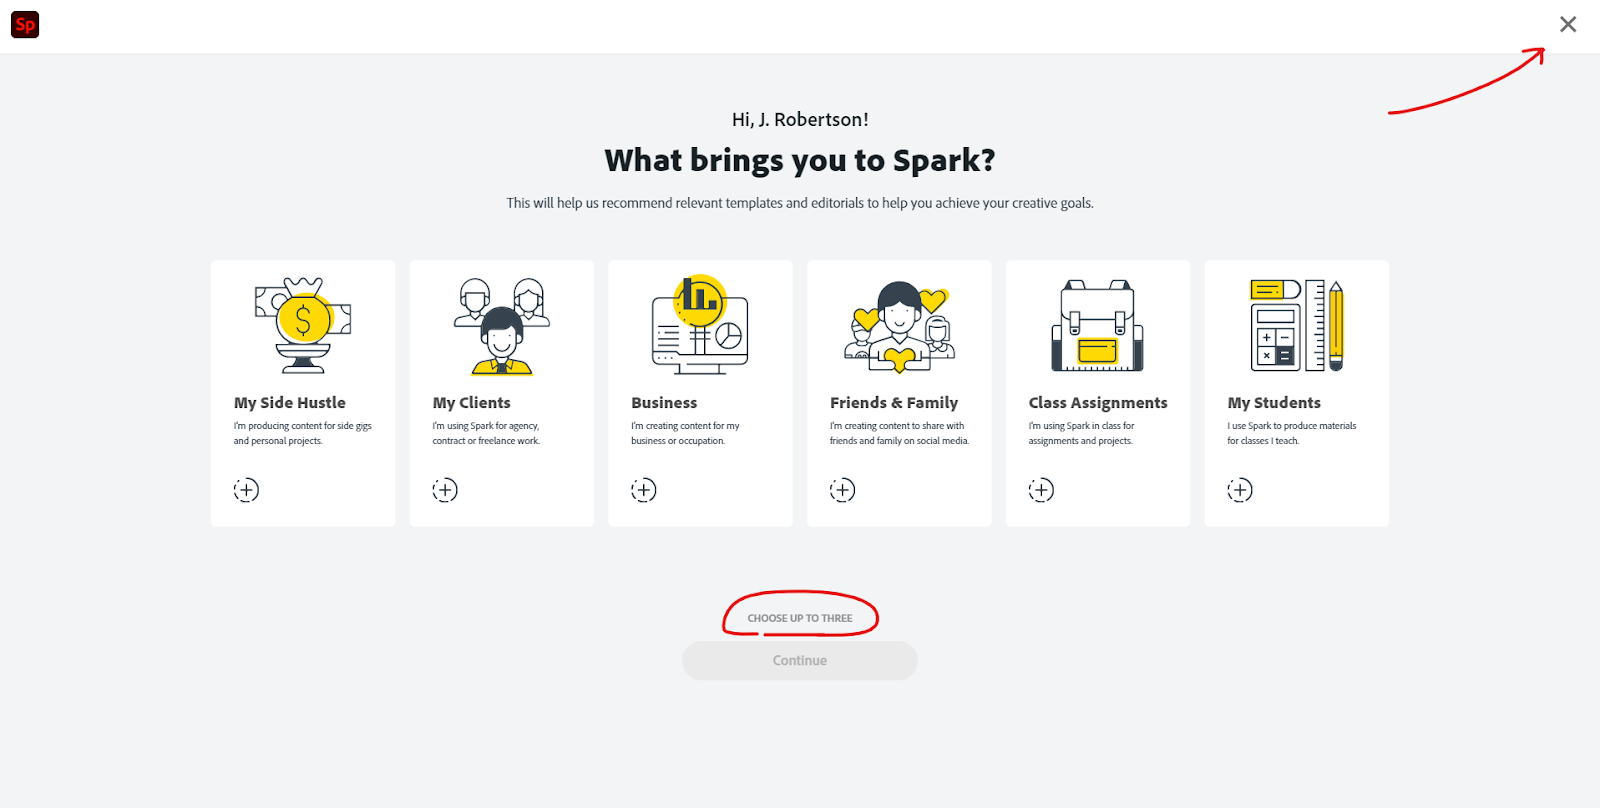
- Once you’ve signed in, you’ll immediately be prompted with certain questions as a first-time user. You can either skip this by clicking on the X icon at the top right corner or answer the questions to proceed.
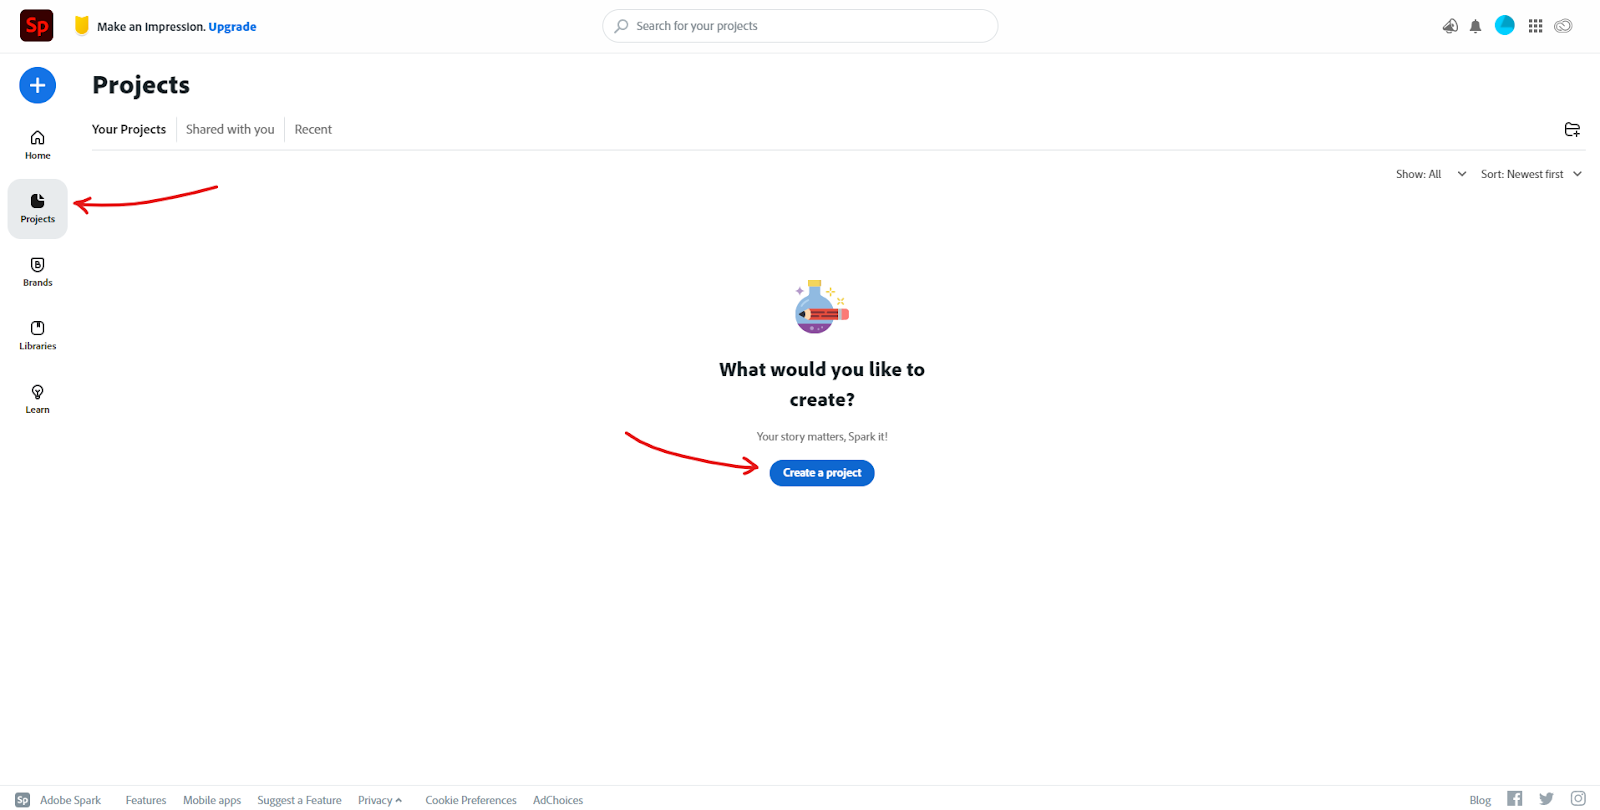
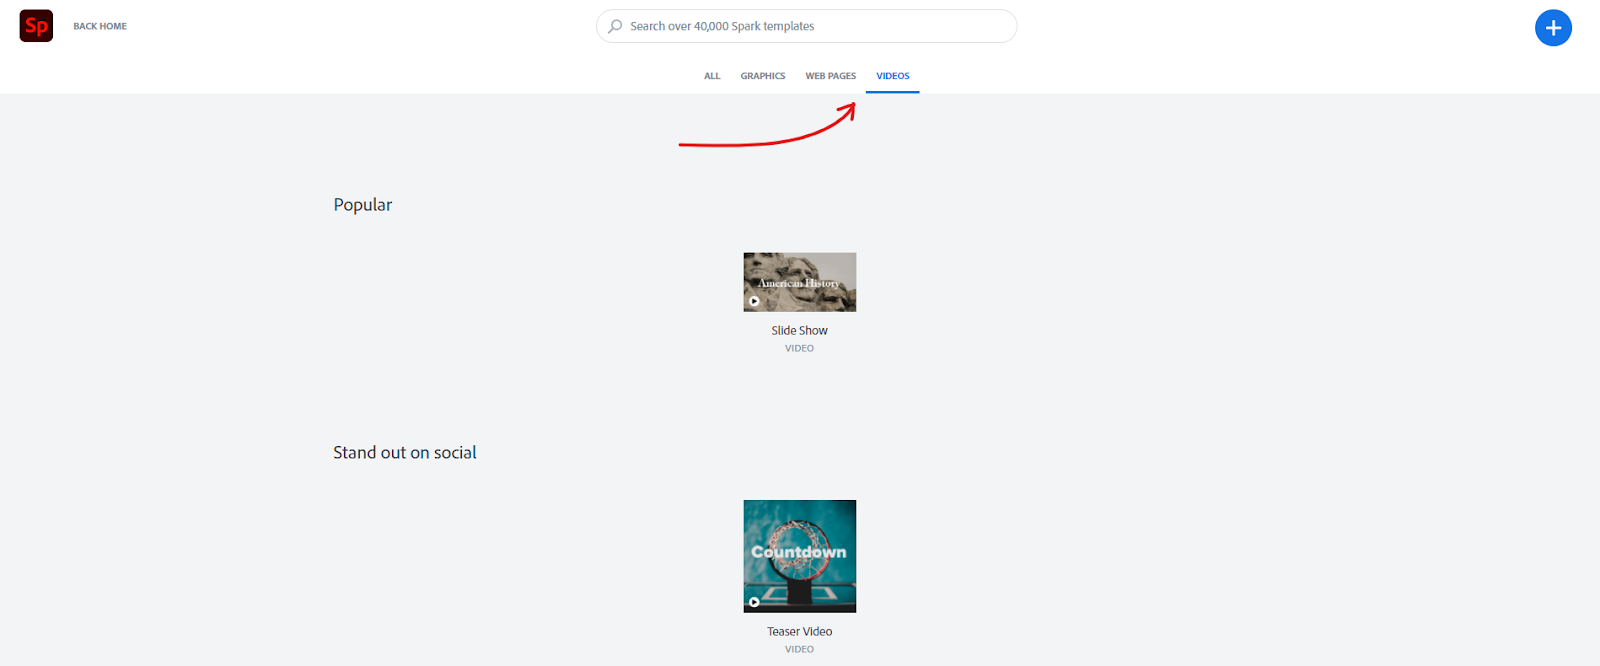
- You should be on the home page by default. Navigate to the Project tab to start editing your video and click on Create a project.
- From there, click on the Videos tab and select any of the pre-made templates below.
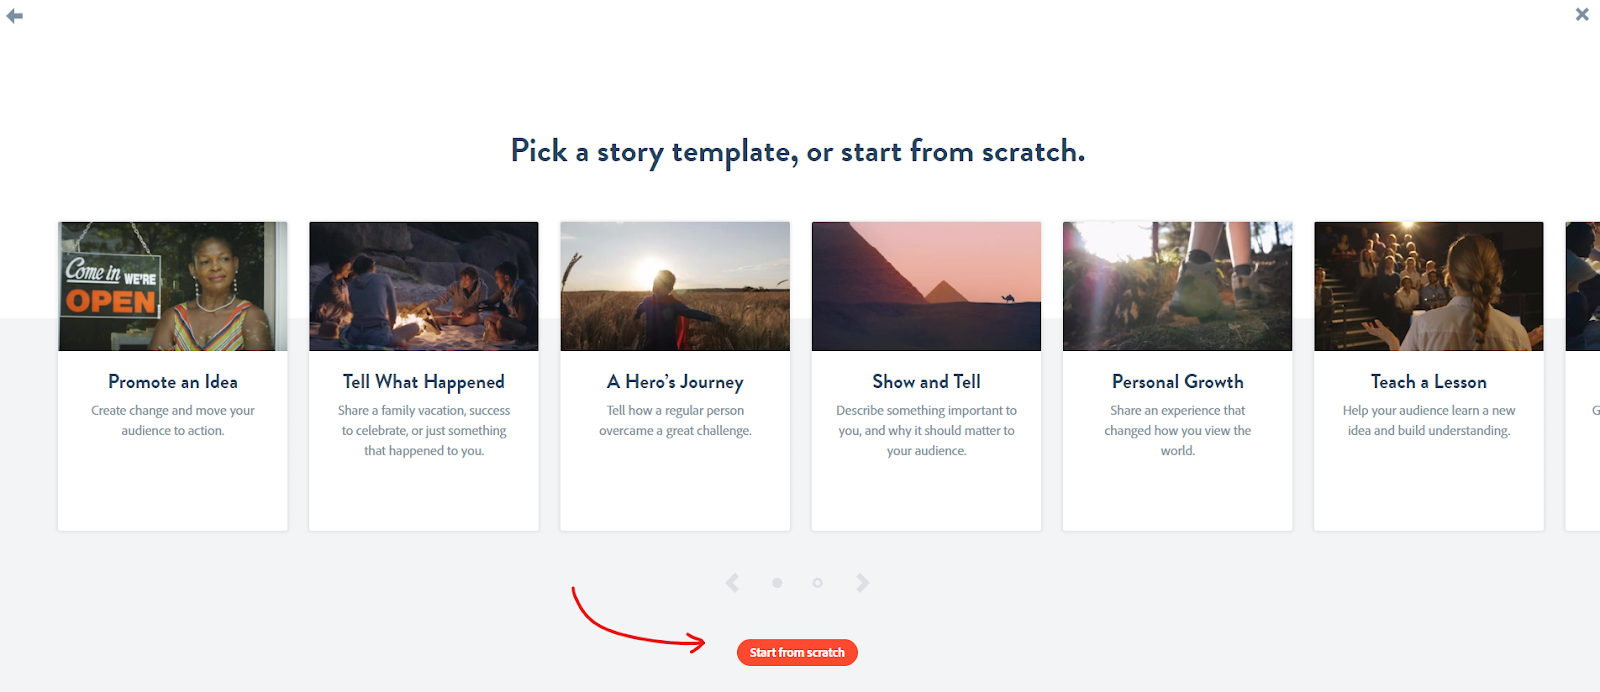
You’ll be asked to give your project a title. Once you’re done with that, simply click on Start from scratch.
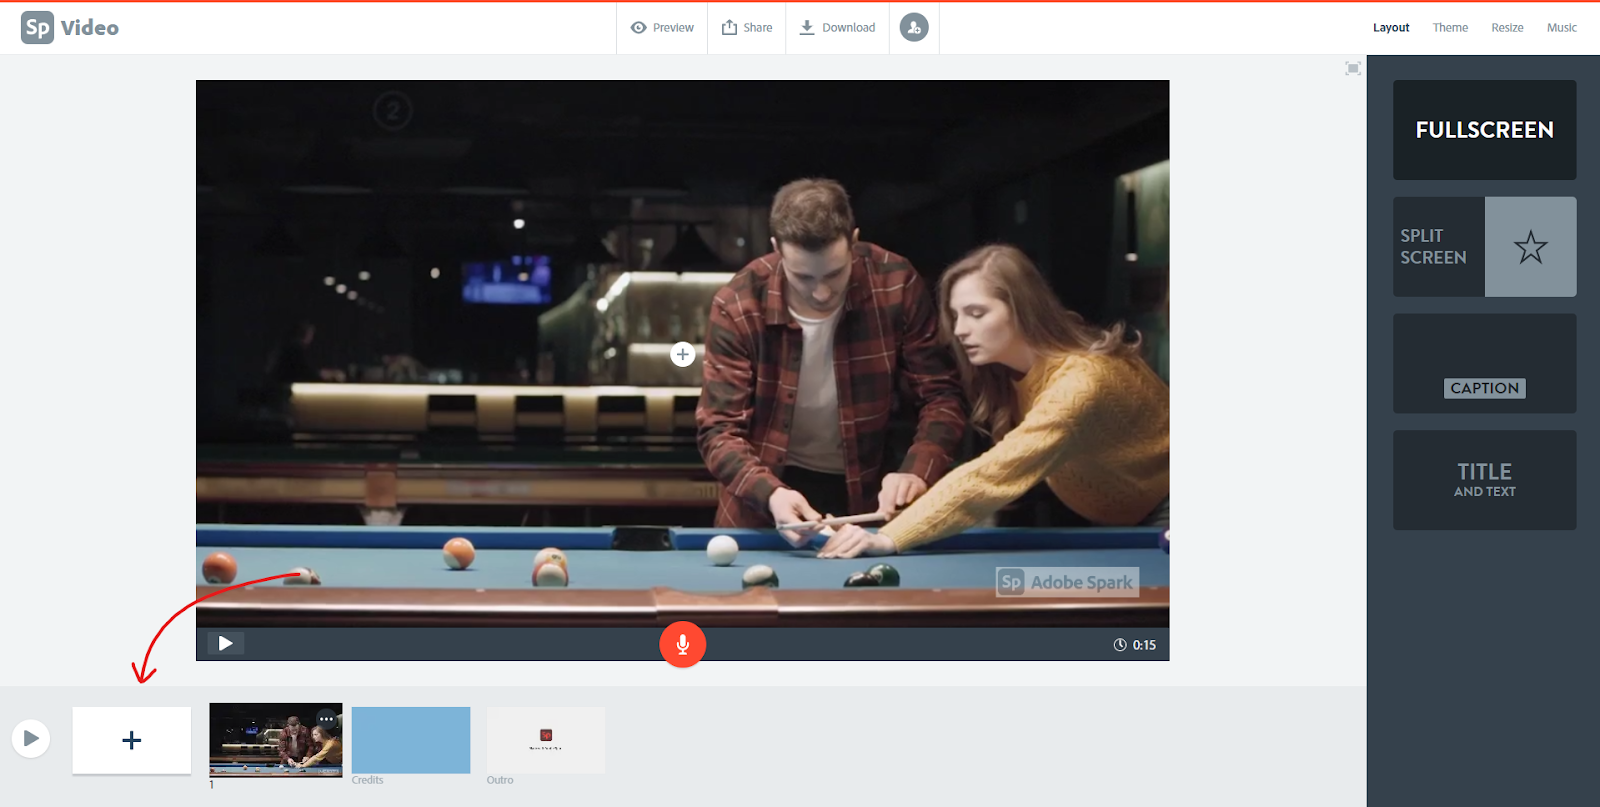
- You should finally be directed to the video editor. Add a video clip by hovering over the empty slide. Click on Video and select the video clip from your computer that you’d like to upload.
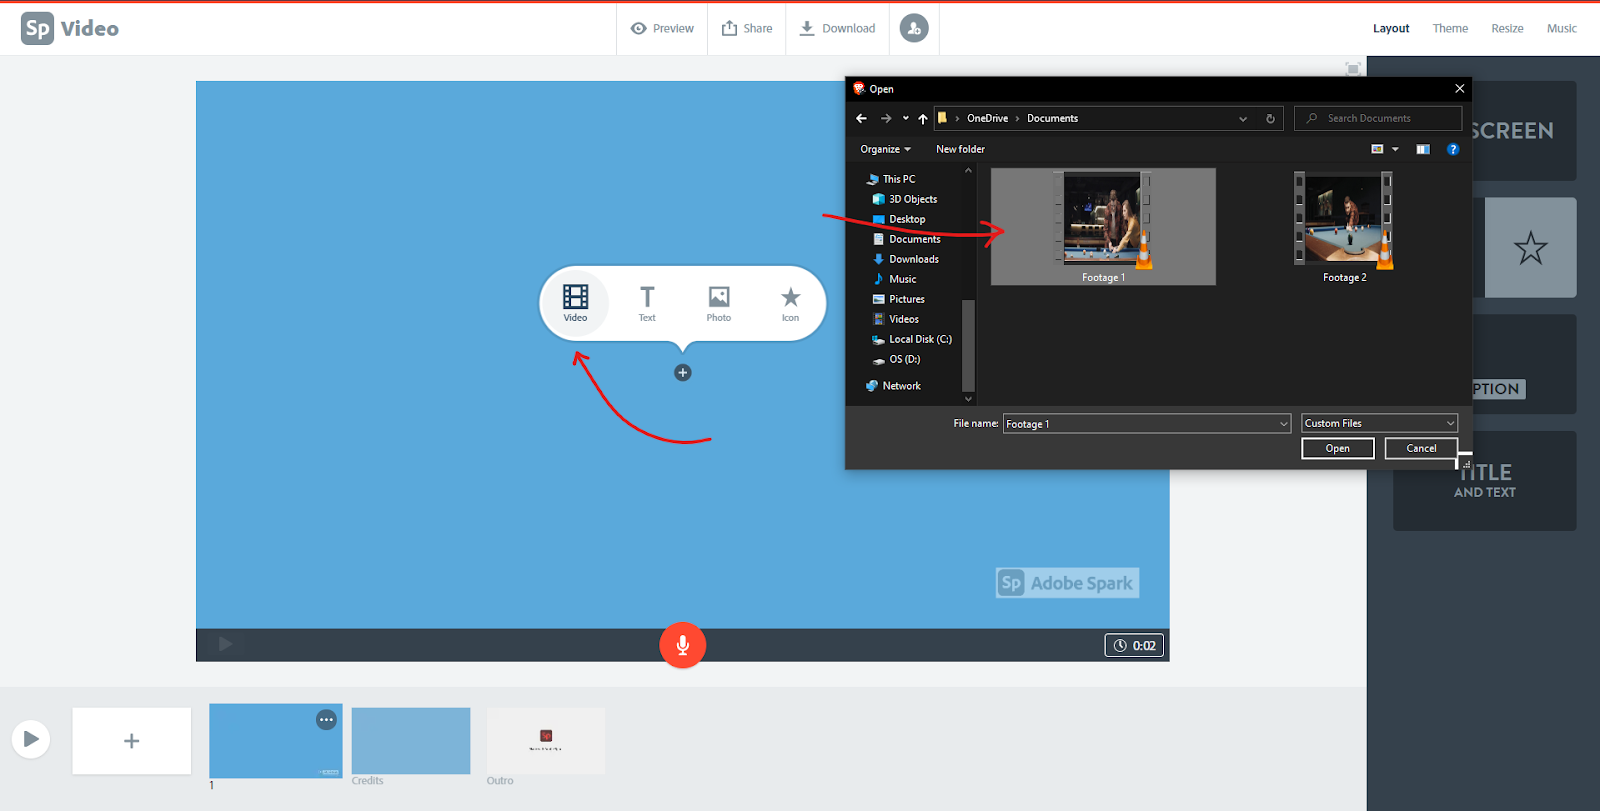
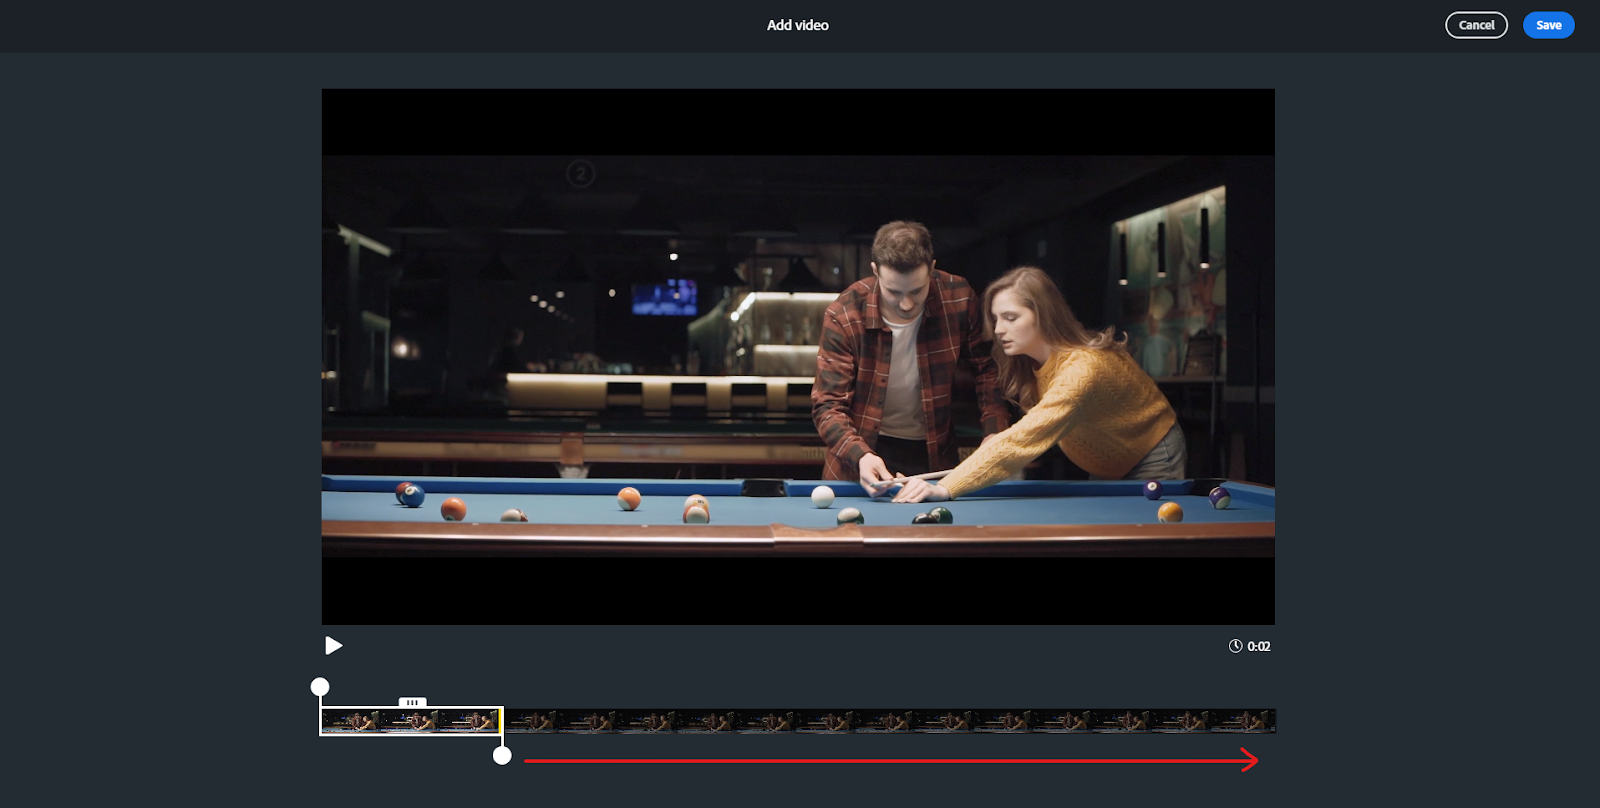
- Adobe Spark will ask you to confirm the video you want to upload, as well as the length. You can trim the video to your desired length here. In my case, I’m going to upload the entire clip.
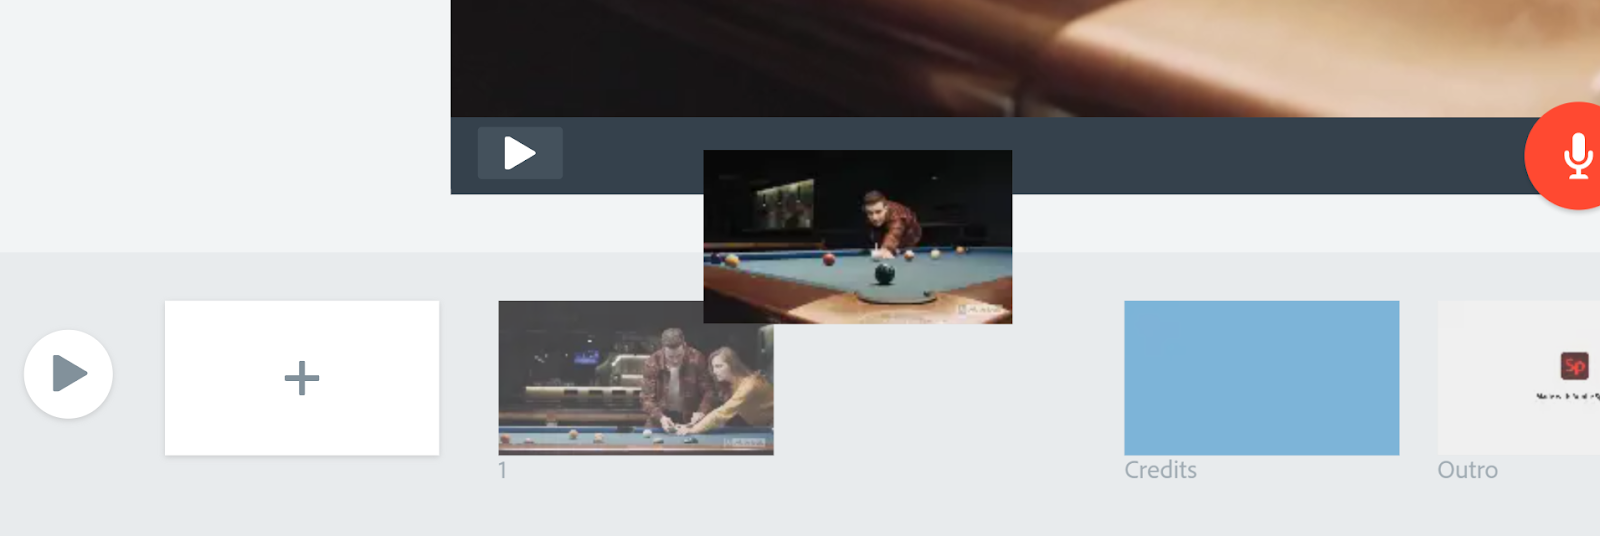
- Once that’s done, click on the white rectangle at the bottom left corner of your screen. This will let you add your next video clip. Repeat Steps 5 and 6 to add your video clips to the editor.
- Now that all your video clips are in the editor, make sure the clips are in their proper sequence. Left-click the clips in the timeline and drag them around to reposition them.
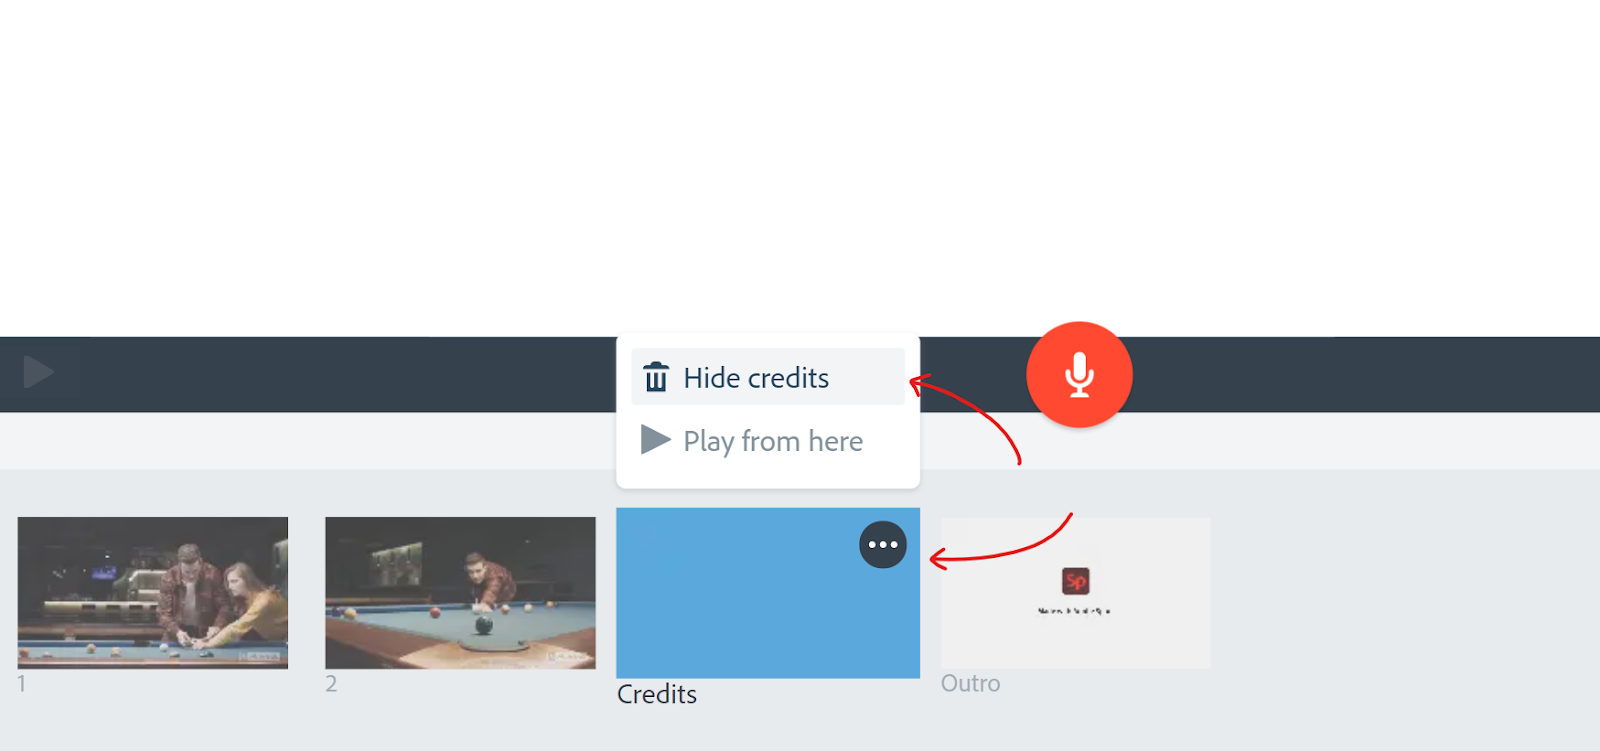
- Before you download your video, you can remove the credits at the end. Unfortunately, the outro is mandatory and can’t be removed if you’re using the free version.
- Finally, click on the Download button at the top and center area of your screen. Adobe Spark will begin rendering your footage and preparing it for you to download.

Here’s the final product. Adobe Spark added in a music track by default.
Plans and Pricing
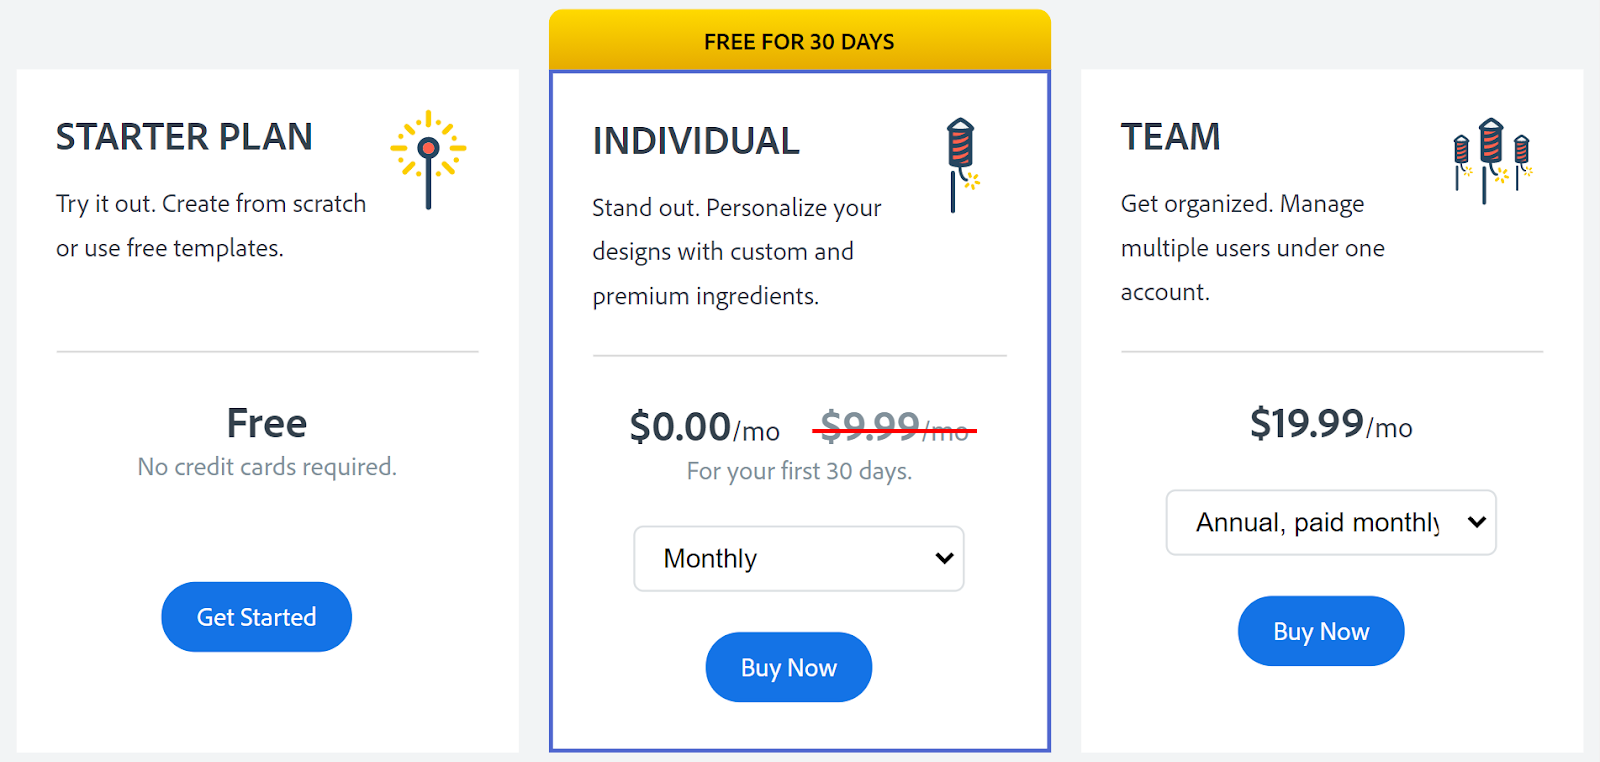
Adobe Spark’s pricing plan is catered more to individuals and teams.
- FREE — Watermarked, up to 720p export quality, access to thousands of free icons and images for designing.
- Individual — $99.99/year or $9.99/month — team collaboration, premium and branded templates, use your own logo, colors, and fonts, removes Adobe Spark watermark, access to complete Adobe library.
- Team — $239.88/year or $19.99/month — Everything above including admin features like consolidating ownership, billing multiple individual licenses, assigning licenses, and dedicated 24/7 phone, email, chat, and forum support.
Spark is a complete editing platform for beginners who are looking for an all-in-one deal.
How to Combine Two Videos on Your Phone
Phones have come a long way in just one decade. We’ve gone from using phones to just make calls to having a mini-computer in our pockets. Mobile video editing programs are strong and convenient.
We’re covering three famous mobile apps and going over their different pros and cons. While mobile editors aren’t as powerful as computer editors, it’s more than enough to just combine a couple of videos.
InShot
Starting off with a simple entry, InShot is an older app that’s been active since 2011. It’s made by a Chinese company and has over 100 million downloads as of today. InShot’s target audience lies more with social media influencers. The video editor offers a ton of emojis and transitions for TikTok and Instagram stories.
InShot’s features and benefits:
- Lets you share your videos to social platforms easily
- Filters and stickers
- Sound effects and voice recorder
- Exports up to 60 FPS and 4k resolution
Merging videos with InShot:
- First, you’ll have to download InShot on your Android phone through the Play Store. Apple boys and girls can find InShot in the App Store too.
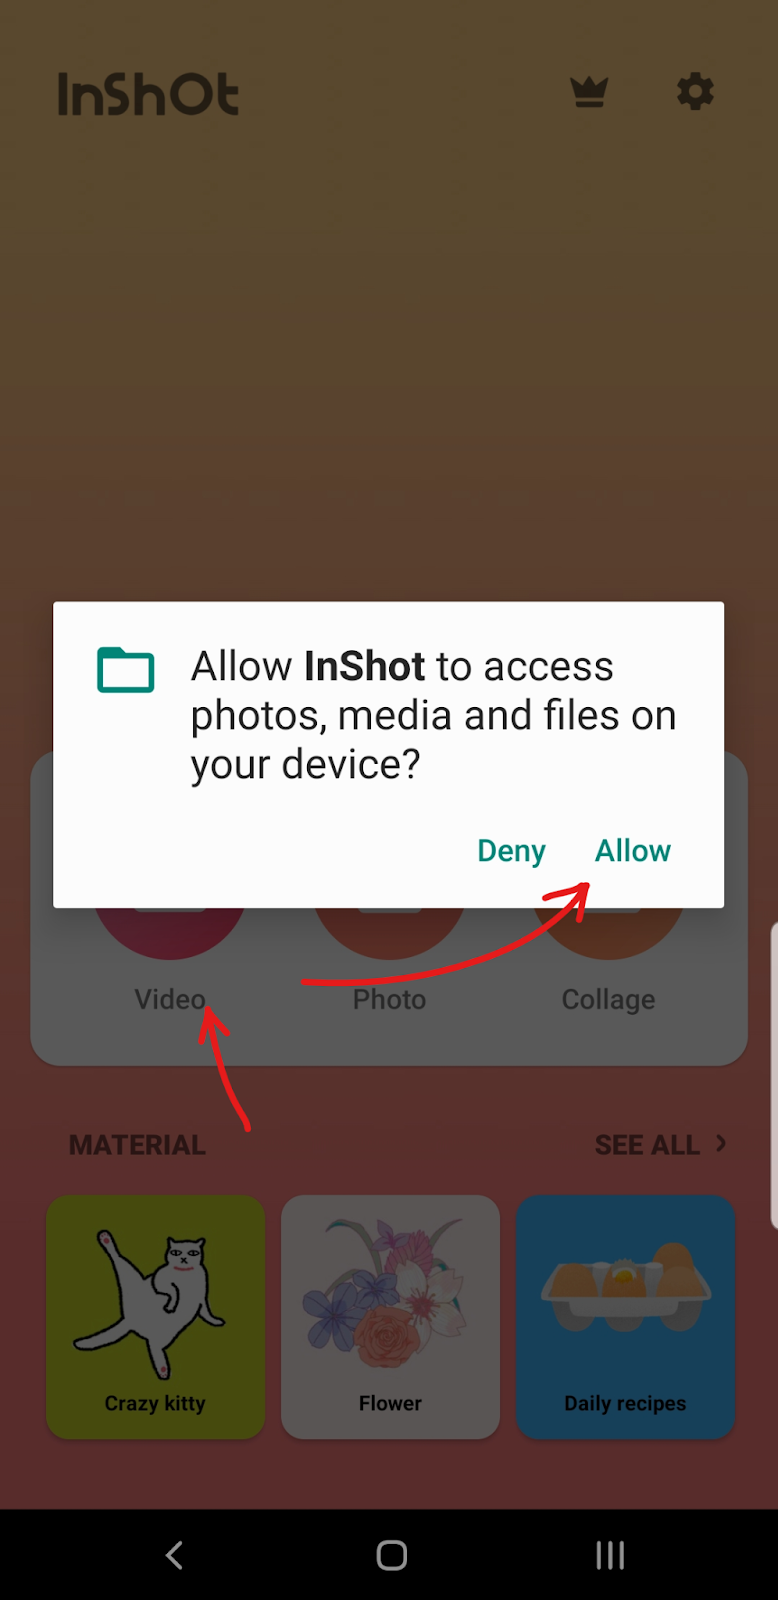
- Once that’s downloaded, you can open the application and immediately tap on Video. Allow InShot to access your media and storage to let it retrieve your video clips.
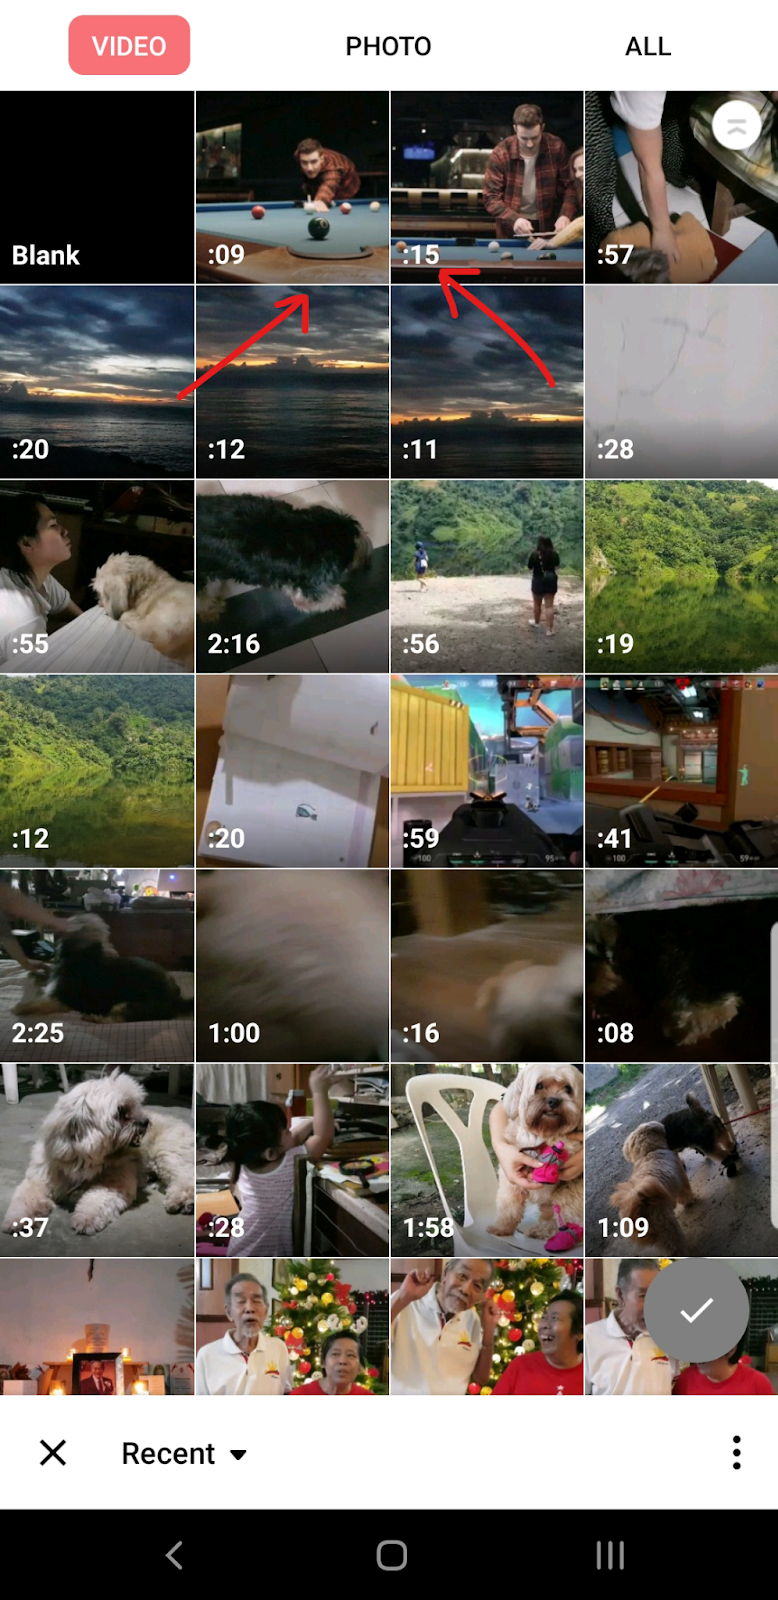
- From there, go to the Video tab and click on the videos that you want to add. Click on the Checkmark at the bottom-right corner once you’ve selected the clips you want to merge.
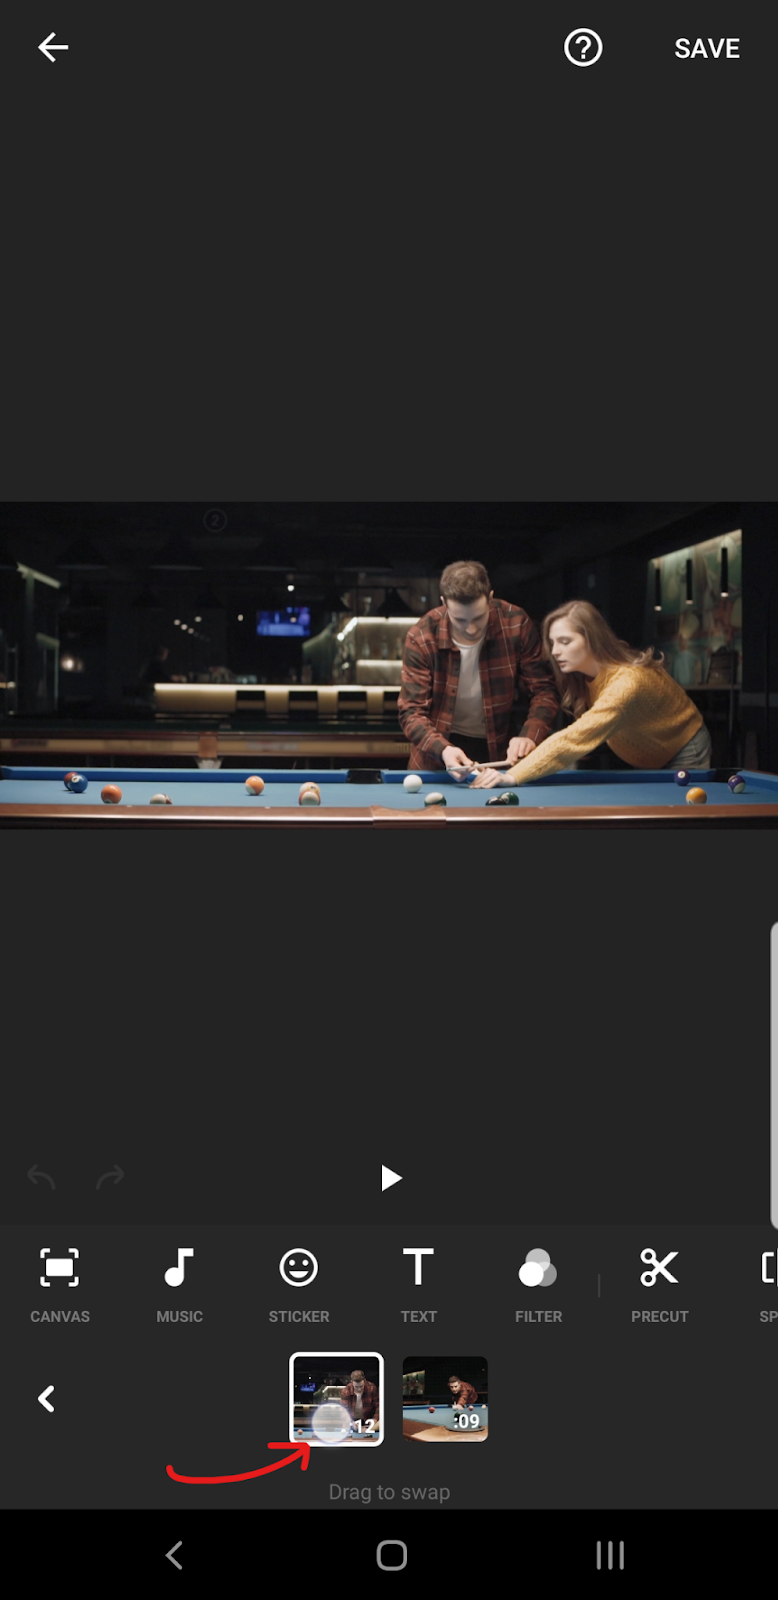
- That should move you back to the editor. Scroll to the right until you can find the Transition between your clips. If you uploaded the footage in the correct order, you should be able to play the project file with the video clips in your intended sequence.

If your video clips are not in the right order, simply tap and hold any of the video files in the timeline. That should shrink the video clips into squares. You can tap and hold these square files and rearrange your video footage to the way you want it to be sequenced.
- When you’re satisfied with how the videos are merged, simply click on the Save button at the top-right corner of your screen. Here, you can choose the resolution and FPS of the video you want to export. Simply click on the Resolution and FPS buttons to check out the options.
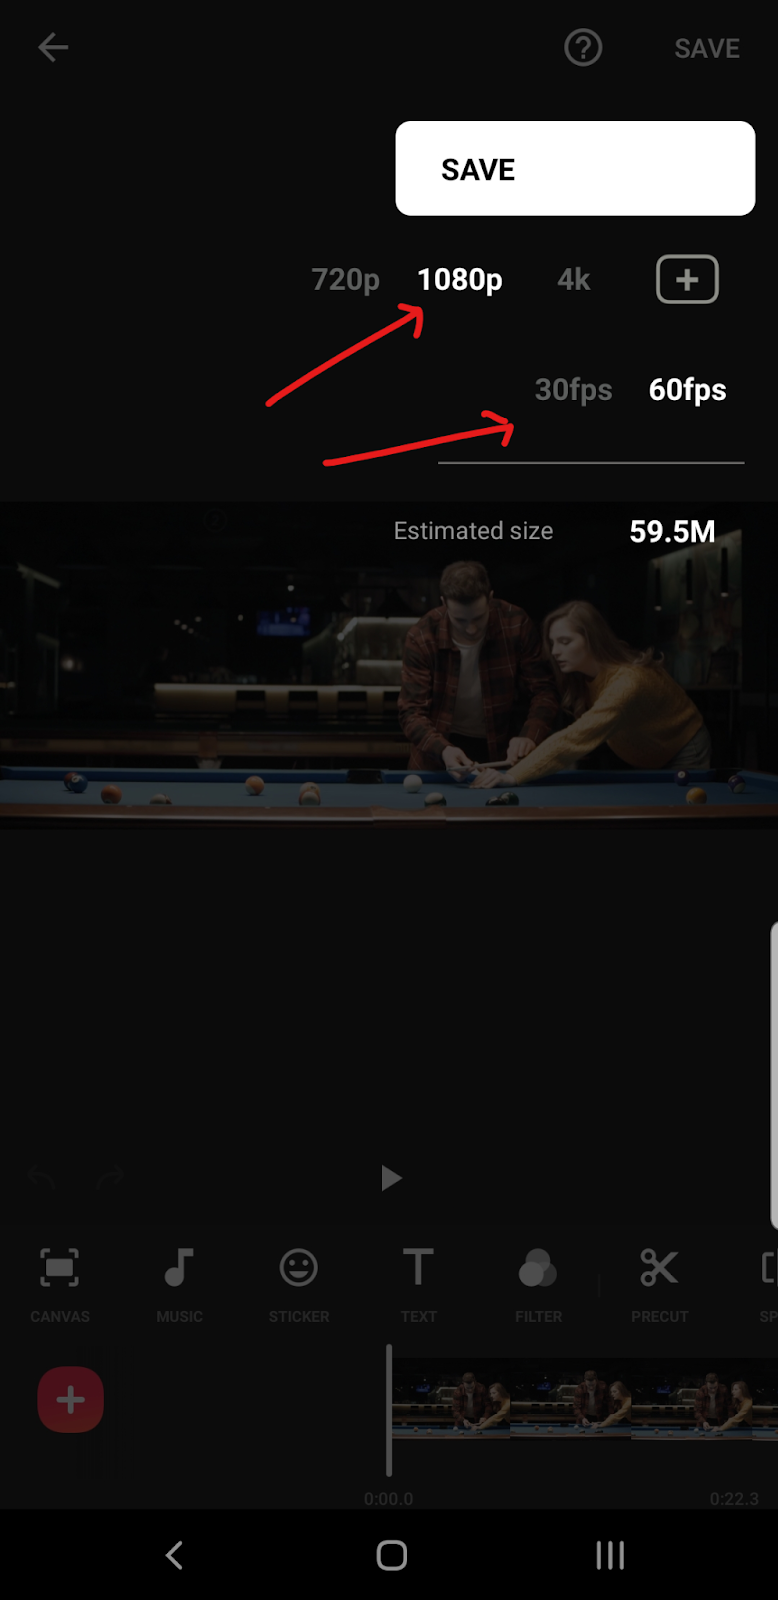
InShot blows the competition out of the park here, allowing users to pick up to 4k resolution and 60 FPS of video quality.
7. When you’re happy with your export settings, simply click on Save again to begin exporting your video.
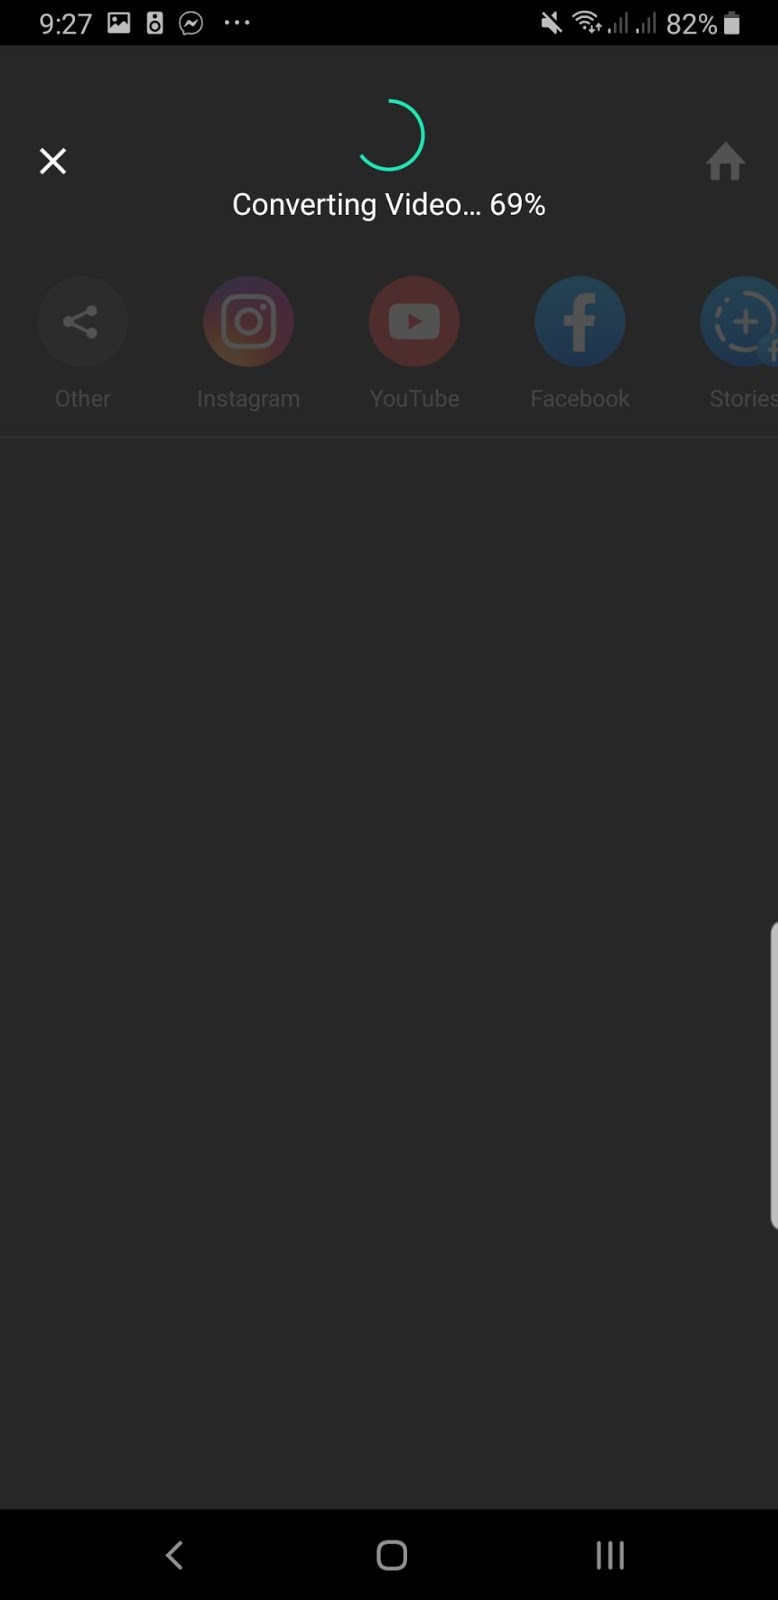
8. When the video is done converting, it should be automatically saved to your phone’s default storage. You can also automatically share the video to your Instagram, YouTube, and Facebook accounts. Finally, if you want to see where the file was stored, just tap on the checkmark at the left side. InShot will let you know where your video file was saved.

If you want to see the end result, here’s the final product rendered in 60 FPS and 1080p resolution.
Plans and Pricing
InShot has a wide variety of purchasable items. Their three main plans include:
- FREE — watermark, up to 4k resolution and 60 fps export, advertisements around the application.
- InShot Pro — $3.99/month, $14.99 per year, or $34.99 lifetime Pro — unlimited access to effects, filters, stickers, and transitions. Removes the InShot watermark, and removes all ads on your phone.
- Remove ads — $2.99 lifetime — If you’re fine with what InShot has to offer you but don’t like looking at advertisements, you can remove them for $2.99. All the features remain the same, but advertisements will no longer bug you.
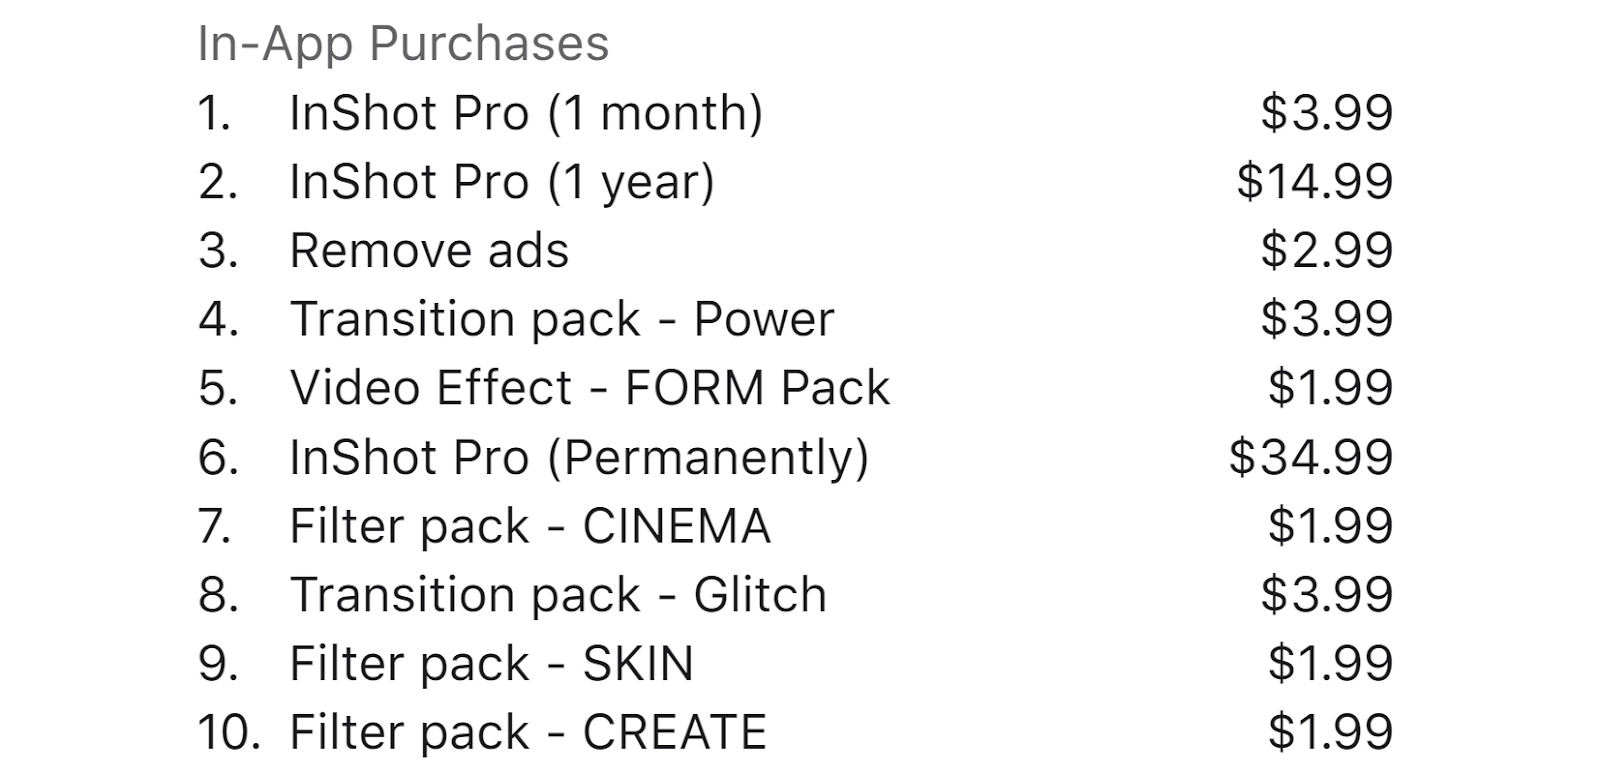
If you enjoyed your experience with InShot like I did, then unlocking the premium features for $3.99, $14.99, or $34.99 for your entire life might be worth it.
Quik
Quik is a video editor that does most of the heavy lifting for you. Unfortunately, this is also a downside since Quik automatically adds in filters, effects, and even trims your videos on its own. Although it is free, the Quik interface is a bit confusing and the hassle of merging videos here is arguably more trouble than it’s worth.
Note: the steps below are more about removing Quik’s effects, so it is a bit tedious.
Quik’s Quirks:
- Powerful mobile editor
- Automatically adds flashy effects to your videos
- Although the UI is complicated, Quik adds professional-level edits to your videos automatically.
Quickly merging with Quik:
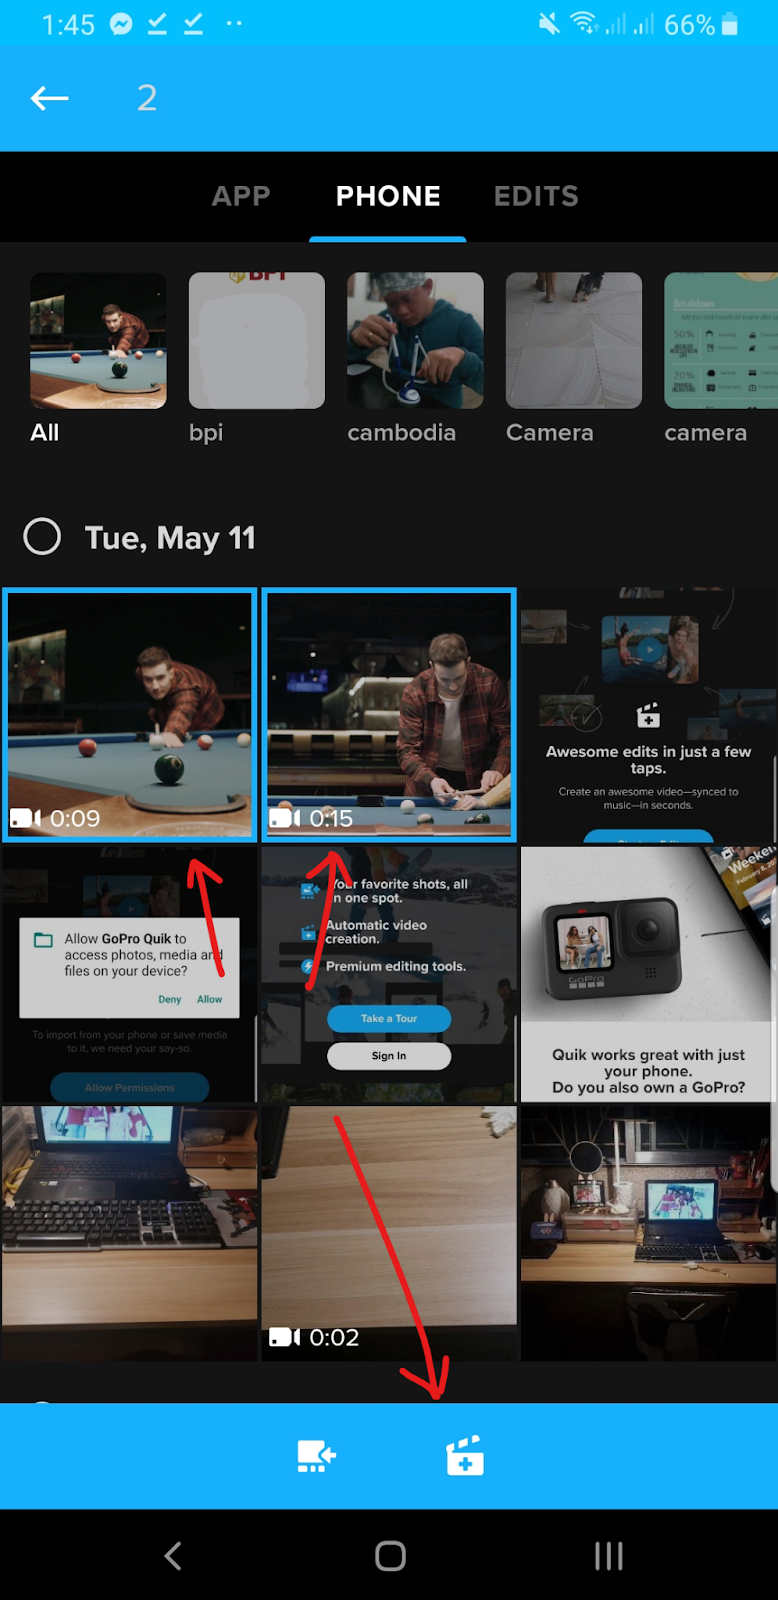
- Go ahead and download the Quik application from the Google Play Store or Apple App Store.
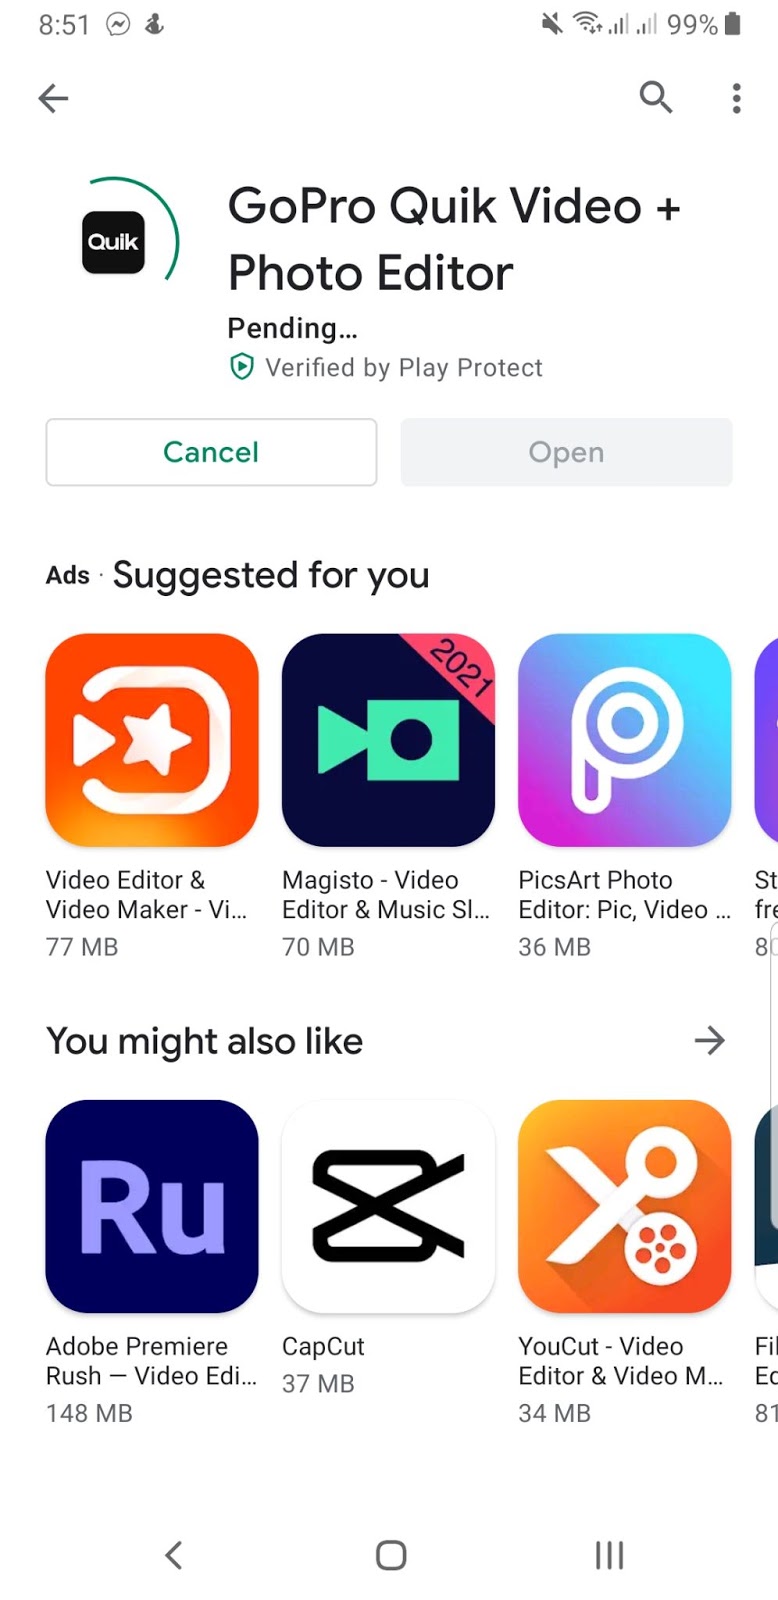
- Open the video editor after you’ve downloaded the application. If you own a GoPro, you can connect it to the app. Otherwise, Quik works just as well on just your phone.
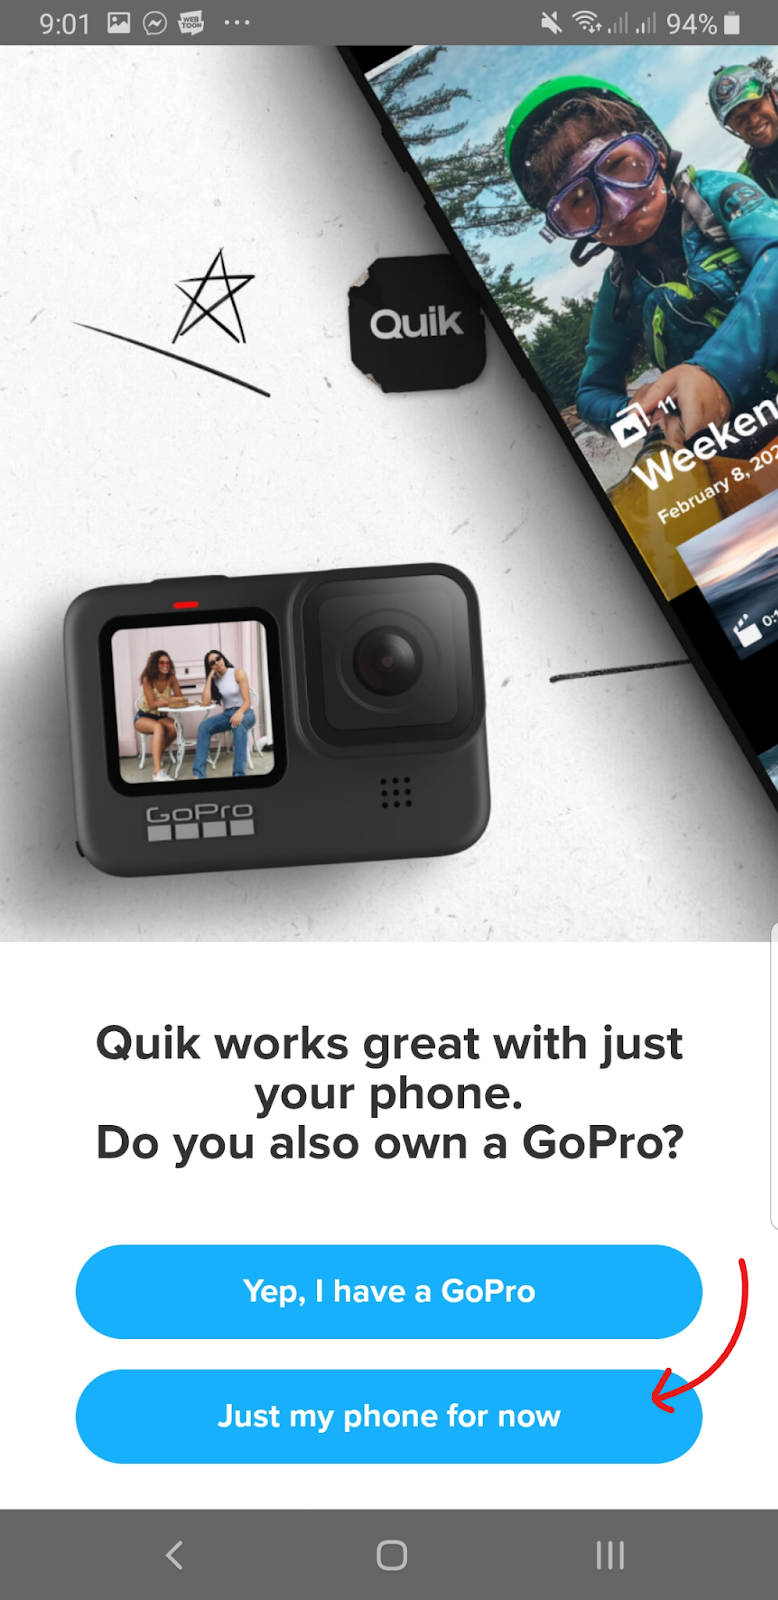
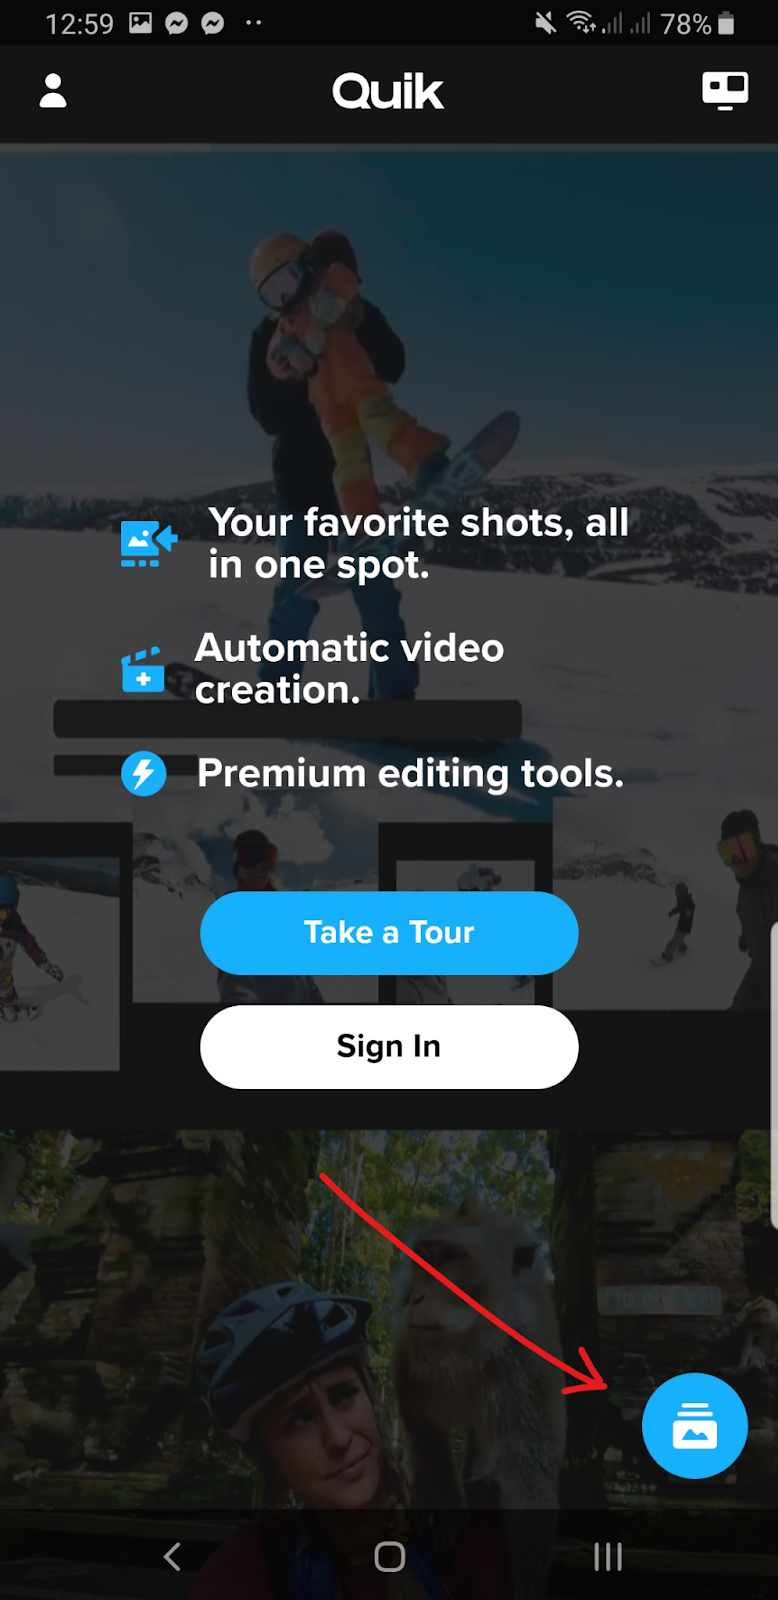
- For the next step, you can choose to sign in or take a tour. If you don’t want to create an account, simply tap on the Gallery icon at the bottom-right corner of your screen.
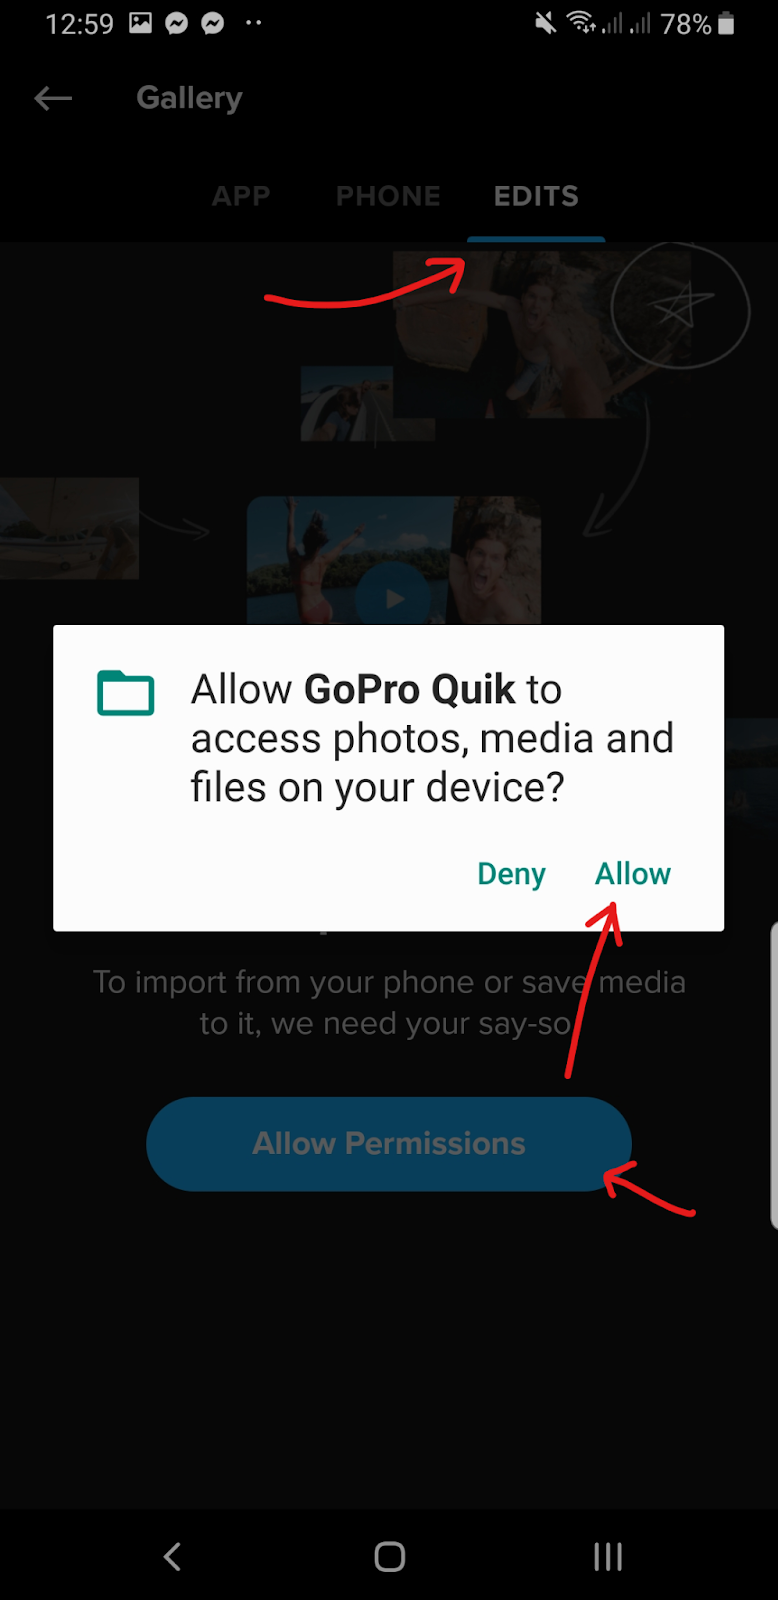
- From there, click on the Edits tab and allow Quik to access your photos, media, and files.
That should allow you to finally start an edit.
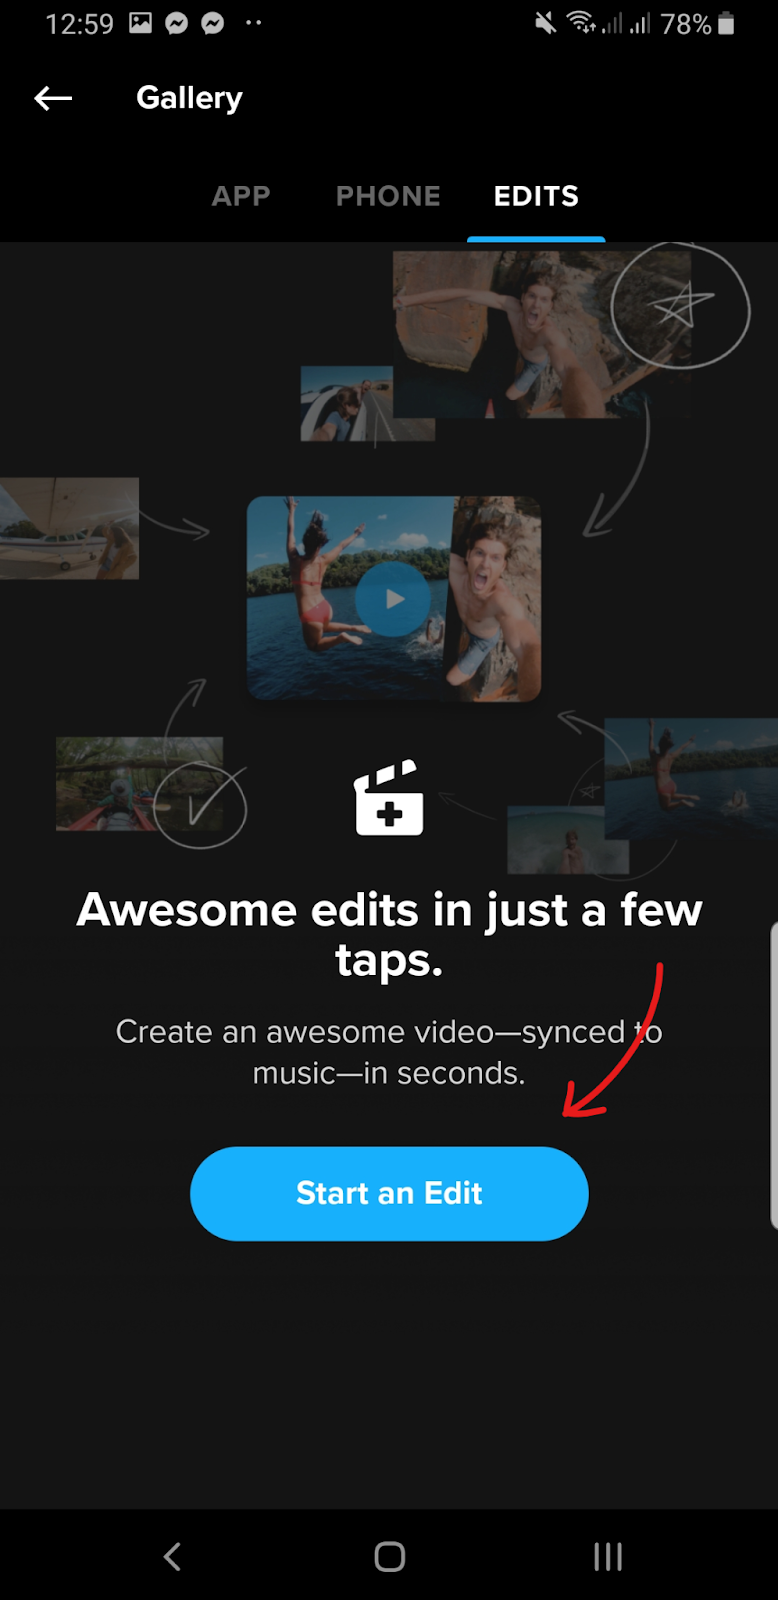
- Go ahead and select on the video clips that you want to merge from the gallery of videos and photos. Once you’ve selected the video clips, tap on the clipperboard icon to proceed to the video editor.
- When you’re in the editor, you’ll want to remove the beginning and ending clips immediately. These are automatically added in by Quik to show your title name and Quik’s end credit clip. If you don’t want this, remove it by simply holding down the video clip. Once you can move it around, drag it to the trash icon at the bottom.
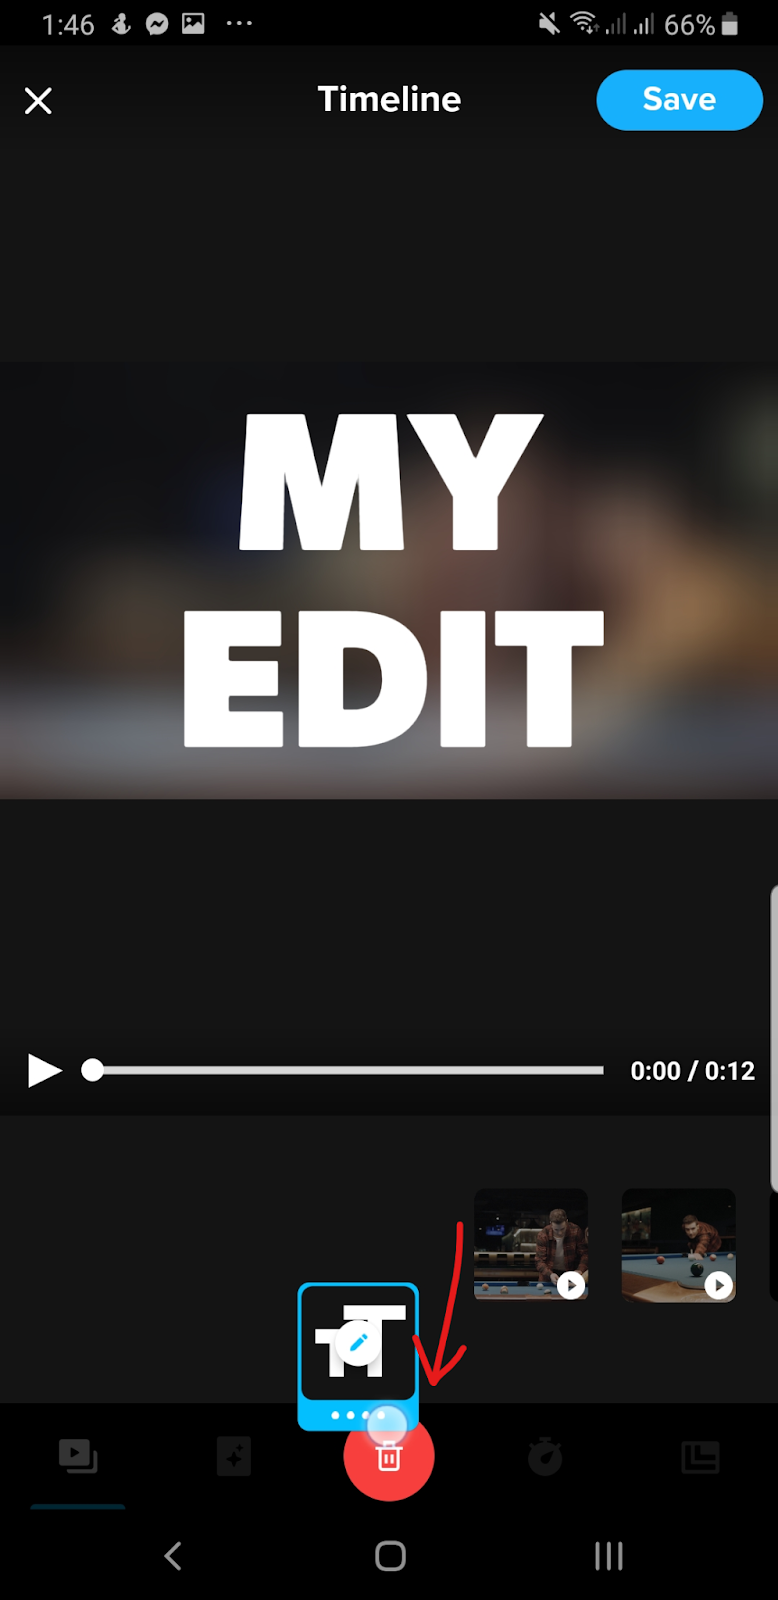
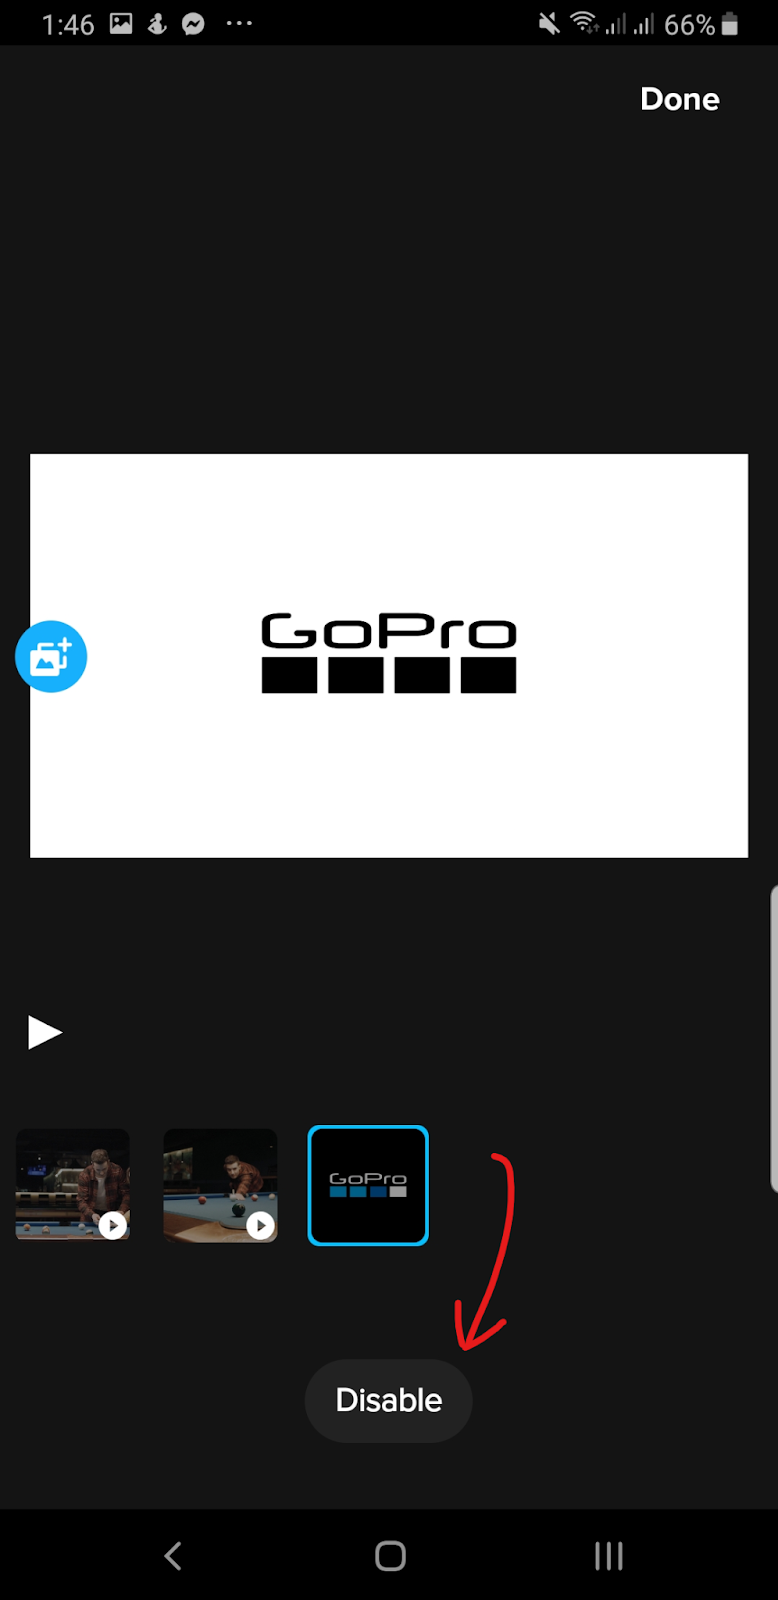
Repeat the same step for the last clip, except you can just tap on Disable to remove it.
- Moving on, we’ll have to remove all of Quik’s filters, trims, and edits on your video clips. Hold down your video clips until a pencil icon appears. Tap on that to edit your video clip.
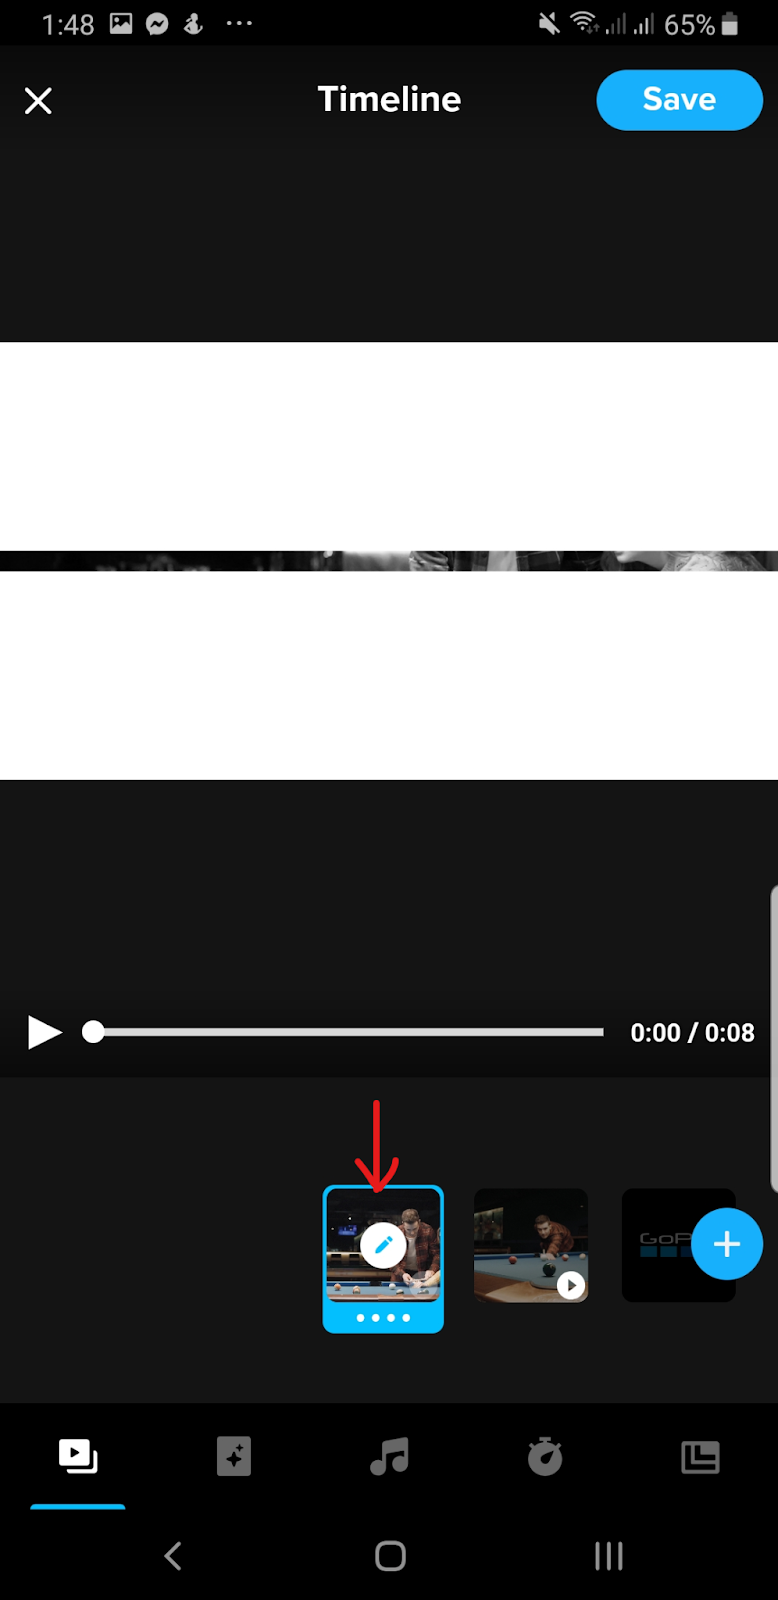
You’ll want to check all three of these options. Quik automatically edits these video options to make your clips look cooler. Simply remove the edits or revert these settings back to their default orientation.

- When you’re satisfied with everything, simply click on the Save button at the top-right corner of your screen.
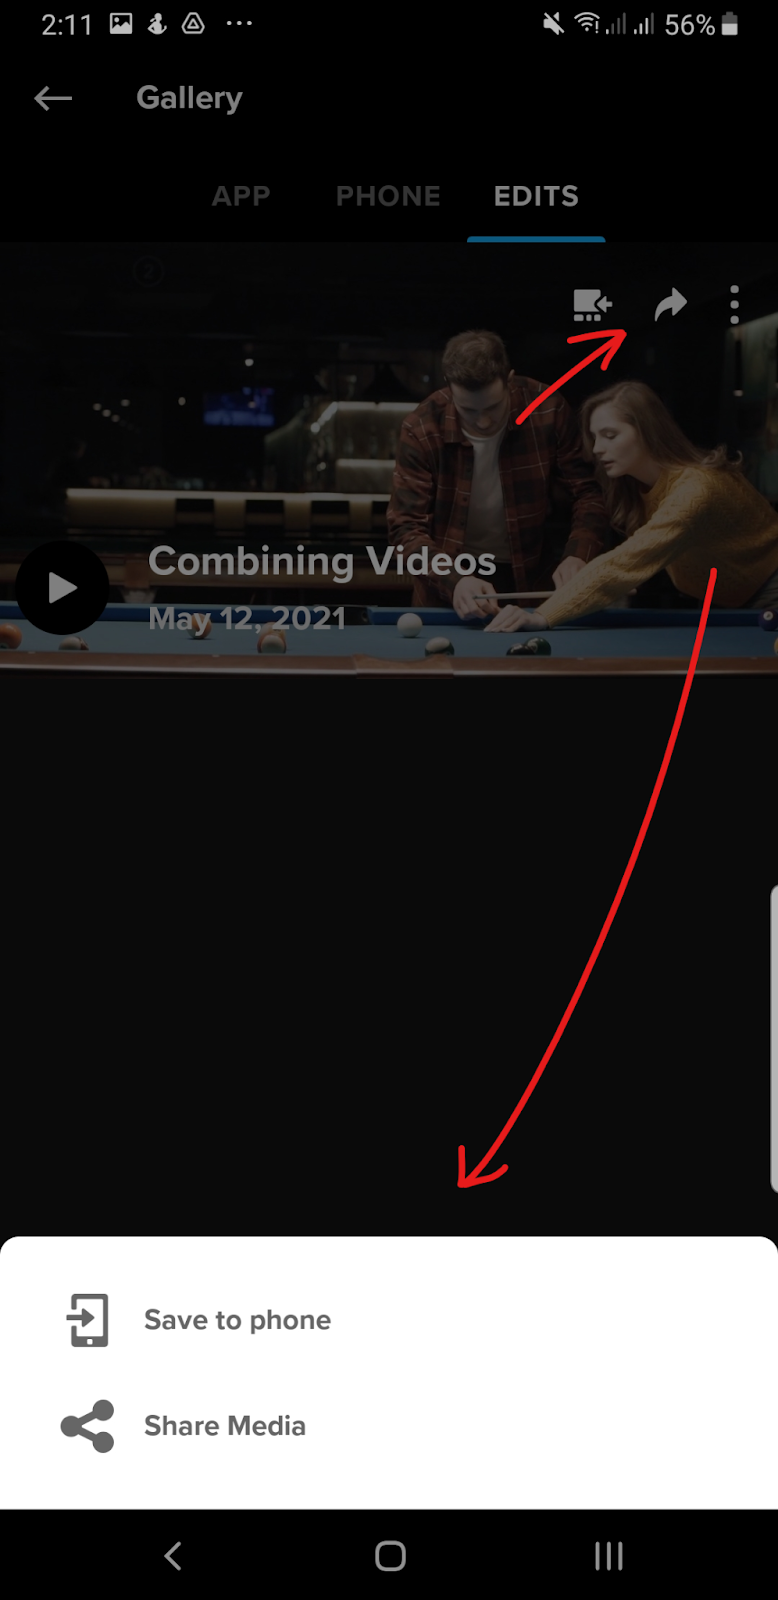
- This will save the video to your Quik Mural. Before we download this, let’s change the name of your video first. Click on the triple-dot icon on your screen.
Change the name of your video to whatever you want.

- Finally, download your video by clicking on the arrow icon. Select Save to phone and you’re done!
Here’s the final render for Quik. There are still a few video effects happening, especially in the first part of the video.
Plans and Pricing
Although Quik is a hassle to use, especially if you just want simple edits, their pricing plan is very affordable:
- Quik Premium — $1.99 per month or $9.99 a year — unlimited cloud backup and access to all Quik’s features.
Adobe Premiere Rush
If Spark was Adobe’s answer to an all-in-one browser editor, Premiere Rush is a dedicated mobile video editor. Rush combines the portability of your phone with Adobe’s powerful video editing tools. It’s an intuitive application with tons of cool features, perfect for social media videos or homemade projects.
Note: you do need an account to proceed with this editor.
A Rush of features:
- Motion graphic templates
- Ease of use and snappy interface
- Exporting your videos to social media is simple and quick
Using Adobe Premiere Rush to combine videos:
- Like all the previous steps, first, you’re going to have to download the application. Here are the Google Play Store and App Store links.
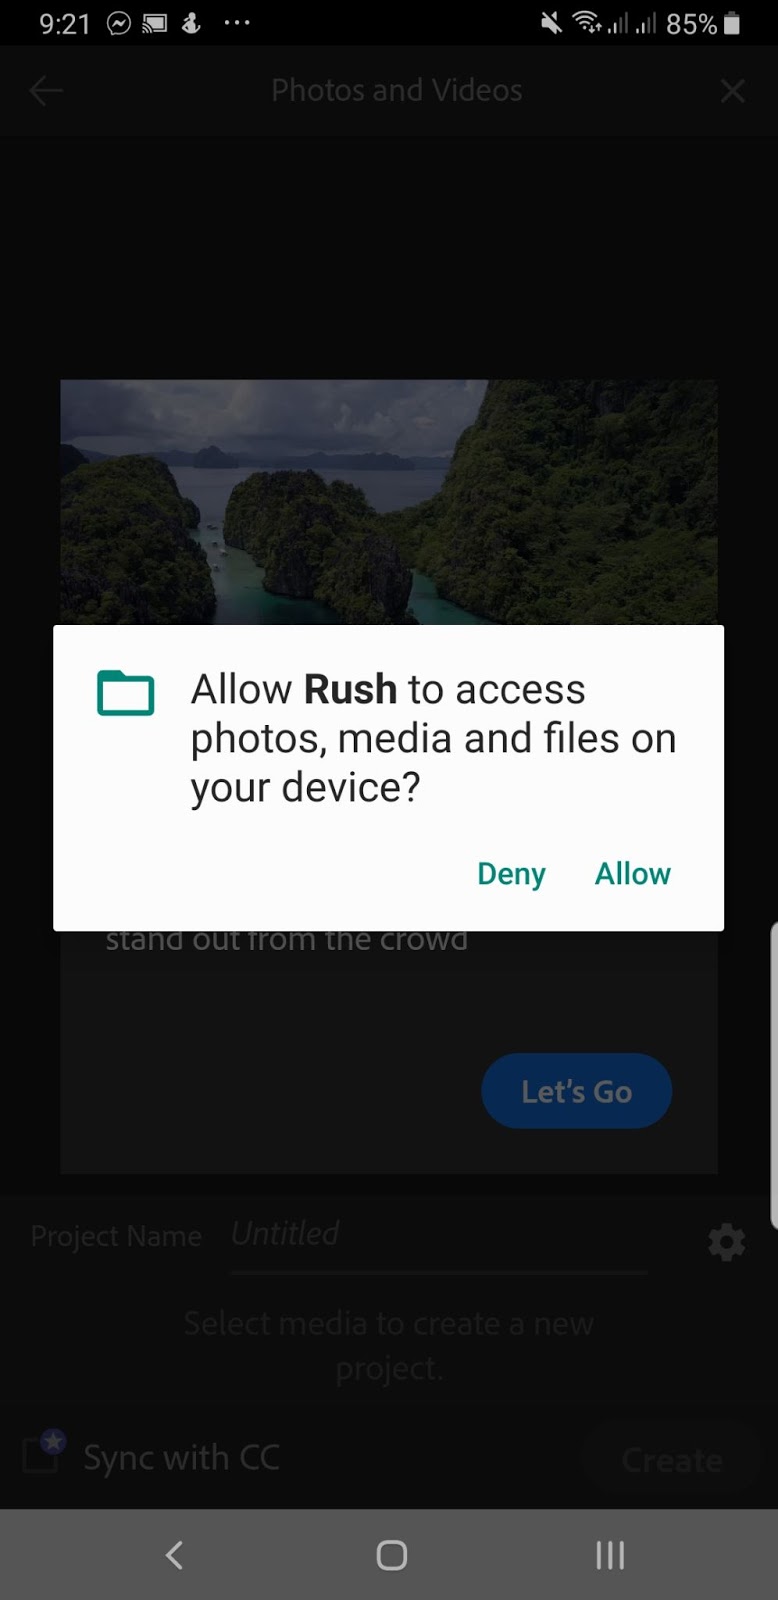
- Once you’ve downloaded the app, either Sign in to your Adobe account or Sign up for a new account. After that, allow Rush to access the photos and media on your device.
- Instead of directing you to an empty timeline, a gallery of all your video clips should open on your screen—just like the photo below. If that isn’t the case, simply navigate through Create New Project > Videos. Tap and select the video files you want to merge.

After selecting your clips, name your project on the empty line next to Project Name. Click on Create to proceed.
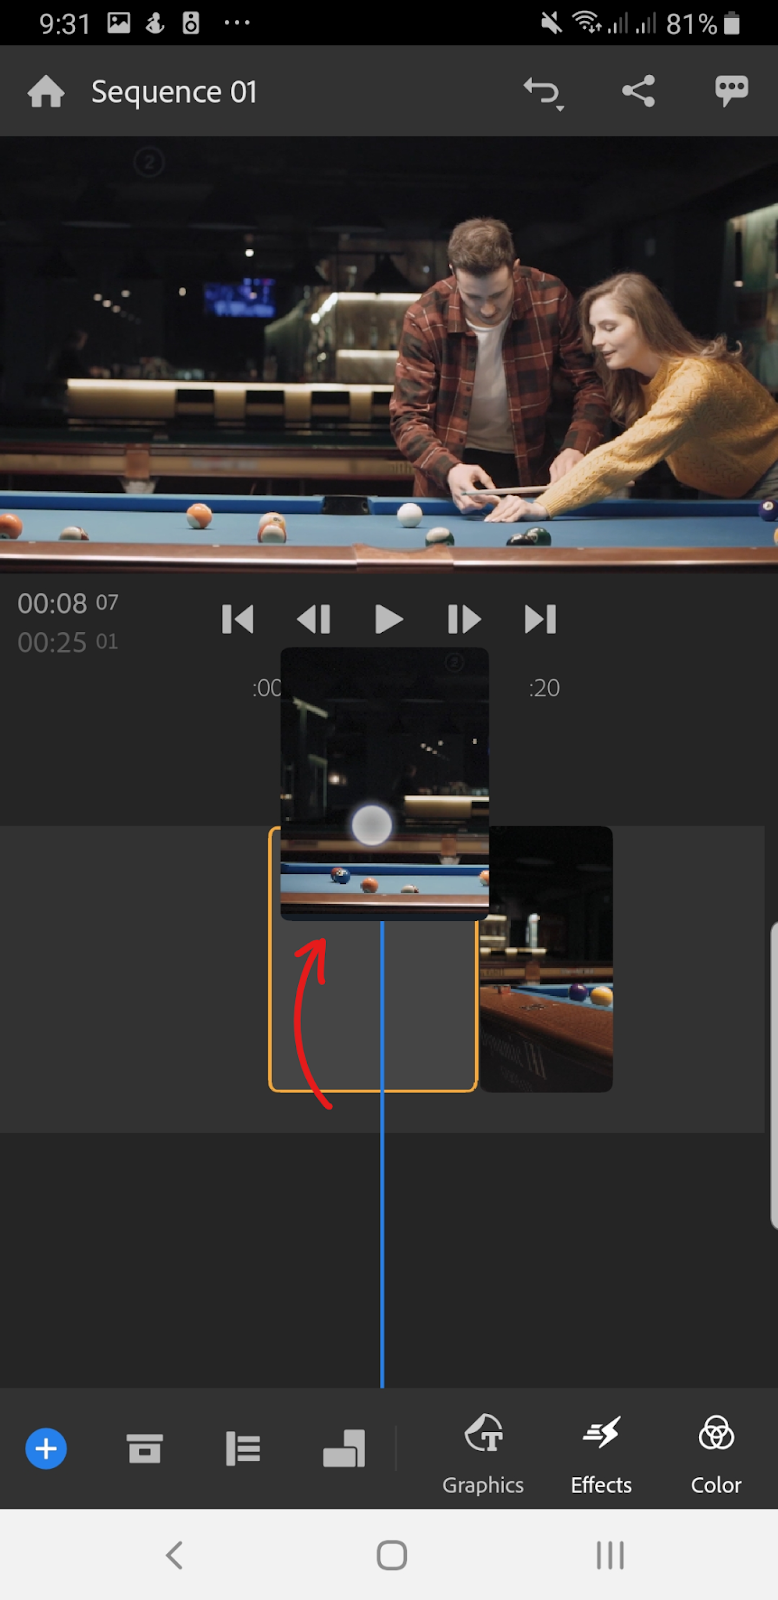
- You should now be on the project timeline. Click on the Play button to see if the video files are arranged the way you want them.
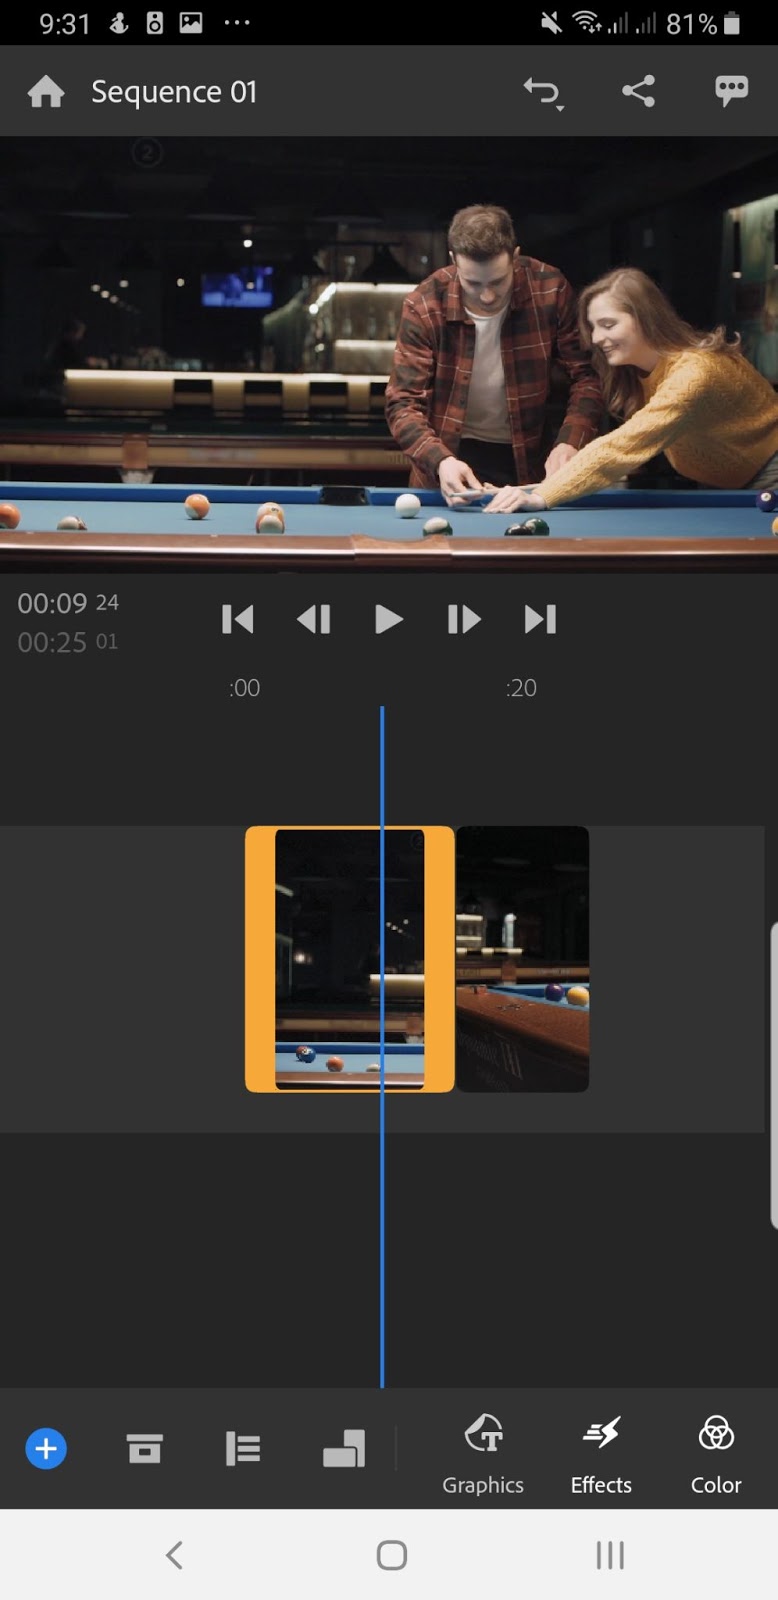
If the arrangement is wrong, you can just tap and hold a video clip. That’ll unhinge it and make it draggable around the timeline. Arrange your video clips in the proper order before going to the next step.
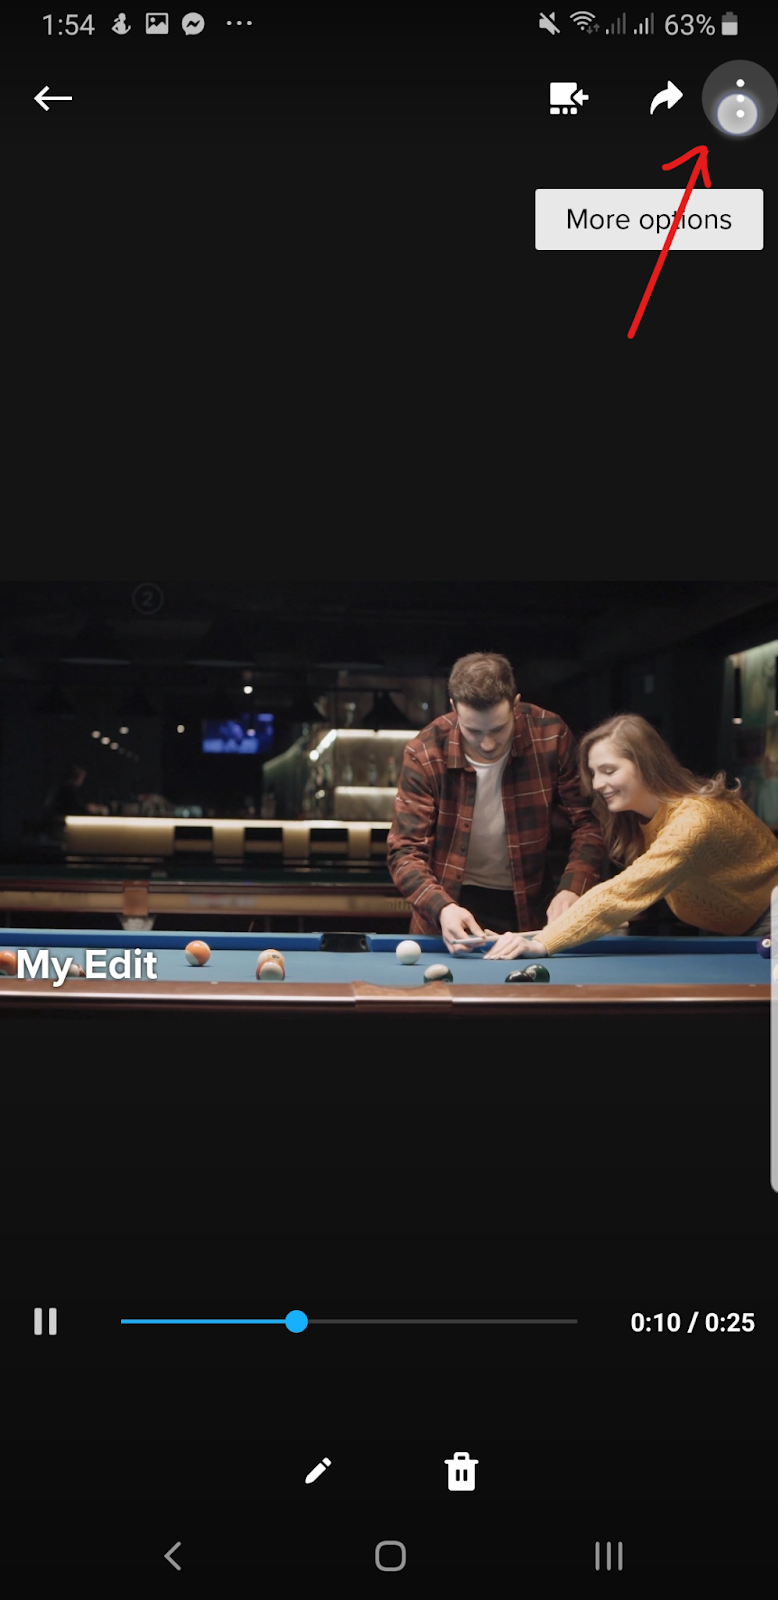
- When you think everything’s good to go, simply click on the Share icon at the top-right corner of your screen. This is the 3 dots connected by two lines. That’ll move you to the export window.
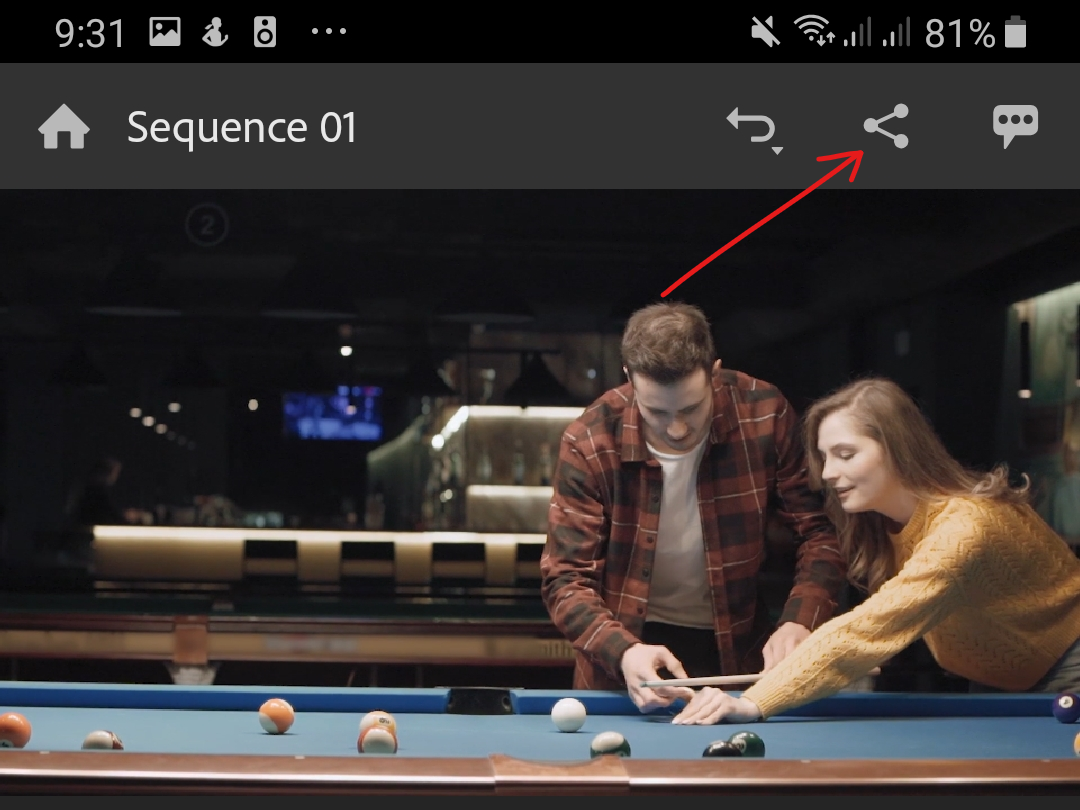
Tap on the Quality Settings option to open up the Presets and specifics of your video file.
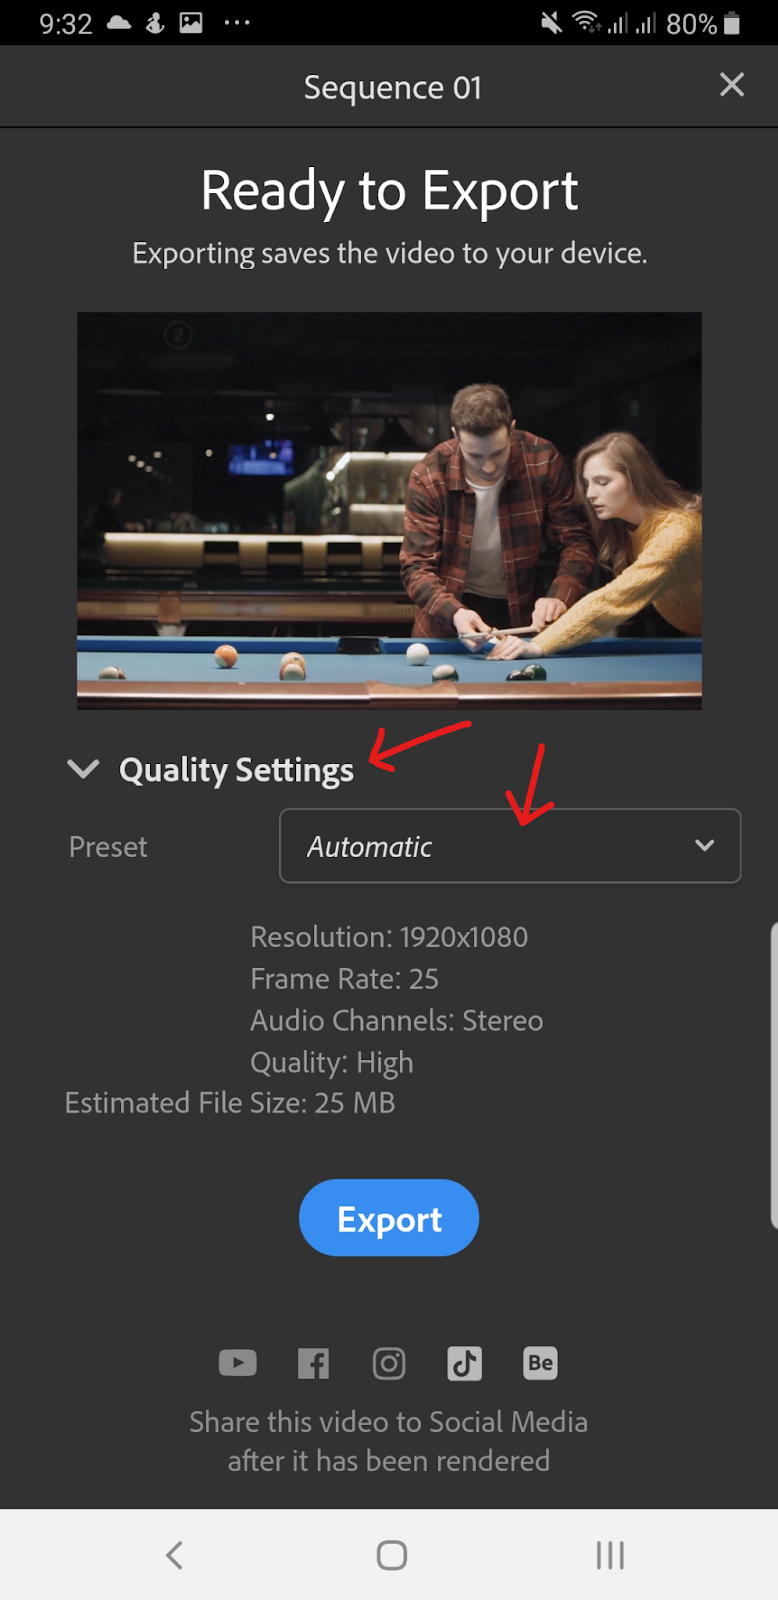
You can choose a different preset here, though the limit is 1080p with 30 FPS or with the native FPS of the video clips you’re merging.

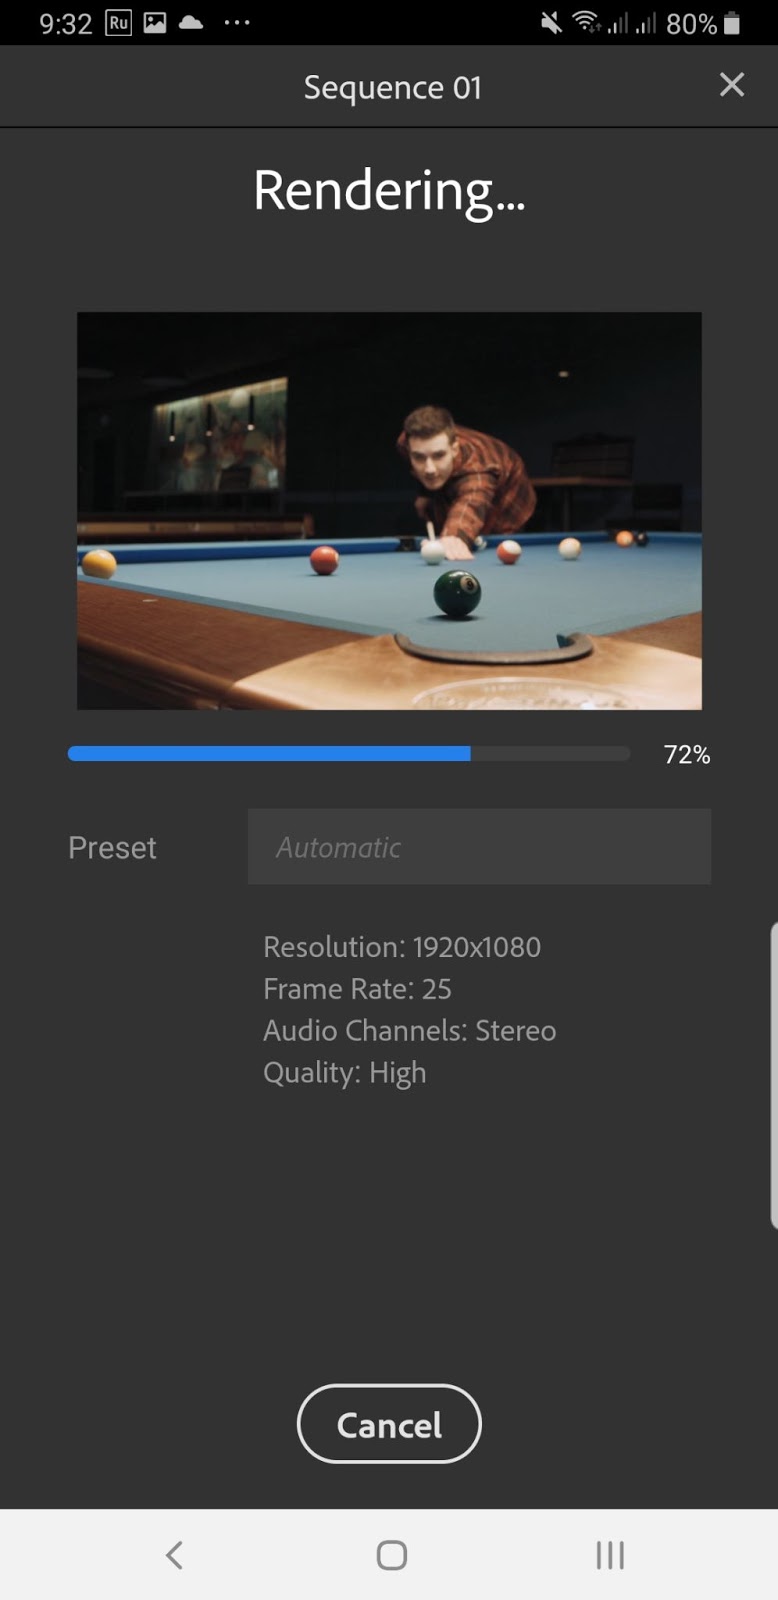
- If everything looks good, click on Export and Rush will begin rendering and exporting your video.
Here’s the final edit from Adobe Premiere Rush.
Plans and Pricing
Adobe offers an exclusive pricing plan for Premiere Rush.
- FREE — Only limited up to 3 video exports and only offers 2 GB of cloud storage.
- Subscribed — $9.99/month or $119.88/year — Access to Rush’s latest features and updates, 100 GB of cloud storage, Adobe’s portfolio, fonts, and Spark.

How to Edit Videos on Your Desktop
Already on your computer, don’t mind downloading an editor, and want something reliable? Edit videos on your desktop. Computer video editors are still arguably the most reliable way to do exactly what you want—merging videos. You don’t have to deal with failed uploads or pesky mobile ads.
Desktop video editors are straightforward. Although some might find these editors confusing, merging videos is a simple task. You can expect a simple drag and drop experience here. We’ll be going over three video editors for Windows, Linux, and Mac operating systems.
Filmora
First on our list, Filmora is one of the more famous video editors for both Mac and Windows. The video editing program from Wondershare is a step stronger than the default iMovie and Windows Movie Maker, but falls short against professional-standard programs like Premiere Pro.
Note: Filmora does include an obscenely large watermark in your videos. I wouldn’t recommend this editor for business purposes.
Features and tools from Filmora:
- Simplistic interface that’s easy to learn
- Lots of free basic effects and overlays
- Considerably cheaper paid version
- A step above default video editing apps
Combining multiple videos into one with Filmora:
- Let’s start by downloading the Filmora application on Wondershare’s official website. Run the installer when it’s finished downloading to install the program.

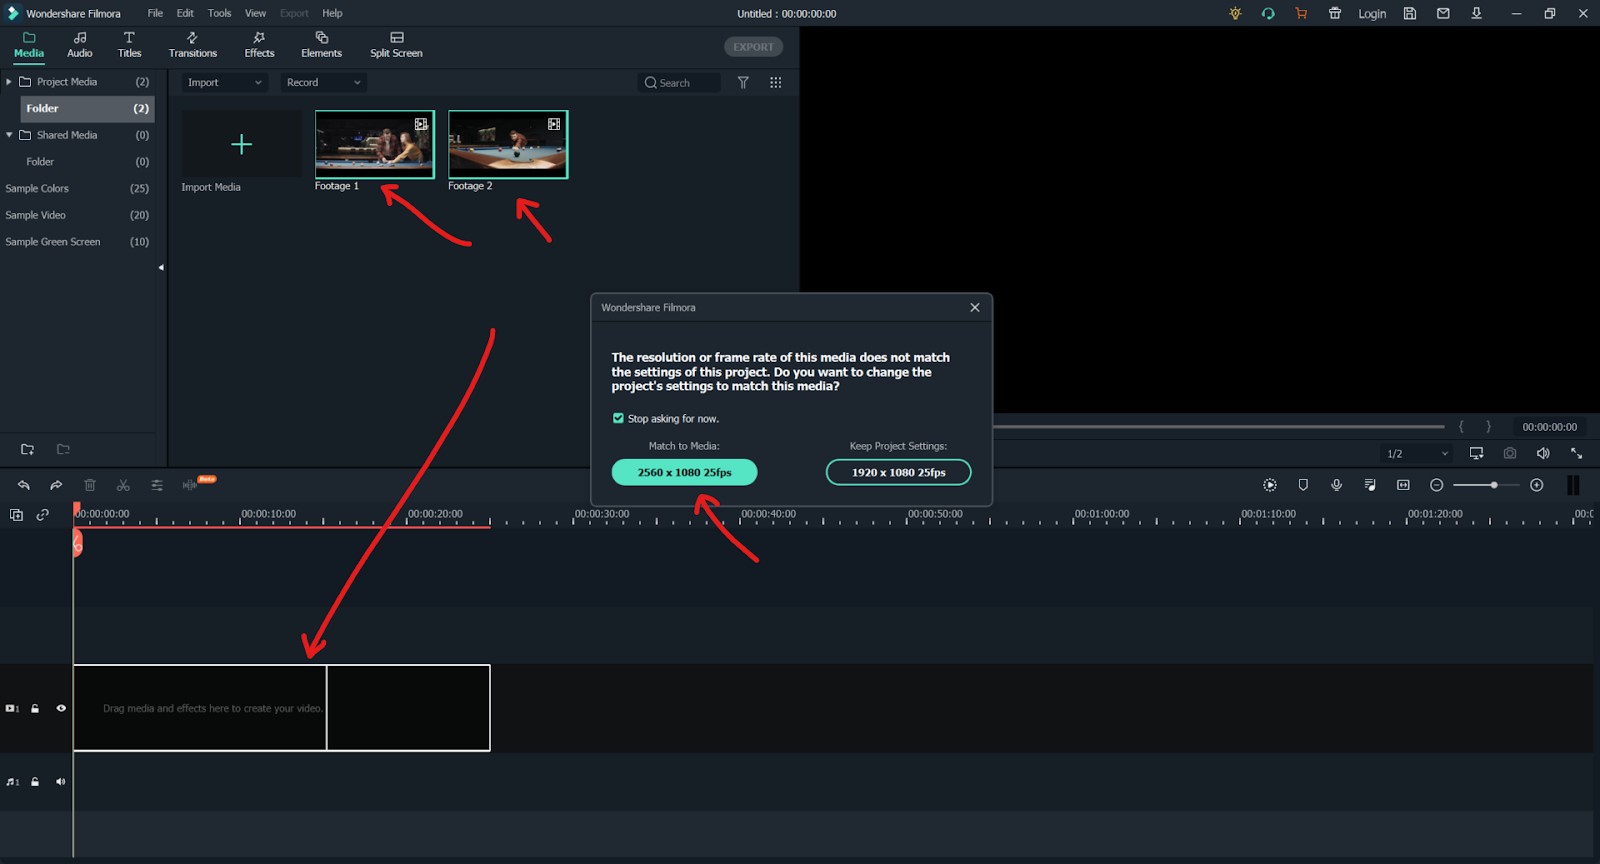
- Once Filmora is open, simply go to the Project Media tab at the top-left corner of your screen and click on the clapperboard icon. From there, look for the files you want to merge and import them into the Filmora application.
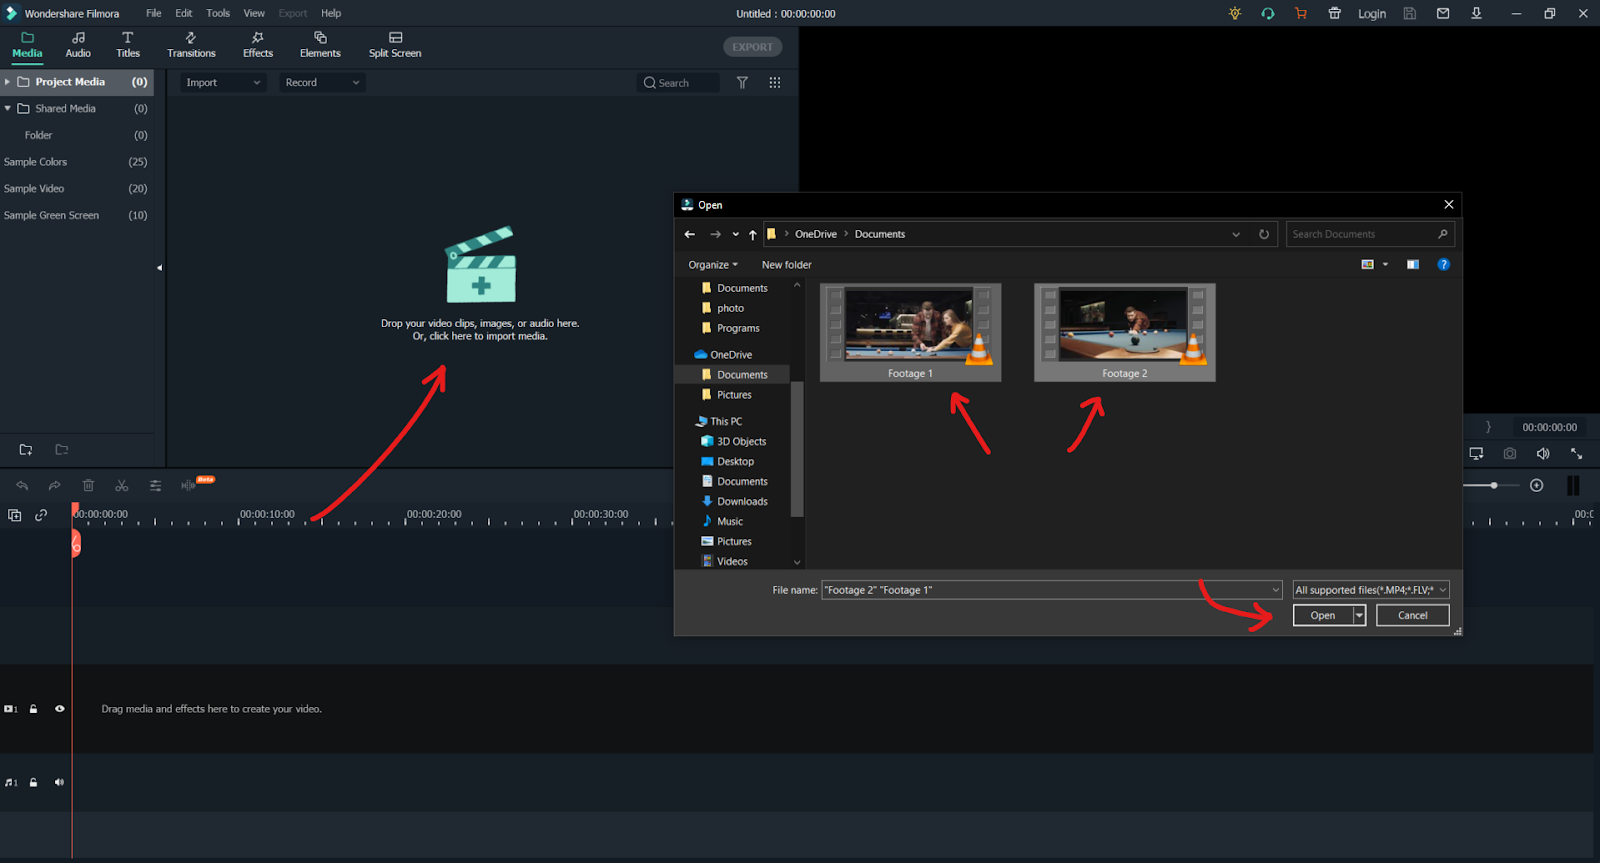
- After that, select the video clips you just added. Hold and drag these clips into the timeline. If your video files differ from the project settings, Filmora will ask you if you’d like to keep the default project settings or match the project to the resolution of your video files. For this tutorial, we’ll be clicking on the Match to Media: option.
- If you’re unsatisfied with the arrangement of the video clips, you can click and drag the files to reposition them around the timeline.
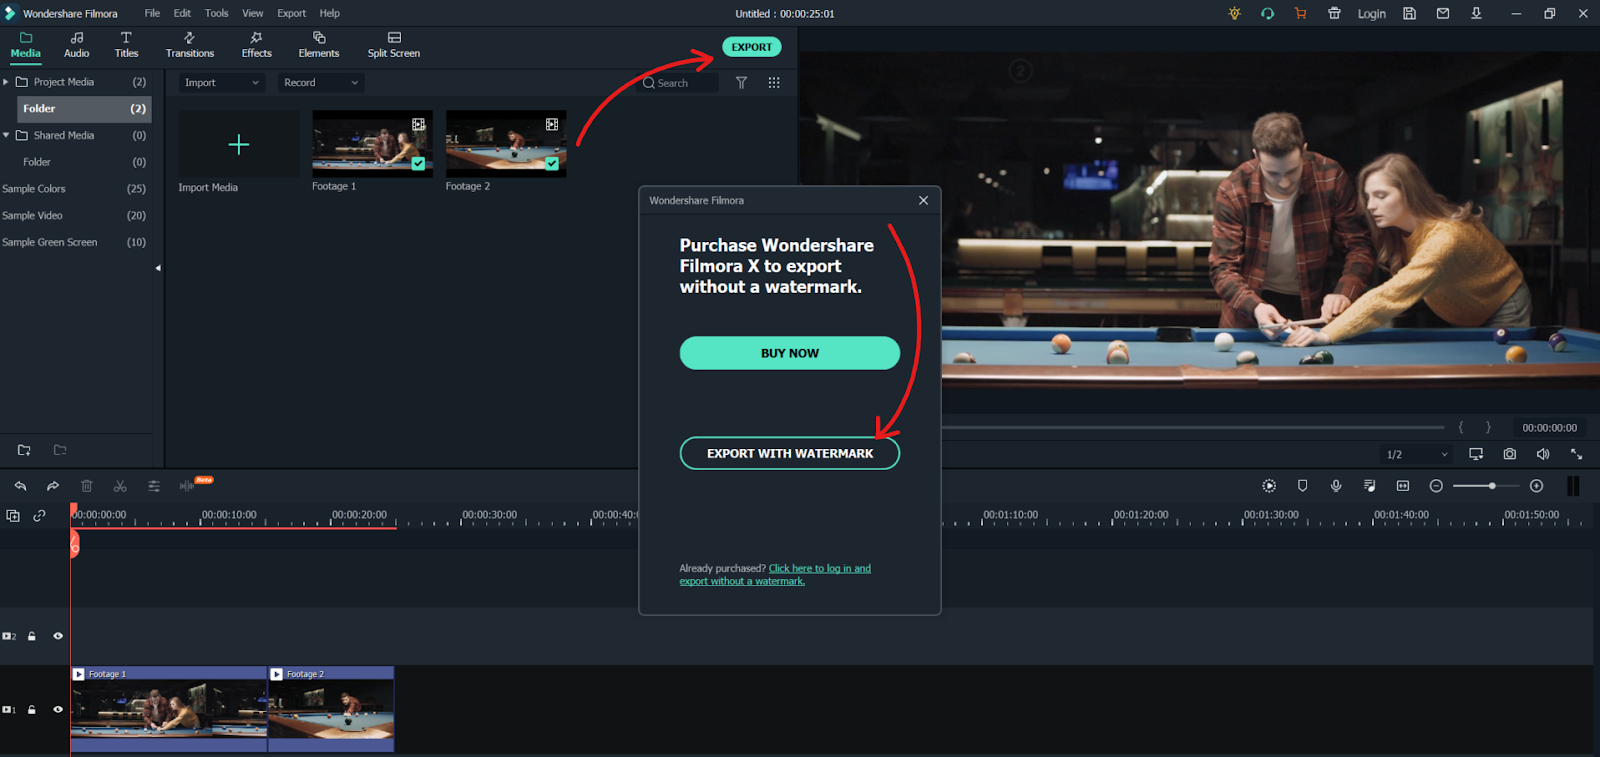
- If everything looks good to you, simply click on the Export button at the center top side of your screen. After that, click on Export with Watermark.
- Go ahead and name your video. You can also change where the video file is saved by changing the Save to: destination. Adjust the resolution and FPS as well by clicking on the Settings icon. Finally, click on the Export button when you’re ready to save your video.

Here’s the final product of the render. As you can see, Filmora has the biggest watermark among all the video editors we’ve tested.
Plans and Pricing
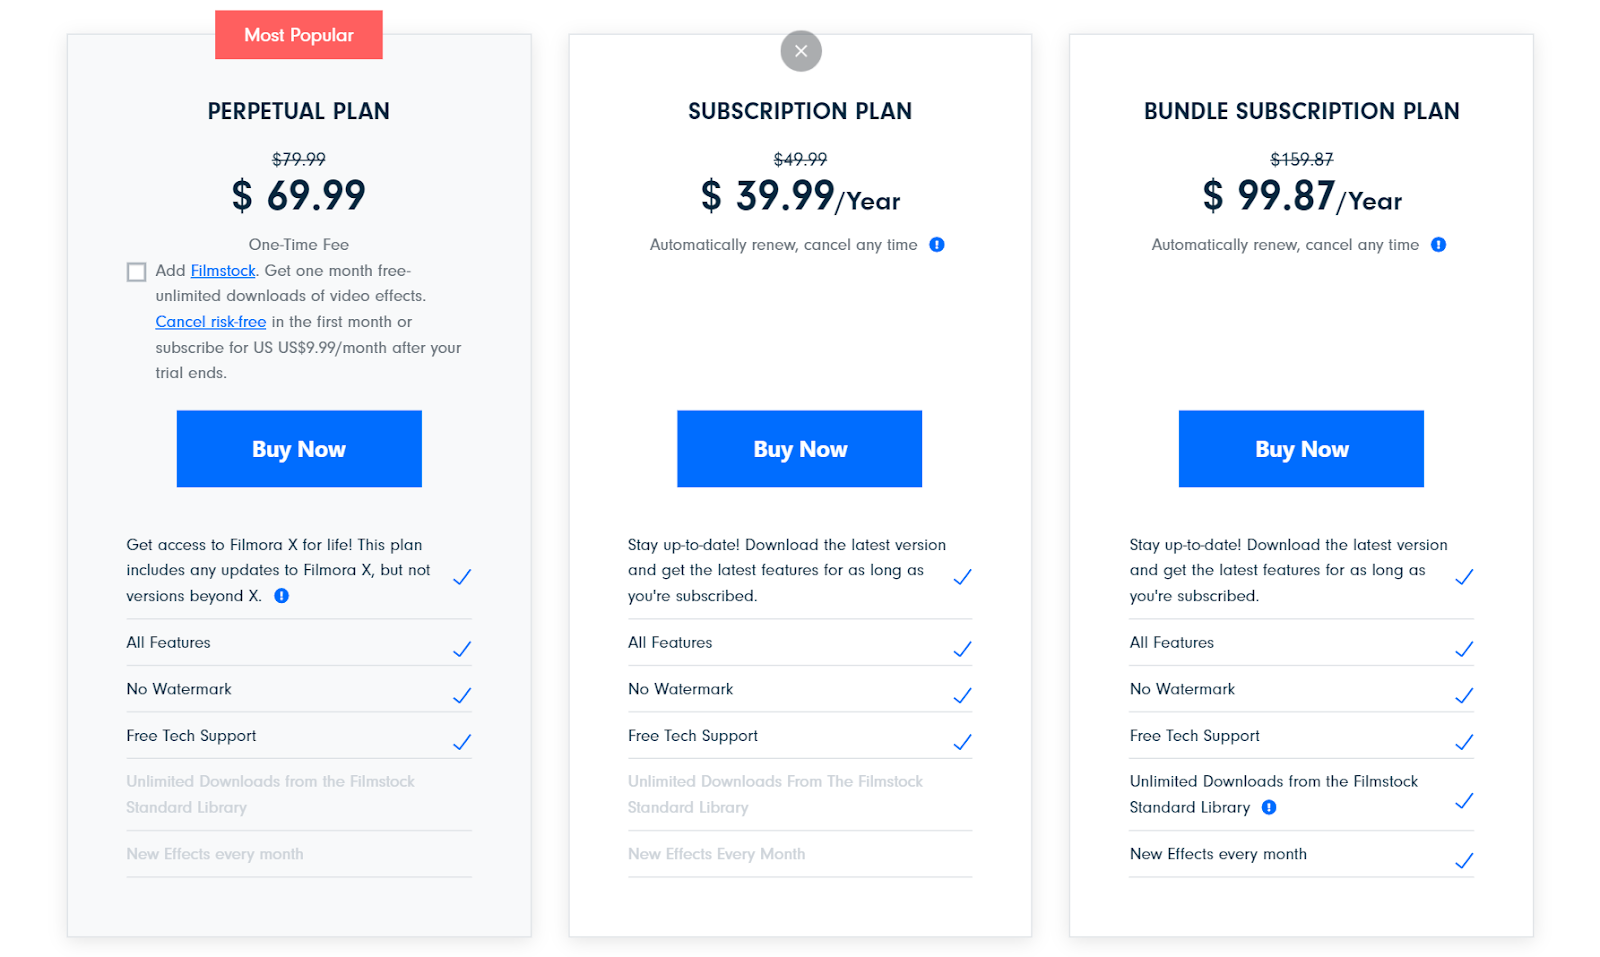
While Filmora has an eyesore for a watermark, they do offer very generous payment options for premium users.
- Subscription — $39.99/year — Unlocks all features, no watermark, free tech support.
- Bundle Subscription — $99.87/year — Everything above, unlimited downloads from Filmstock library, and new effects every month.
- Perpetual — $69.99/lifetime — Unlocks all features for a one-time lifetime price.
Shotcut
If you combine a powerful video editor with a bit of a clunky user experience, you get this. Shotcut is regarded as an excellent, free, open-source video editor with a ton of powerful features. Now, the interface does take some time to get used to, but we can’t really complain since it’s free.
Shotcut’s shots:
- Powerful despite being free
- Solid basic video editing software
- Though intimidating, it’s built perfectly for beginners
- Customizable
Merging your shots with Shotcut:
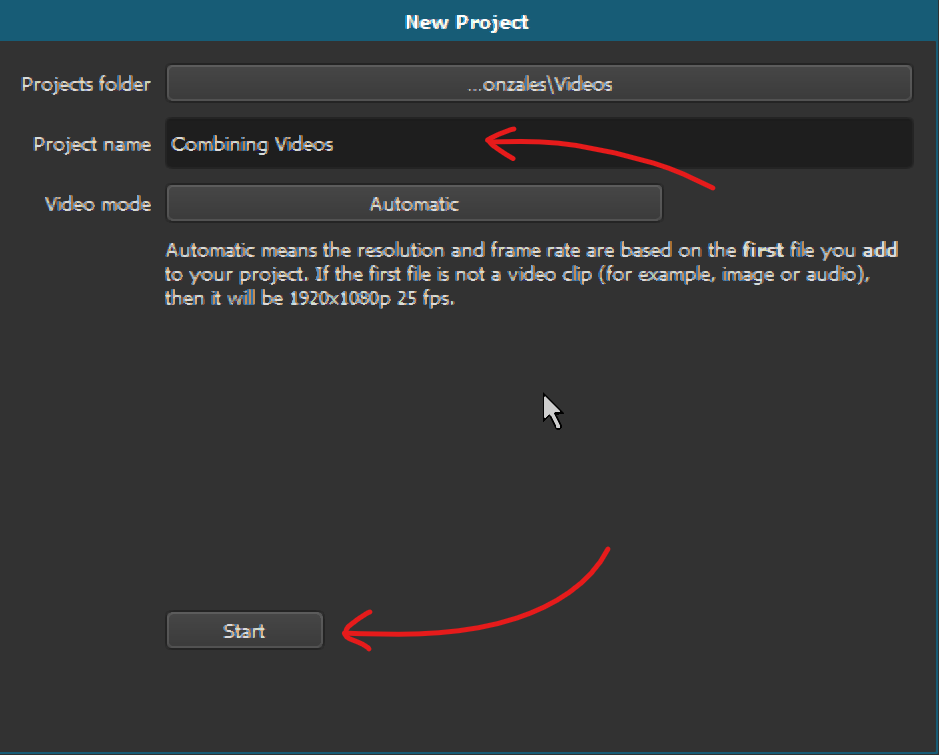
- Again, start by downloading Shotcut from their official website. Once you’ve installed the program, simply run it and you should be greeted with an interface like this.

- Go ahead and name your project. When you’re done, click on Start to begin editing your video.
- From there, click on the Open File icon at the top-left corner of your screen. Navigate to your folder with the videos that you want to merge and select those video clips. Click on Open to export all the video clips to the editor.

- With your clips ready for use, simply select the videos that you added and drag them to the timeline below.
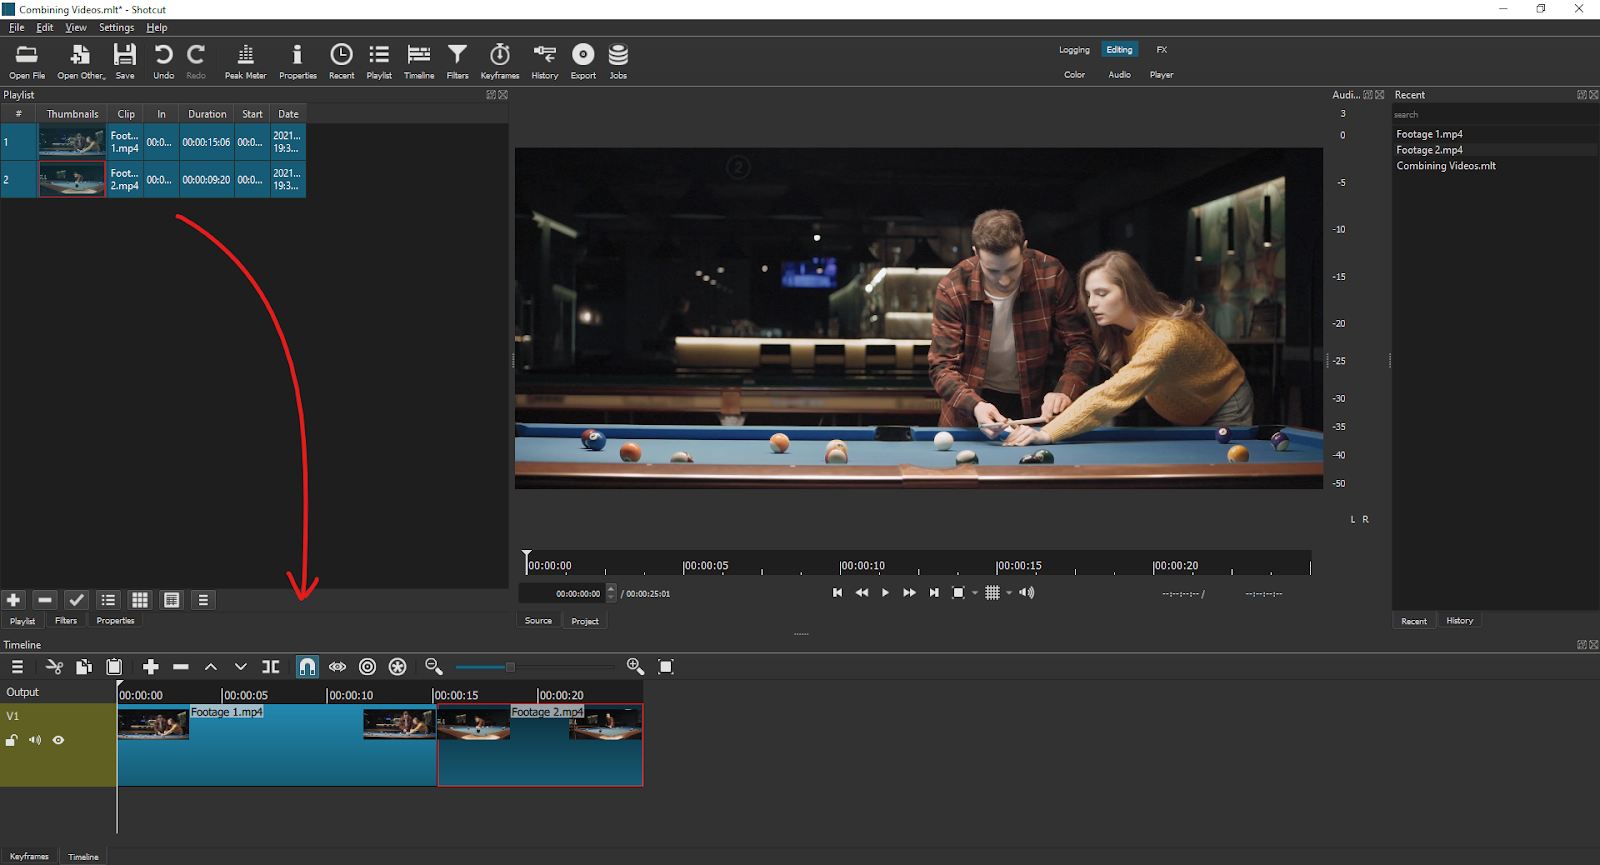
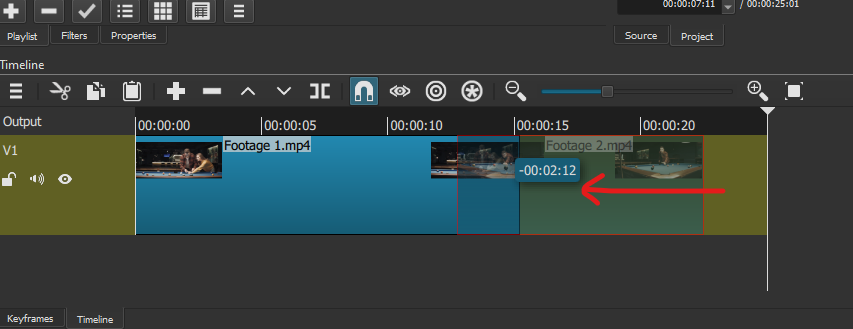
- If you aren’t satisfied with the arrangement of the clips, simply click and drag videos in the timeline to reposition them.
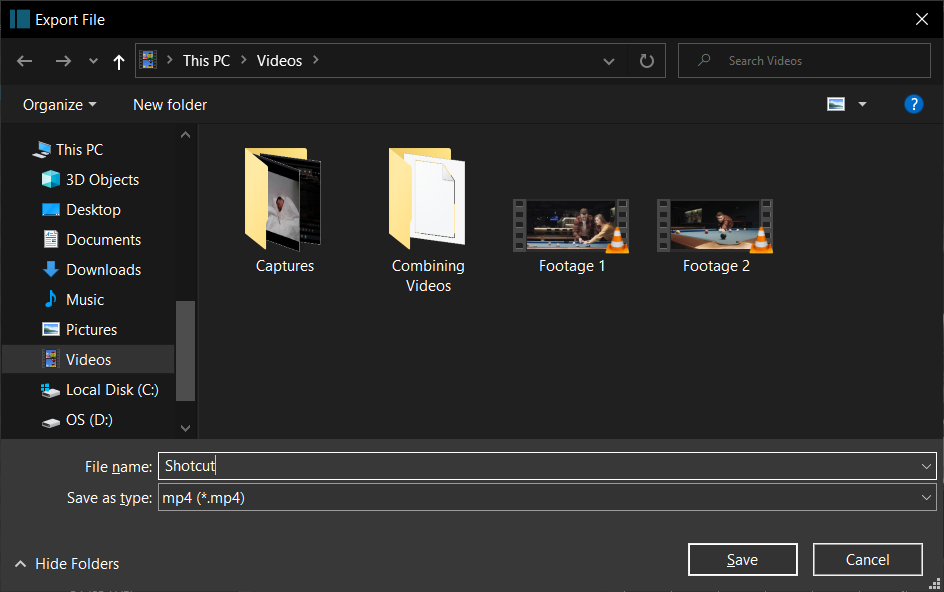
- Otherwise, if everything looks good, then it’s time to export. Click on the Export button at the top center area of your screen. Select the Default preset and then click on Export File down below.

Finally, save the file to your desired location.
I’ve uploaded the final render from Shotcut here. There’s no watermark on the video.
Plans and Pricing
Shotcut is the only video editor on this list that offers exclusively just a free plan. They don’t charge for anything and are largely supported by an open-source fanbase.
iMovie
When it comes to default video editors, iMovie takes the cake against Windows Movie Maker. This Mac program is simple to use and is surprisingly powerful, despite being such a linear experience. If you’re just looking to merge videos together on your Mac, then this is your best choice.
Note: Unfortunately, iMovie is not available for download on Windows and Linux.
Features and benefits from iMovie:
- Exports up to 1080p quality and more
- Free and comes pre-installed in Macs
- Intuitive, responsive, and easy to learn
Merging videos with iMovie:
- Start by opening up the iMovie application on your Mac.
- Import your video clips by clicking on Import Media or by dragging your files into the application.
- Once that’s there, simply drag your video clips into the timeline below. Make sure the clips are arranged in the order you want it to appear in your merged video.
- After that, press Command + A on your keyboard to highlight the entire timeline. Then, click on the Share button at the top-right corner of your screen. In the menu of choices, click on File.
- Here, you can change the file name, resolution, quality, and compression. When you’re satisfied with everything, click on Next.
- Finally, find the place to save your clip and then click on Save.
Plans and Pricing
iMovie is completely free for Mac users and comes pre-installed in the software. You don’t have to download or pay for anything to get exclusive access, iMovie is open from the get-go.
5 Practical Tips for Putting Your Video Clips Together
Making good videos is more than just putting a couple of clips next to each other. There are a ton of practical easy-to-do steps that you can use to make your videos look professional. These tips are simple yet often overlooked.
Create an Outline or Script for your Video First
It’s easier to edit a video when you know where video clips are supposed to go. It’s also easier for your viewers to follow the content when there’s a coherent structure to the video. Creating an outline for your video goes a long way in designing the attention of your viewers.
You don’t have to create a script of what you’re going to say. But keep things fluid and have a system, so that you know what’s next. A simple sticky note on your camera or tripod can go a long way!
Have a Hub to Store Your Content
Nothing’s worse than losing all your progress and work. What’s more? Losing your hard drive, accidentally deleting your files, or having your computer breakdown by some act of God. Point is, store your content and files somewhere in the cloud or in a DAM software, so you never have to worry about losing it again. Cloud VPS hosting solutions (such as ScalaHosting or HostArmada) are also good options, as they often include backup and enhanced security features, which are crucial for protecting your work.
VEED offers a free 2 GB cloud space for video files, so you can easily house multiple projects.
Add Music, Sound Effects and Filters to Video
Watching paint dry is soul-rippingly boring. But watching it while listening to your favorite tunes? Exhilarating. Music adds a lot of value to your videos, even in something as subtle as an instrumental track in the background. Add some sound effects to your videos or filters!
These are some of the best ways to keep your video exciting and your viewer’s eyes glued to the screen. Add music when you introduce b-roll to your videos as well as sound effects and zooms for funny moments.
Trim and Split out Filler Words
Have you ever — uhh — tried listening to a beginner YouTuber? Amateurly edited videos all have one thing in common. “Uhm”. Taking the time to edit out and trim filler words like “uhh” and “uhm” goes a long way to keeping viewer retention and making your videos succinct.
Of course, there’s a stylistic choice when you want to keep those in. But generally, it’s a better move to remove as many filler words as possible. These awkward pauses make your viewers feel like their time is wasted. Attention is expensive these days, so keep people interested by being succinct where it matters.
Repurpose and Distribute
Advertising your video through social media is a great way to attract new viewers. However, the aspect ratio and sizes are different on Twitter, Facebook, and Instagram. Repurpose and distribute the same video clips by resizing your videos! You can do this easily with VEED to make the same video work for every major social media platform.
Frequently Asked Questions
How do I combine multiple videos in one?
You can use multiple programs like VEED, InShot, and Shotcut to combine multiple videos into one. The best part is that you can do this on your browser, computer, or mobile phone.
Can I combine videos without a video editor?
You can combine videos without a video editor by using a Cmd (Command Prompt) command that concatenates or combines videos of the same file type all into one video. This works for music files as well.
How can I combine multiple videos online?
You can combine multiple videos online with VEED, the best online video editor in the market. You don’t need an account to edit with VEED and the program supports HD quality.
Conclusion
Here’s a short conclusion for those of you debating about which application to use.
- What's a powerful video editor to merge multiple videos? VEED
- What's the best video editor to edit on the go on my phone? InShot
- What's the best online editor so that I can edit everywhere? VEED
Although desktop editors are still more powerful, browser editors are simply more convenient. Programs like VEED are simplistic, easy to understand, and straightforward to use. Beginners with no creative background can make and edit their first video easily.
If you want to edit without a sweat, give browser editors a try. VEED is a great place to start!


