
Have you ever watched the BTS footage of movies like Alice in Wonderland and Avatar?
It’s amazing how a simple green screen and chromakey can transport characters standing against basic backdrops into out-of-the-world settings — all without blowing your budget. But what exactly is a green screen and how can you use one to make your videos more fab?
Let’s find out.
Jump to a specific section:
[#TOC1]What is a Green Screen?[#TOC1]
A green screen is quite literally a large green backdrop that serves as a background placeholder to allow for adding visual effects or VFX to your videos later. It provides a blank canvas for creating professional and engaging videos using chroma keying or compositing, a post-production technique where a specific color is removed and replaced with another image.
Think of it as combining two separate frames:
- the subjects in front of the green screen (during filming/shooting)
- the special effects added to the green screen (post-shooting/while editing)
Chroma keying is how Hollywood makes actors appear in crazy places or create awesome special effects!
Green screens are commonly used in film and music video production, news and weather reporting, and video games. But lately, more content creators and marketers are using them to create impactful videos and grab the viewer’s attention. Even educators are finding a green screen handy to make their lesson videos more impressionable.
Green vs. Blue Screen: Which is Right for Me? When deciding between a green screen and a blue screen, consider the subject color and lighting conditions. Opt for the opposite color of your subject (e.g., green color for blue elements, and vice versa). If you have control over the lighting, choose a screen color that contrasts well. Many prefer green screens as they match human skin tones and costumes more commonly than blue. Green also appears cleaner and more vibrant in digital images, reducing image noise.
Some Important Green Screen-Related Terms
To better understand how green screens work, you must familiarize yourself with a few key terms. Here are some important jargon you should know about:
- Keying: Keying is a cool video production trick used in movies that involves isolating a specific color or range of colors in the footage, making it transparent. It's often used with green screens or blue screens to replace the removed color with a different virtual background or cool effects.
- Luma Keying: Luma keying or luminance keying removes or replaces parts of the green screen video based on brightness values (aka luminance) instead of specific colors. Unlike other keying techniques, it doesn't target a particular color, but rather removes pixels based on their brightness levels. This separation of foreground and background based on brightness differences allows for background replacement or compositing.
- Color Spill: Color spill is when the background color reflects onto the subject or objects in the foreground during chroma keying. It happens because light bounces off the green or blue screen and tints the subject's edges with the background color. This is an unwanted effect that may require extra post-production work to fix or remove the tinted areas.
[#TOC2]How to Use a Green Screen in Your Videos?[#TOC2]
Now for the fun part.
Using a green screen in your videos is super simple. Here’s how to get started.
1. Get a Smooth Green Screen
For optimal green screen results, make sure your screen is smooth and flawless. Check for blemishes, creases, and tears that can mess up your keying.
- Blemishes like marks or stains cause color irregularities, leading to difficulties in achieving a clean key.
- Creases or wrinkles create uneven lighting and shadows, making it challenging to achieve a seamless composite.
- Tears or holes allow light to pass through, affecting the integrity of the keying process and potentially causing unwanted shadows.
To keep your green screen smooth, inspect it carefully for damage or wear. Store it properly to prevent creases and permanent wrinkles. When setting up the screen, take care to stretch it tightly and remove any visible blemishes or dirt. Also, use proper lighting techniques to minimize shadows and ensure even illumination.
2. Make Sure Your Green Screen is Well-Lit
When working with green screen backgrounds, make sure your green screen has ample lighting. Here are the prerequisites:
- Separate Lighting: Light the green screen and the subject(s) separately using dedicated lights or light sources. This is to minimize shadows from the subject appearing on the green screen. This also creates a clean separation between the subject and the green screen background during keying.
- Even Lighting: Aim for uniform lighting across the entire green screen by strategically positioning multiple lights or light sources. This avoids hotspots and uneven brightness, resulting in a smooth and evenly lit green screen. This consistency will help you obtain a more accurate key, reducing the chances of uneven color spill or artifacts during post-production.
- Shadow Control: Shadows can pose challenges during keying, as they can introduce inconsistencies or unwanted elements onto the green screen. Position lights effectively to minimize shadows or use fill lights to soften harsh shadows. By controlling shadows, you improve the overall quality of the key and get cleaner separation between the subject and the background.
Here are a few additional tips to ensure well-lit green screen backgrounds:
- Use Soft lighting: Softboxes or diffusers help create a smooth and even light spread. They reduce harsh shadows and create a more pleasing result.
- Recommended Lights: Professional options include dedicated studio lights, such as fluorescent or LED panel lights, which provide consistent illumination. These can be costly but offer precise control.
- Budget-Friendly Alternatives: If you're on a tight budget, consider shooting near a big window for plenty of natural light or using inexpensive clamp lights/work lights with daylight-balanced bulbs. Diffuse the light and adjust positioning for even lighting on the green screen.
3. Chroma Key with VEED

A clean chroma key is crucial for sharp and well-defined subject edges with no color spills. And while this ensures seamless background removal and professional compositions, it's a tedious process without the right tools. Luckily, VEED's online chroma key editor makes chroma keying simple and effective, giving you professional-looking clips within minutes.
Here's how to use Chroma Key in VEED:
1. On the Chroma Key page, click on Choose Video.

2. You'll be redirected to VEED’s online editor and prompted to upload your video file. Here, you can import from your device, use a Dropbox link, or record fresh content.

3. After uploading your video, open the Edit Video tab by clicking on the video in the editor.

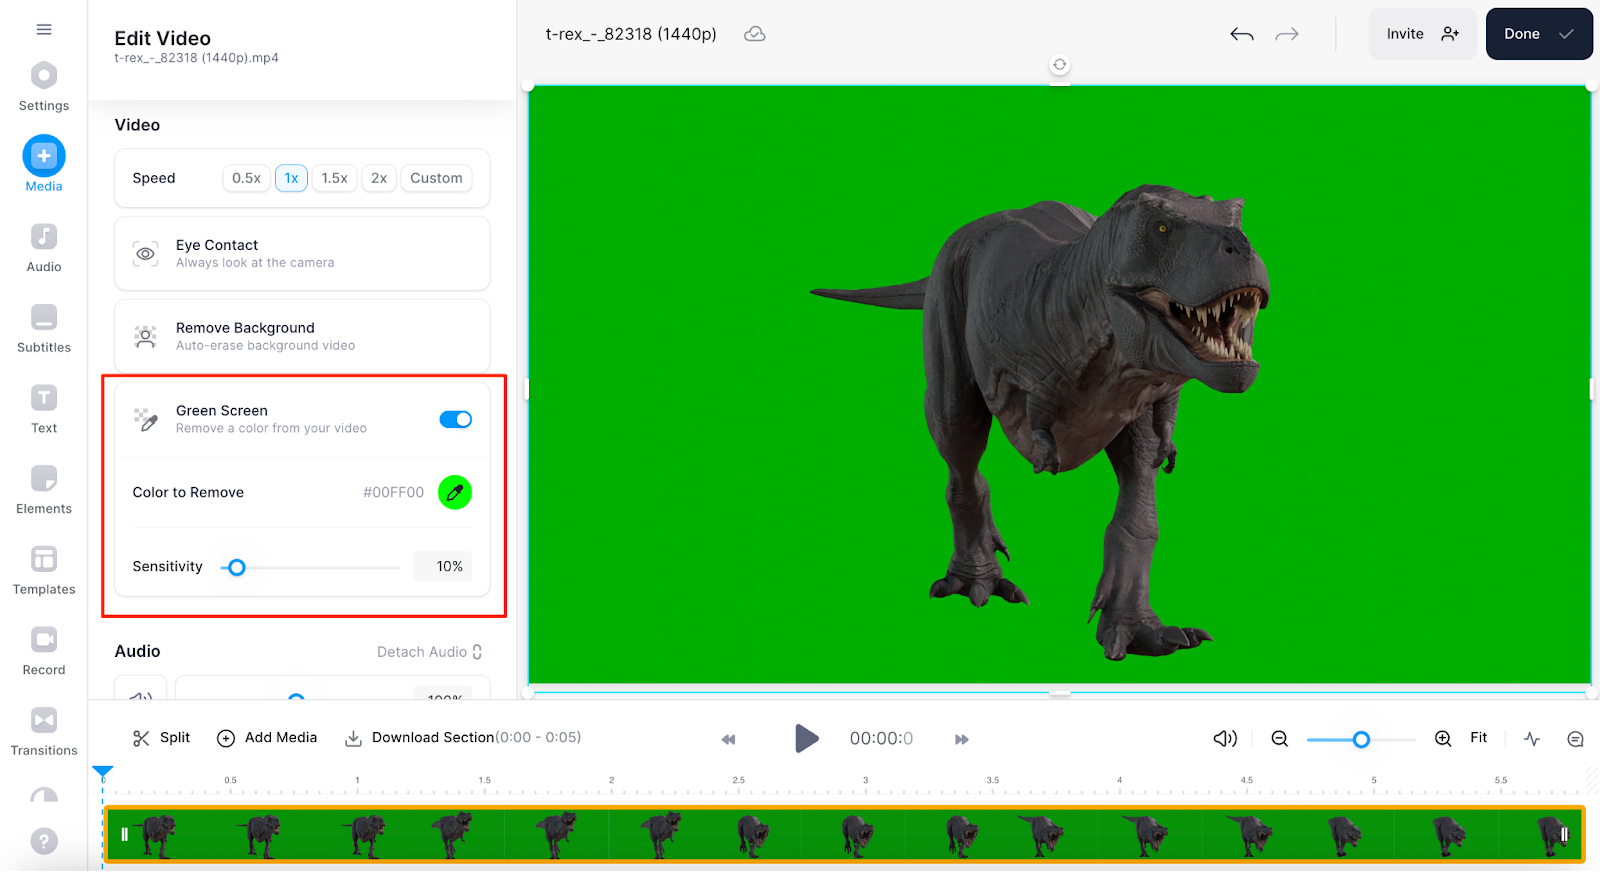
4. Next, click on Green Screen located under the Remove Background button. The editor will automatically key your footage and remove the green screen.
4. Continue Editing Your Video as Needed
What makes VEED really cool is that after editing the green screen footage, you can seamlessly continue editing. Choose from a range of additional features and tools to further enhance your video editing experience, including:
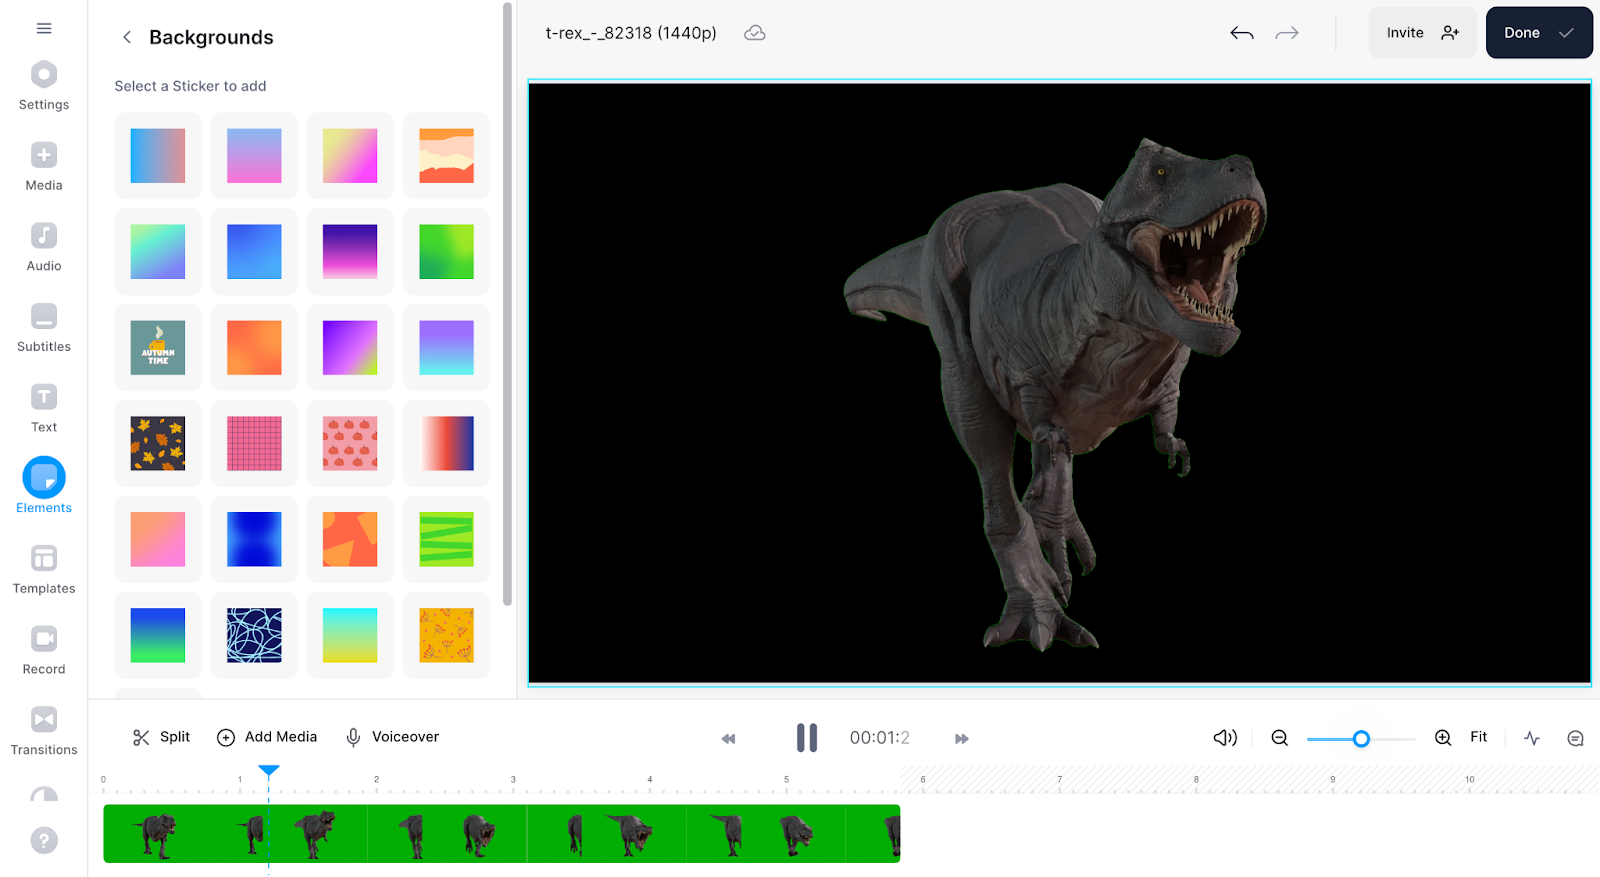
- Add a New Background: Go to Elements and select Background to easily enhance your video. Choose from a variety of background options to give your video a polished look and feel.
- Magic Cut: With just a single click, remove outtakes, mistakes, repetitions, and filler words from your video. The Magic Cut feature streamlines the editing process, saving you time and ensuring a polished final result.
Check out our YouTube video to learn how to use VEED's Magic Cut feature.
- Auto Subtitles: Enhance your video's accessibility by adding and editing subtitles with the help of AI. VEED's Auto Subtitles feature intelligently generates accurate subtitles, making your content more inclusive and reaching a wider audience.
And a lot more!
Click on Done, then choose the export quality that suits your needs. Then, select Export Video to finalize the process. If you haven’t signed up for (or logged into) VEED, you’ll be prompted to do so at this point. After that, you can share or download your video.
[#TOC3]Can I Make a Green Screen Myself?[#TOC3]
Yes, you can make a green screen yourself — and you certainly don't need a huge budget or complicated equipment to begin. Here's a short step-by-step DIY tutorial to create and use your own green screen:
1. Set Up Your Green Screen Backdrop
Find a large piece of fabric or material in a lively shade of green. Muslin works great, giving you that vibrant color you're after. Also, look for a matte finish to minimize those pesky reflections. If hanging cloth is too much hassle, opt for a collapsible green screen panel from Amazon. It's also a nifty option, especially if you're always on the go for your shoots.
Pro tip: When positioning yourself in front of the green screen, make sure to stand about two or three feet away from the backdrop. This helps to prevent any unwanted shadows from creeping in. Also, remember to keep your hands close to your body during filming to avoid them being cut off in the final video.
2. Get a Camera with HD Support
When it comes to picking a camera or webcam, go for one that can capture high-definition (HD) video with a resolution of 720p or higher. Aim for a decent frame rate of 24 fps or above to ensure smooth and professional-looking footage.
Don't forget to check that the camera saves files in a format compatible with your green screen software (won't be an issue if you use VEED, which supports nearly all the popular video formats 😉), so you can seamlessly work with your recordings.
Using your smartphone, like an iPhone, is a great option too! They often deliver fantastic video quality and are super convenient. Most digital camcorders will do the trick just as well.
3. Ensure the Right Green Screen Lighting
Shadows can be tricky, so aim for a well-lit background that will make your subject — and you — shine. Opt for a flat green background, as it's easier to remove during post-production. For more advanced lighting, consider upgrading with a couple of hardware store clamp-on work lights equipped with high-output LED bulbs.
The key is to evenly light the green screen, avoiding any dark or bright patches. Focus on the area directly behind the person you're shooting, as you can crop out excess space later. You can also build your own DIY video lighting rig or try video softboxes for a professional touch.
Keep an eye out for continuous lighting options and remember to use diffusion filters to remove any sneaky shadows.
4. Use the Right Key or Video Editing Software
Next, you'll need a video editor or keying software to remove your DIY green screen. And that's where VEED comes in.
With VEED, you have the power to transform your greenscreen background into a blank canvas, a captivating image, or even a dynamic slide — all with just a few clicks. And the best part? No advanced skills are required! You also gain access to a vast collection of high-quality free video templates, themes, elements, and transitions. Whether you're a solo creator or part of a marketing team, you can edit videos seamlessly with VEED.
Ready to Green Screen?
With proper planning, you can add amazing special effects to your video content, no matter your budget or project size. And now that you have all the tips (and VEED!), you'll become a green background pro in no time.
Go ahead, bring your ideas to life and create unforgettable visuals for your audience.


