![What is an SRT File? How to Create & Upload SRT Files [Complete Guide]](https://cdn.prod.website-files.com/616e938268c8f0a92cb2b540/69dc5cfb640f4c53ceca77ec_How%20to%20create%20and%20upload%20SRT%20files.jpg)
- SRT is the universal subtitle format — one file works everywhere. SubRip (.srt) files are plain text, compatible with YouTube, Facebook, LinkedIn, and most other platforms. Creating one file means you don't have to rebuild subtitles separately for every channel you publish to.
- Captions are a direct engagement driver, not just an accessibility feature. Most social video is watched without sound — subtitles keep viewers engaged regardless of their environment. VEED lets you auto-generate, edit, translate, and download an SRT file in minutes, without technical knowledge.
- SEO benefits are real and measurable. Search engines index caption text. Uploading an SRT file to YouTube gives Google the ability to crawl your video's spoken content as keywords, improving your chances of ranking in search and appearing as a featured snippet.
Videos need subtitles. These texts allow viewers to visually connect with your content, regardless of whether they’re watching a Parasite on Netflix, PewDiePie's latest antics on YouTube, or Jimmy Fallon on Facebook.
Plus, every viewer has unique preferences. Some like to keep their audio off; some prefer reading captions as well as hearing the audio. To cater to these individual tastes, you need inclusive videos that resonate better with the audience—something that adding SRT files make possible.
SRT files, also known as the SubRip Subtitle files, are a plain-text file that lets you edit and control exactly what gets displayed on your viewer’s screen. They contain critical information related to your video captions, like the start and end timestamps of your text and the sequential number of subtitles.
Ever wondered how the video text always matches the audio? Now you know the answer.
SRT files boost your engagement on social media, expand your global reach, and improve your YouTube video SEO. Here's why captions matter for your video performance:
- According to Facebook's internal research, adding captions to videos boosts average view time by 12% — and 85% of Facebook videos are watched without sound, meaning captions are often the only way your message gets through.
- The 2019 Verizon Media and Publicis study (5,616 US adults) found that 80% of consumers are more likely to watch an entire video when captions are available.
- Captions feed search engines. Uploading an SRT file to YouTube enables Google to index your spoken content as searchable text — directly improving your video's chances of ranking in search results and appearing as a featured snippet.
Excited to know more? Here's a 5-second overview of how to create an SRT file:
- Sign up for a VEED account.
- Select Create New Project on the main dashboard.
- Upload your final video from your device or Dropbox. You can also paste a YouTube link or record a brand-new video.
- Select Subtitles on the side toolbar and click Auto-Transcribe to generate captions.
- Choose the language your video is in to start generating captions.
- Do a quick spelling and grammar check. VEED flags low-confidence words automatically — start there.
- Go to Options and click Download Subtitles → .srt to download the file.
What is an SRT file?

An SRT file (short for SubRip Subtitle) is a plain text file that contains the captions for a video plus the timestamps that tell the player when each line should appear and disappear. It's the most universally supported subtitle format — works in YouTube, Facebook, LinkedIn, Vimeo, VLC, Premiere, Final Cut, DaVinci Resolve, and almost every other video tool.
SRT files are popular because they're plain text. Any tool can read or write them, they're compact (a 2-hour movie's full subtitle file is usually under 100 KB), and they're easy to edit by hand — open in any text editor and fix typos directly.
SRT file example: what does an SRT file look like?
Here's what an SRT file looks like for a short clip — three subtitle entries with timestamps and text:
1
00:00:00,200 --> 00:00:02,600
So this is a video example
2
00:00:02,700 --> 00:00:05,400
and I just want to show you
3
00:00:05,500 --> 00:00:09,000
how an SRT file is structured.
Every SRT entry has four parts:
- Numbered section (1, 2, 3) — indicates the order of the captions on screen.
- Starting and ending timestamps (00:00:00,200 --> 00:00:02,600) — tell the video player when to display and remove the text. Format is hours:minutes:seconds,milliseconds.
- Caption text — the actual line that appears on screen during the timestamp window.
- Blank line — separates each entry from the next. Required.
3 Best Ways to Create SRT Files (Based on your budget and trime available)
An SRT file is a simple, DIY solution for adding subtitles to your video content, but it can feel overwhelming if you don’t have the right guidance—or the tools.
Below is the list of the top three best ways to create SRT files based on your budget and availability.
#1 TextEdit/Notepad: If you’re on a zero dollar budget and don’t mind having to type things out
If you don’t have the budget to buy a premium video editor, you can use the good ol’ text editor on your computer. Mac users have TextEdit pre-downloaded on their devices, while Windows users can use Notepad.
Disclaimer: This method can get long depending on the video length. So make sure you clear your schedule and are prepared to type—a lot!
For Mac Users:
- Open TextEdit on your Macbook.
- Type the number 1 to indicate the start of the first caption sequence. Then press Enter.
- Type the beginning and ending timecode for this section using the following format: hours:minutes:seconds,milliseconds – -> hours:minutes:seconds,milliseconds
- Press Enter.
- In the next line, start typing your captions. Generally, it’s best to limit your subtitles to 32 characters, with two lines for every caption, to avoid overwhelming the viewer. Also, nobody likes a cluttered screen. Many of these principles mirror best practices in website design, where clarity, spacing, and readability are essential to a good user experience.
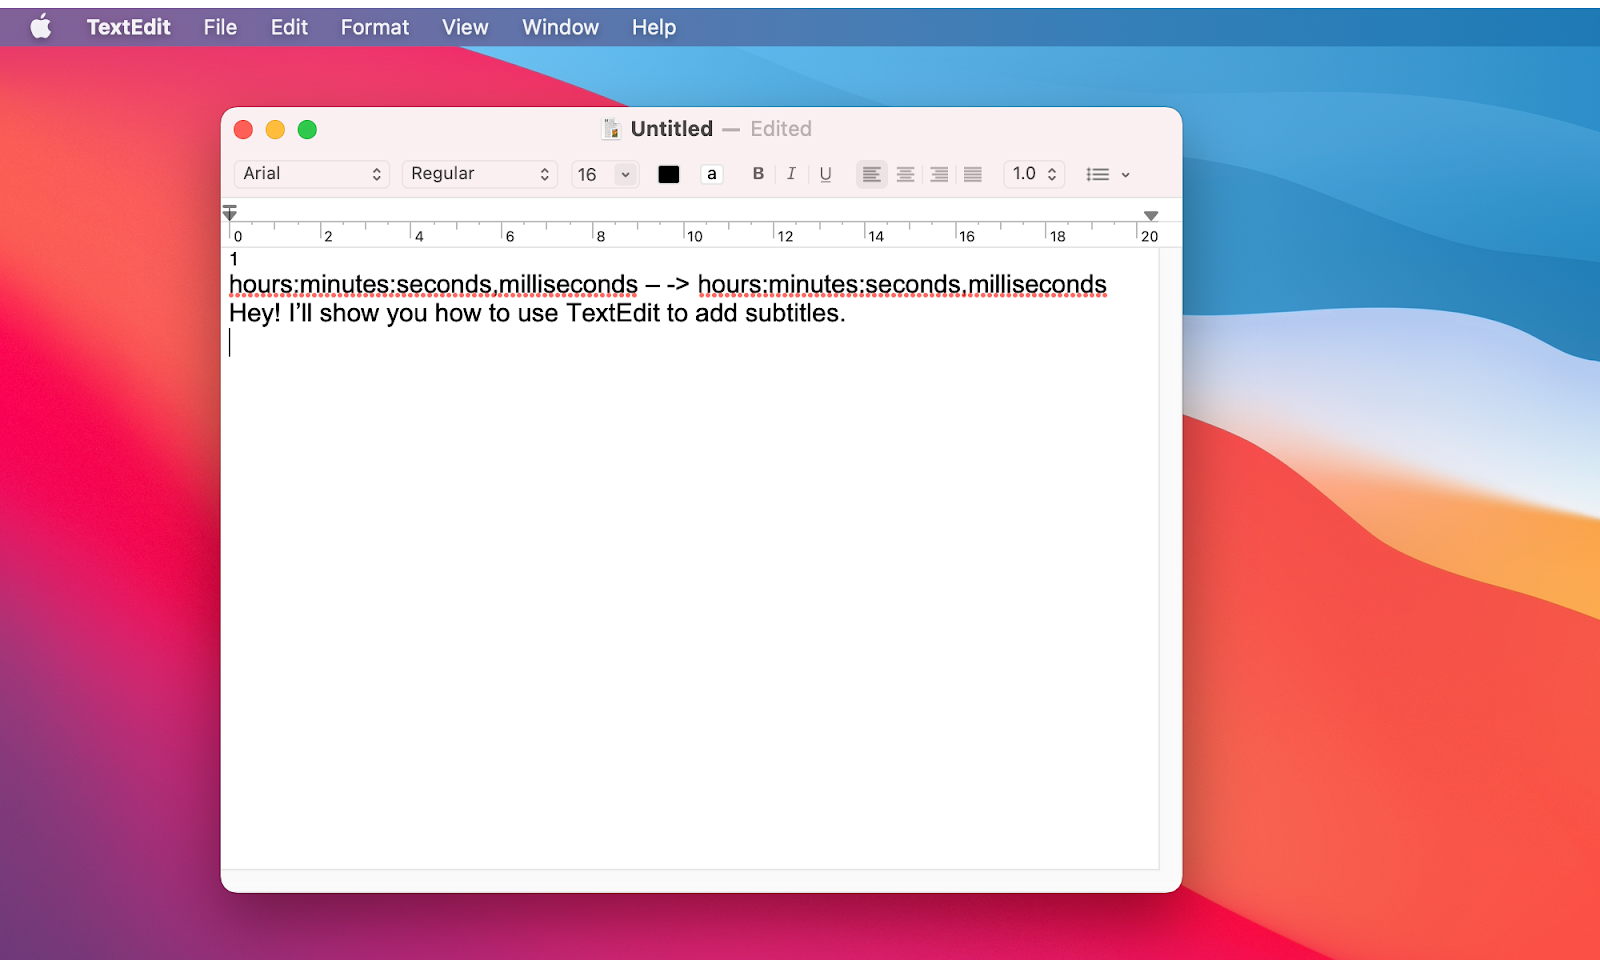
- Once you’re finished typing the last line of text in the sequence, press Enter twice. Make sure you leave a blank line before starting a new caption sequence.
- Type the number 2 after the blank line. This will indicate the beginning of the second caption sequence.

- Repeat the above steps until you complete your transcript.
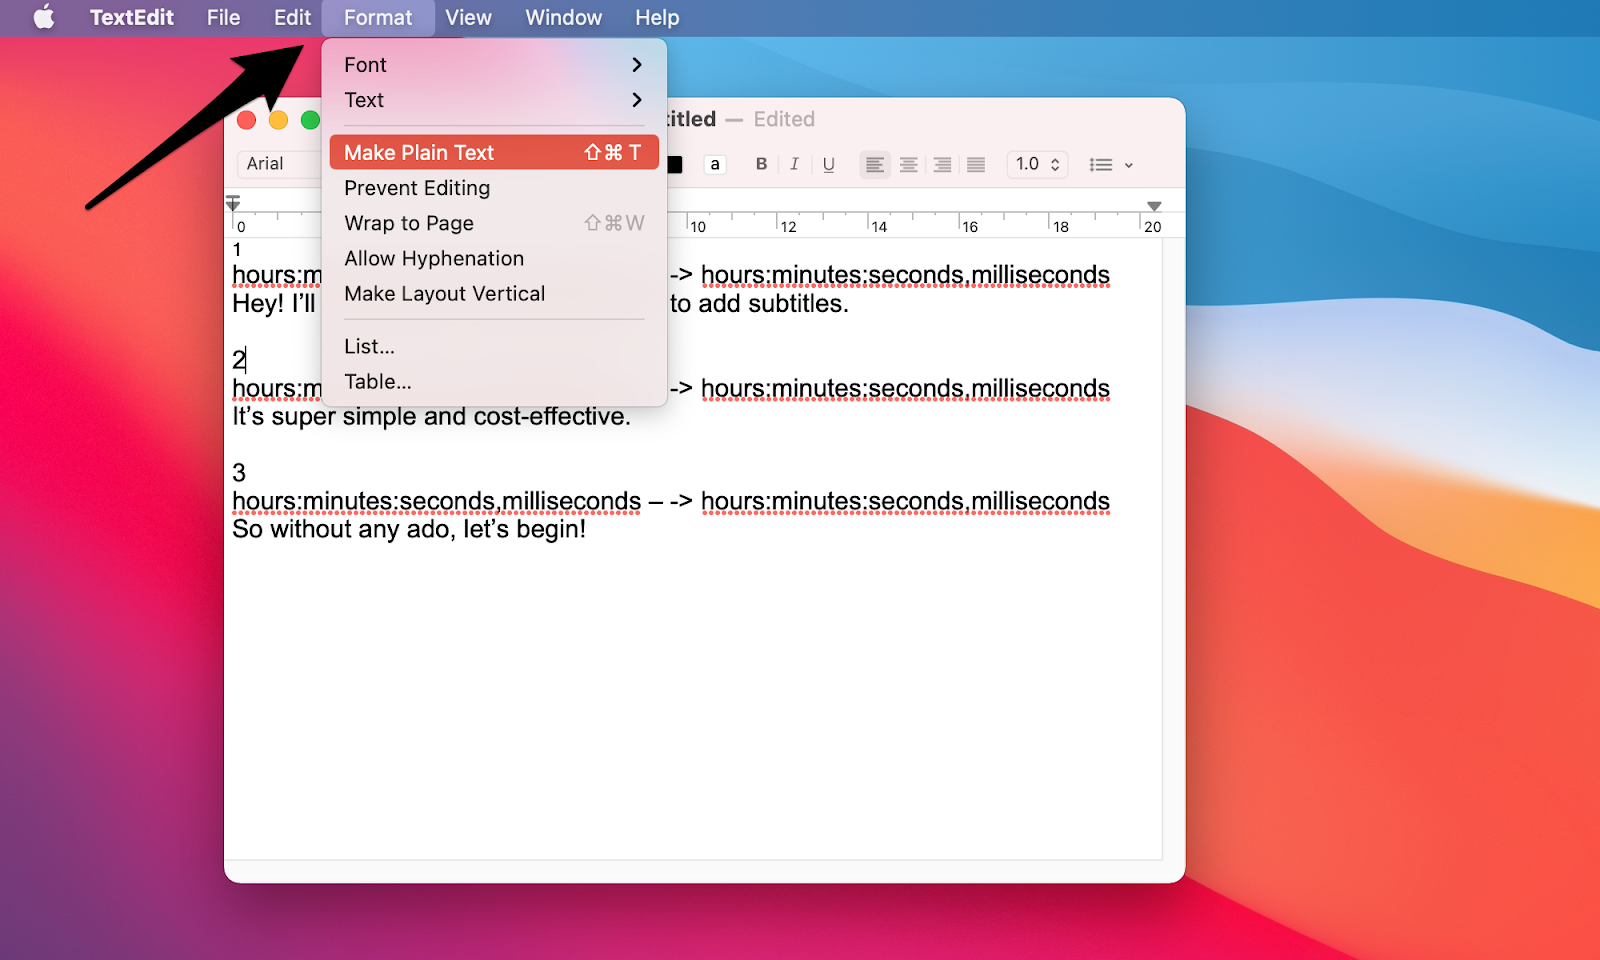
- Next, you have to save your file as an .srt. Click on Format, followed by Make Plain Text on the top menu bar. Click OK.
- Select File and then Save. Under the Save as option, type the name of your file before changing the file extension from .txt to .srt. Uncheck If no extension is provided, use “.txt”. Finally, select Save.
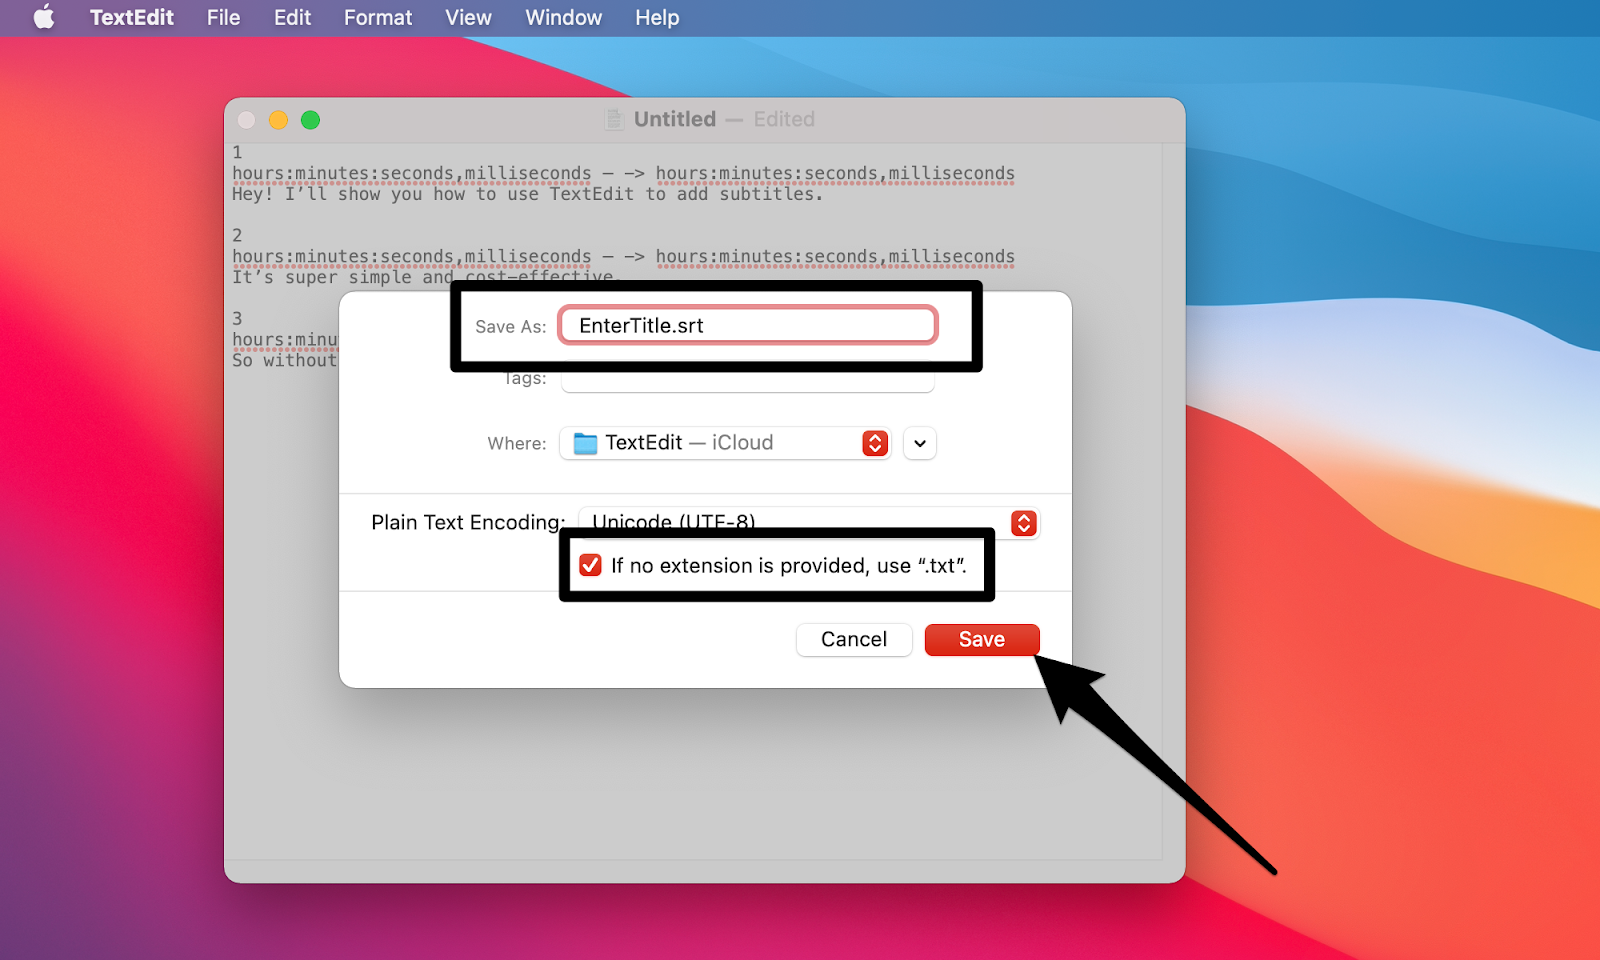
Congratulations! You can now upload closed captions to your videos.
For Windows Users:
Creating an SRT file for Windows is similar to Mac. No joke. The only difference is that instead of TextEdit, you use Notepad.
Here's what the format should look like when you create an SRT file on TextEdit or Notepad:
[Section of subtitles number]
[Time the subtitle is displayed begins] –> [Time the subtitle is displayed ends]
[Subtitle]
To get the timestamp formatting right, show:
[hours]: [minutes]: [seconds], [milliseconds]
What else can TextEdit or Notepad do?
TextEdit and Notepad are just what you expect them to be: a simple text editor where you type. Nothing fancy.
- Collaborative Editing: Feeling tired doing all the typing? No biggie, you can have someone else from your take over.
- Coding Capabilities: TextEdit offers coding features, such as syntax highlighting, autocompletion, find and replace, and so on. Not that you'll need them, but we just wanted to let you know.
Pros and cons of TextEdit / Notepad
Pros:
- Completely free — no signup, no install beyond what's already on your computer.
- No internet required.
- Full control over every line.
Cons:
- Massively time-consuming. Typing out a 10-minute video with timestamps can take well over an hour.
- No video preview — you can't see how captions land in context as you write.
- Easy to make timing errors that are hard to debug without a visual editor.
- Best fit only for short clips, scripts you've already prepared, or one-off corrections to an existing SRT file.
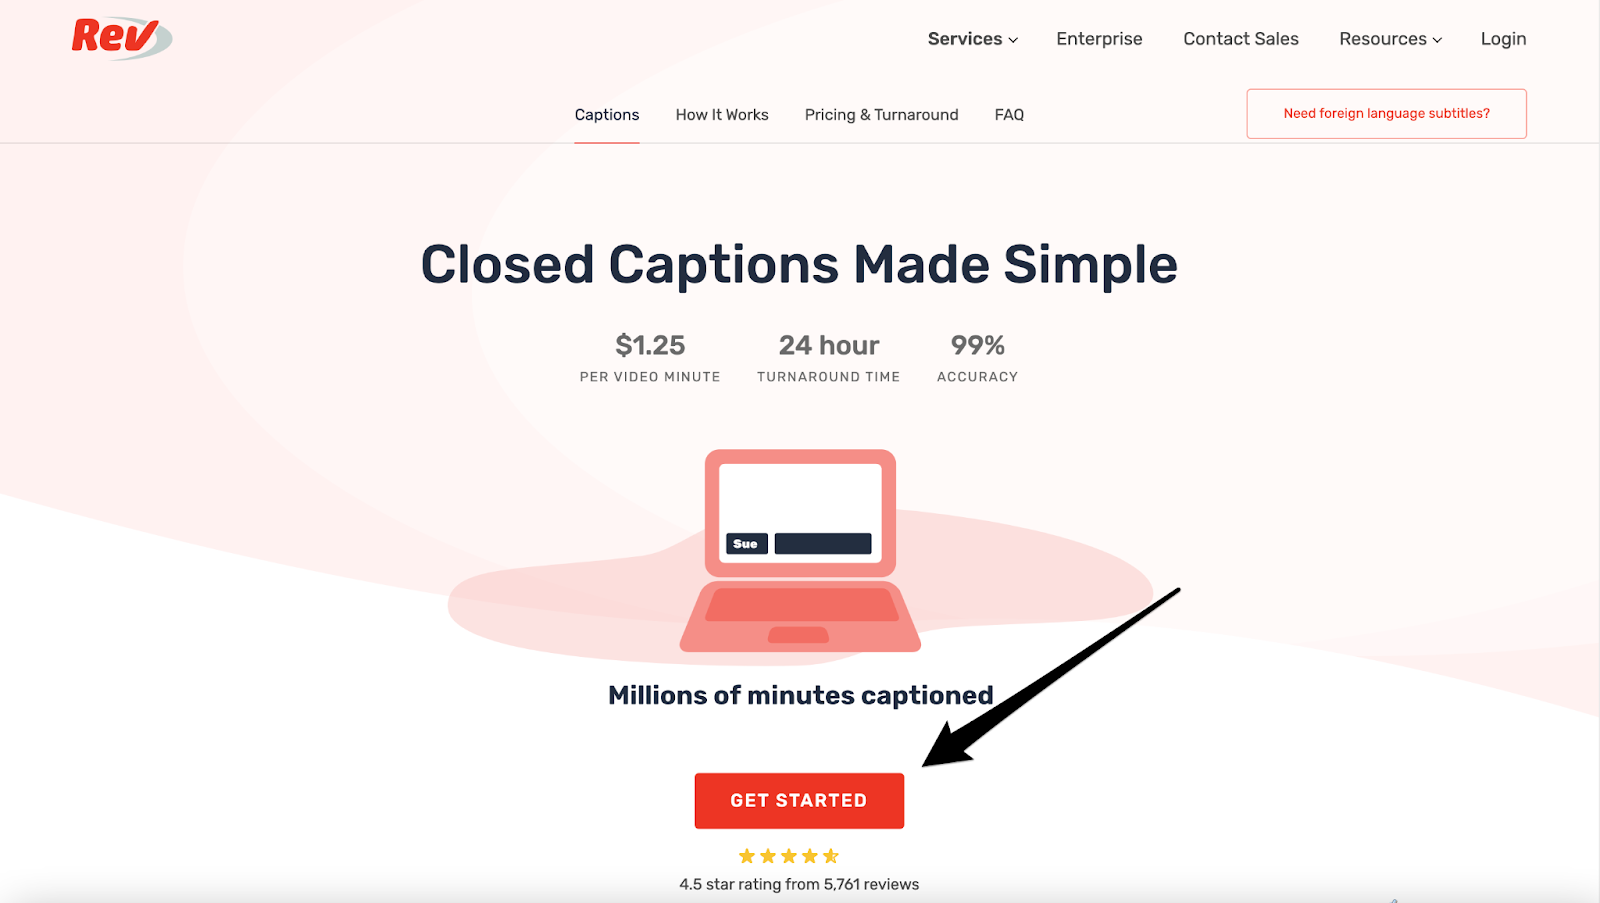
#2 Rev: If you want the SRT file as accurate as possible, want to save time, and have a higher budget to be billed on a per-minute basis
Rev is a professional transcription service that delivers SRT files using human transcribers. It's the strongest fit when you need maximum accuracy for high-stakes content — legal recordings, medical content, complex multi-speaker interviews, or anything where automated tools struggle. It's billed per minute of video, so cost scales with content length.
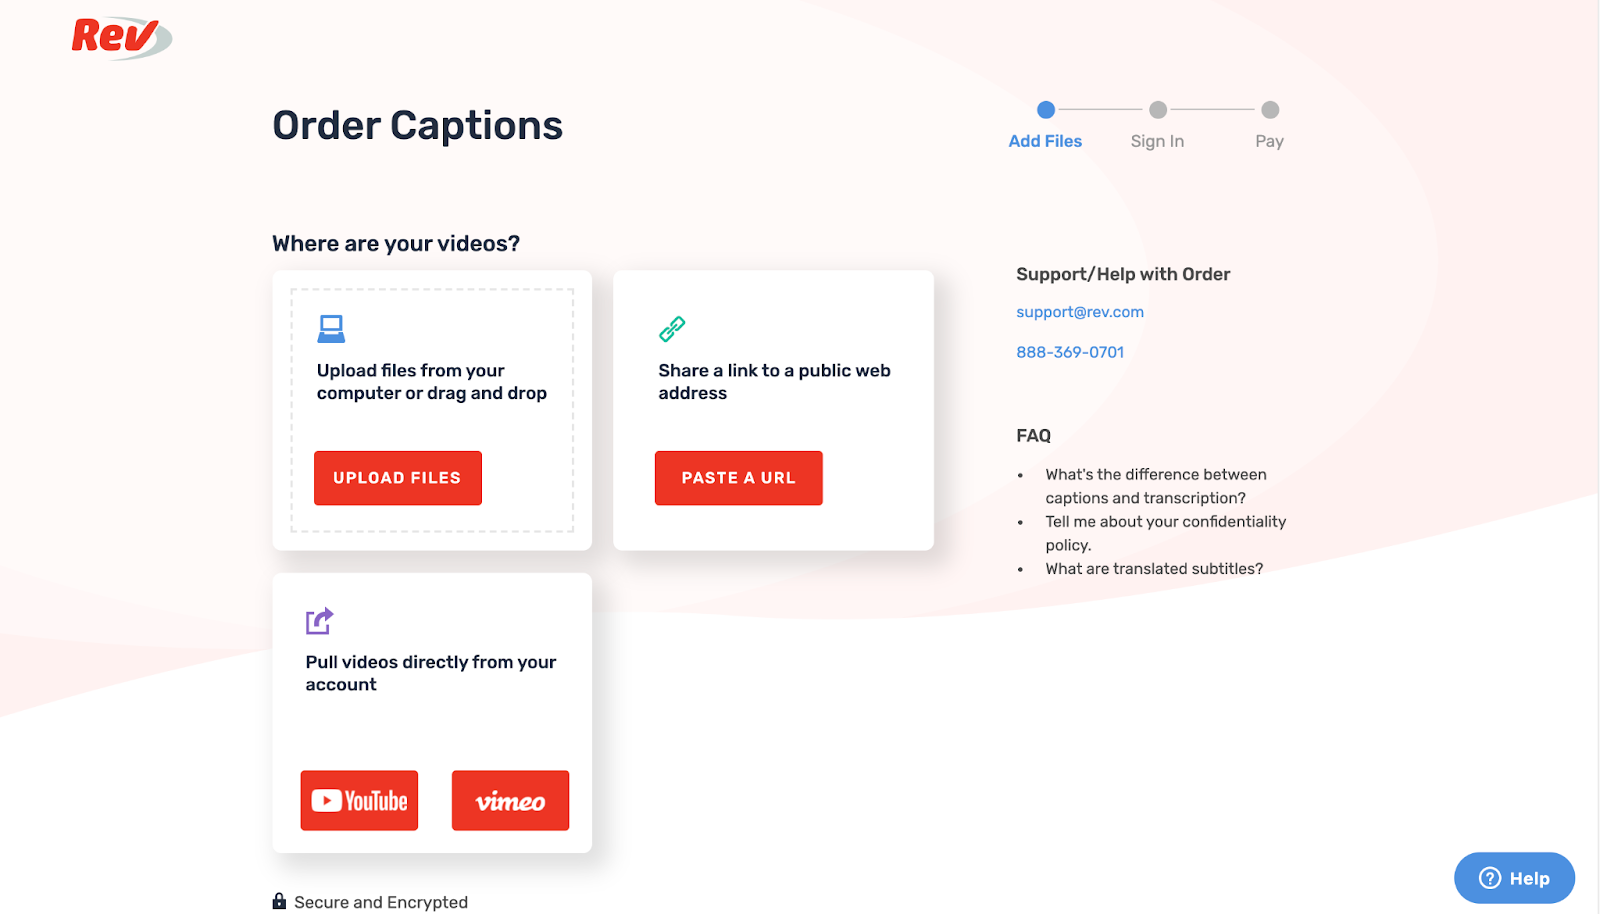
With Rev, you place an order for video closed captions or subtitles, and a vetted team of native freelancers transcribes your video in SRT format. You can send the video by uploading it from your computer, sharing a public URL, or automating uploads with their API or Zapier integration.
To create an SRT file with Rev:
- Go to Rev’s Caption service page and select Get Started.
- Decide how you want to share your video. You can either upload your file from your computer or paste a public web address. Alternatively, you can also upload videos directly from YouTube or Vimeo.
- After adding the video, all that’s left is to pay. Keep in mind your total is calculated at $1.25 per minute, so the longer your video, the higher the charge. Click on the Checkout button to finalize the deal.

Rev's freelancers will then deliver a near-99% accurate SRT file. The Output File Format is set to SubRip (.srt) on the Checkout page by default.
When Rev is the right pick
Use Rev when accuracy is non-negotiable and budget allows: legal depositions, medical training videos, journalism, accessibility for live events, or anything where automated tools have failed you. For most marketing video, social content, and explainer content, browser-based AI transcription will be much faster and cheaper at near-equivalent accuracy.
#3 VEED: browser-based, AI-powered, fast
VEED is the AI video creation platform built to grow your brand on social. The auto subtitle generator creates SRT files from any video upload in your browser, in 125+ languages, with up to 99.9% accuracy on clear audio. No install, no software to learn.
From business presentations to review videos to vlogs, you can use VEED to edit and enhance — even with zero video editing experience. Here's a step-by-step breakdown of how to create an SRT file using VEED:
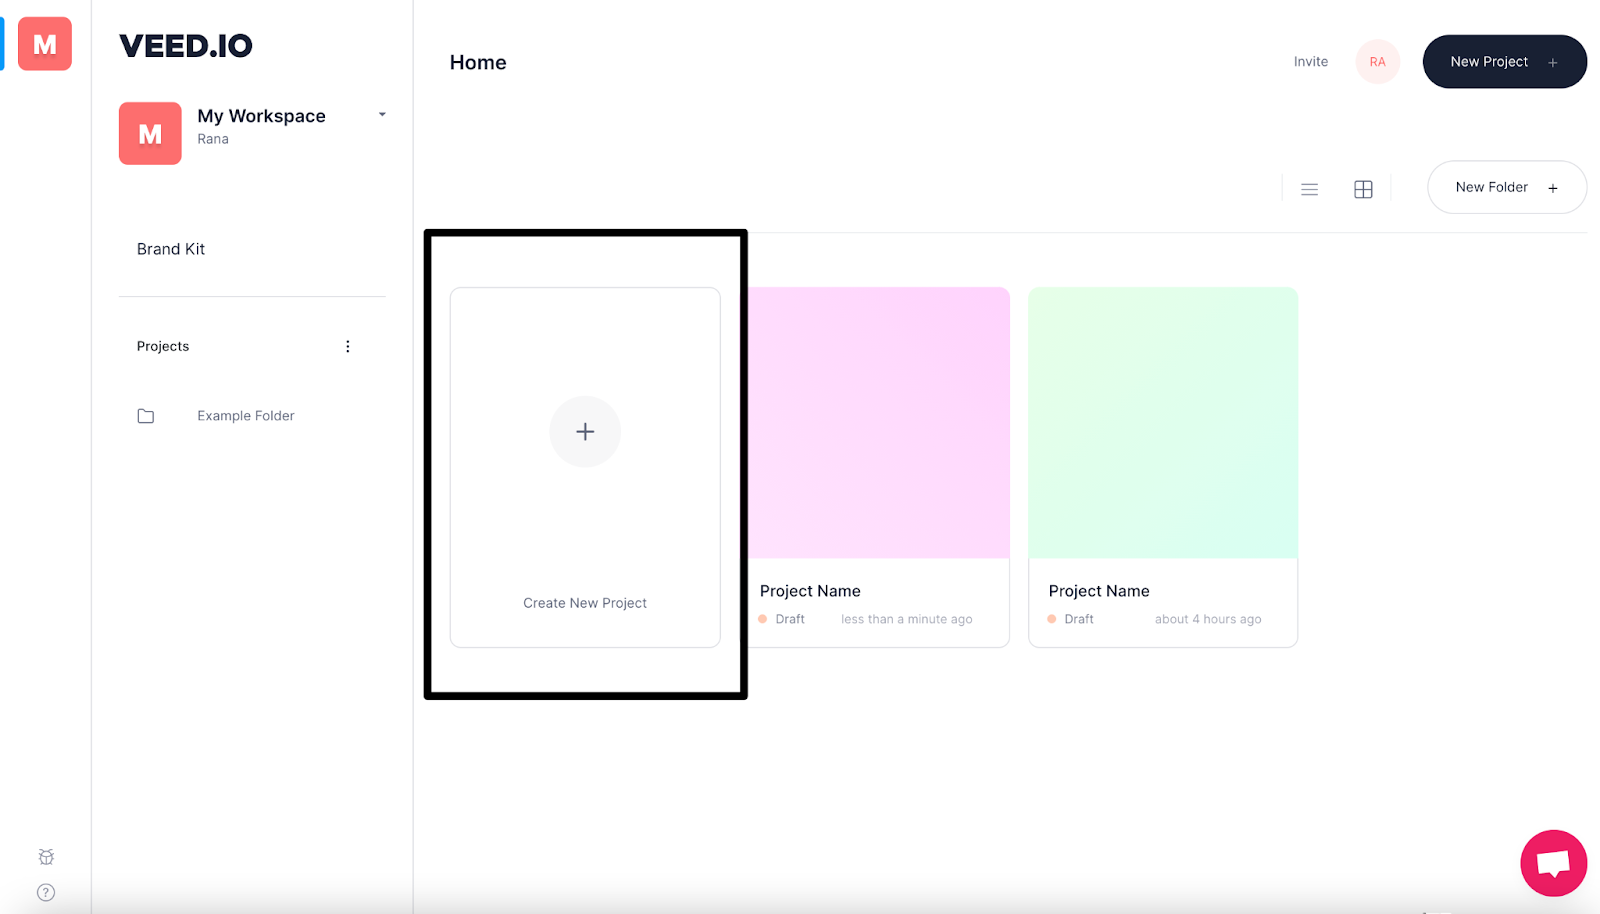
- Click here to make a free VEED account. The platform offers a magic link registration, which makes signup super fast and convenient.
- Select Create New Project from the main dashboard. Try to upload a video in its final form, with all the edits and cuts being taken care of. If you edit the video after making the SRT file, the timestamps will no longer match the actual video.
Note: You may also click on Upload Your Video directly from VEED's website and create your account during the process.
- Upload the video directly from your device or Dropbox. Pasting a YouTube link or recording a brand-new video—something that can be incredibly handy for vloggers—is also possible. Convenient, right?
- Once uploading is complete, click on Subtitles on the toolbar on your left, and then select Auto Transcribe.
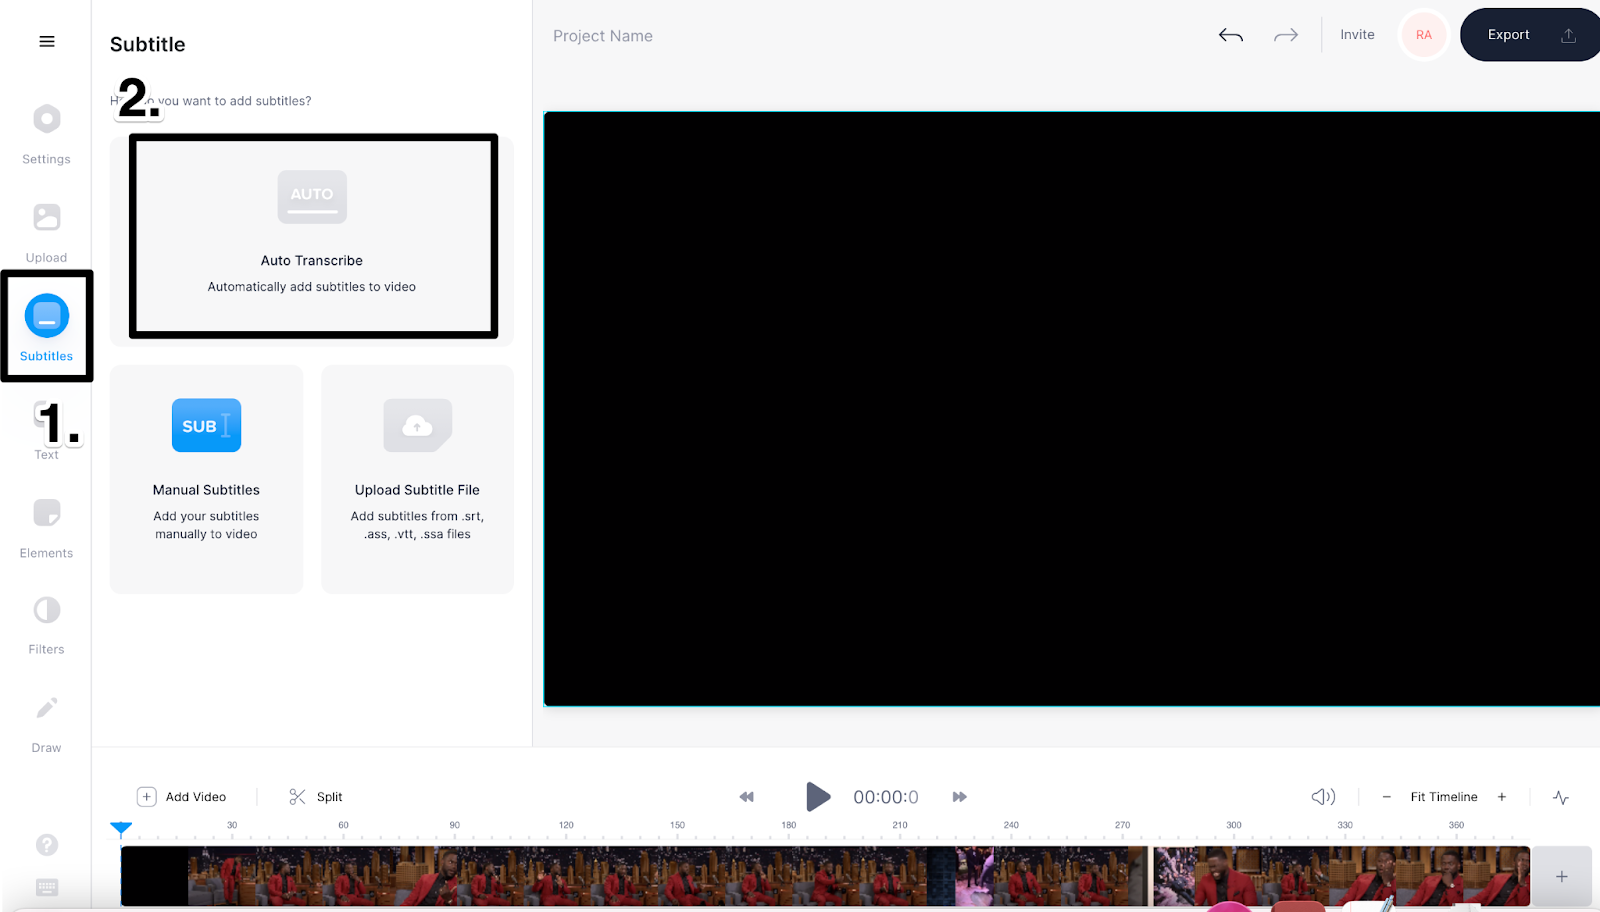
- Choose the language your video is in. This will automatically transcribe all the audio of your video to text and place it at the right timestamps.
- At this point, all your subtitles will be auto-generated. Although the VEED subtitle generator is 95% accurate, it can still make mistakes when it comes to names and other unfamiliar words. Precisely why we recommend checking the spelling and grammar using the SRT editor on your left. Just to be safe.

- Like what you see? Next, you’ll have to download the SRT file. Click on Options from the top menu bar. Make sure Download Subtitles is set in the .srt format.

Voila! You’ve effortlessly created an SRT file of your video within minutes.
What else can VEED do?
Beyond creating SRT files, VEED handles:
- Automatically generating subtitles for videos
- Translating your video's subtitles into 125+ languages
- Converting between subtitle formats (SRT, VTT, ASS, SSA, TXT)
- Editing existing SRT files with the subtitle editor
- Adding audio and music visualizers
- Resizing your videos for all major social platforms
- Recording yourself and your screen with the screen recorder
- Editing your podcast videos
- Creating GIFs from your video clips
VEED offers a free plan plus paid tiers with more advanced features, longer project caps, and full SRT download access. See VEED pricing for current details — pricing changes periodically.
How to create an SRT file from audio (no video required)
If you only have an audio file — a podcast episode, interview recording, or voice memo — you don't need to convert it to video first. VEED accepts MP3, WAV, M4A, and most other audio formats directly.
Steps:
- Open VEED's auto subtitle generator and upload your audio file the same way you'd upload video.
- VEED transcribes the audio and generates SRT-formatted captions with timestamps.
- Edit, restyle, or translate the captions if needed.
- Click Options → Download Subtitles → .srt.
This is the cleanest path for podcasters, audio journalists, and anyone repurposing audio content for video platforms or transcript-based blog posts.
How to create an SRT file from text (when you already have a script)
If you already have a finished script or transcript and just need it formatted into SRT structure with timestamps, you have two paths:
- Manual approach. Use TextEdit or Notepad and the SRT structure shown above. Slow but free.
- Voice-record your script, then auto-generate. Read the script into a voice memo, upload to VEED, and let Auto Transcribe handle the timestamping. Often faster than manual formatting.
How to edit an existing SRT file
Once you've created an SRT file, you may need to fix timing, correct typos, or restyle the captions before publishing. The fastest path is VEED's subtitle editor — upload your existing SRT file, edit the text and timing visually with the video preview, then re-export. For a deeper walkthrough, see our guide on how to edit subtitles.
How to Upload Your SRT File to YouTube
We totally recommend adding SRT files to all your YouTube videos. Not only will this make your content more inclusive, but it'll also help it climb higher on the SEO ladder.
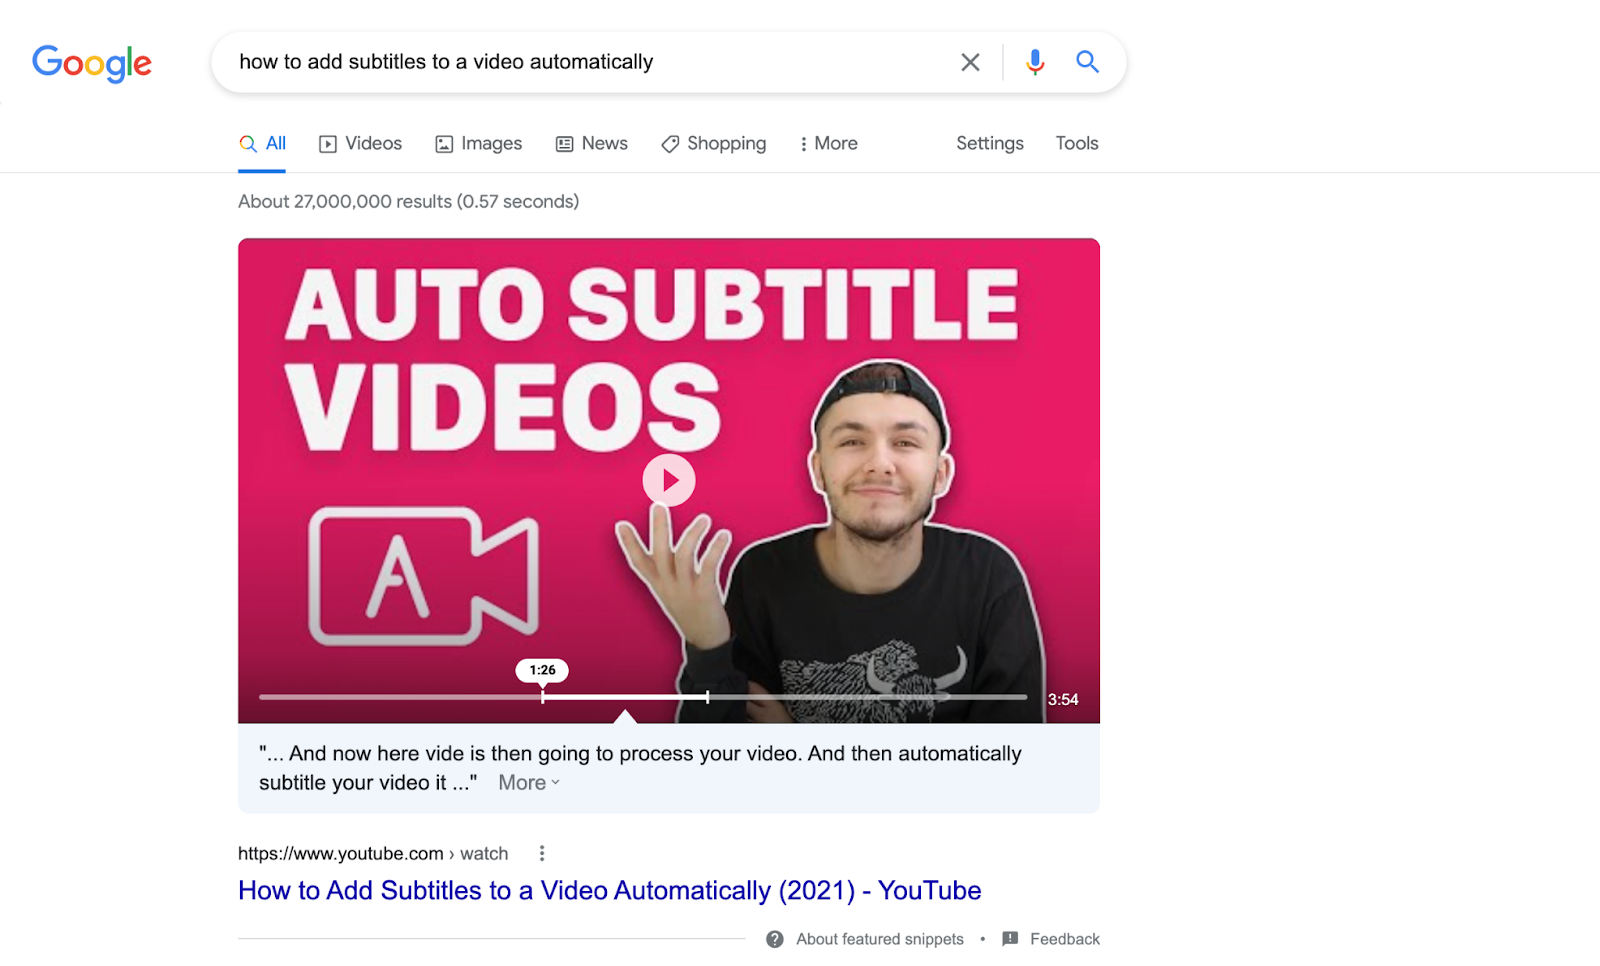
Google loves videos with accurate and clear subtitles! Plus, since it can pull tags and timestamps from your video and file, your chances to become the featured video snippet improves significantly like our How to Add Subtitles to a Video Automatically (2021) video.
Here’s how to go about it:
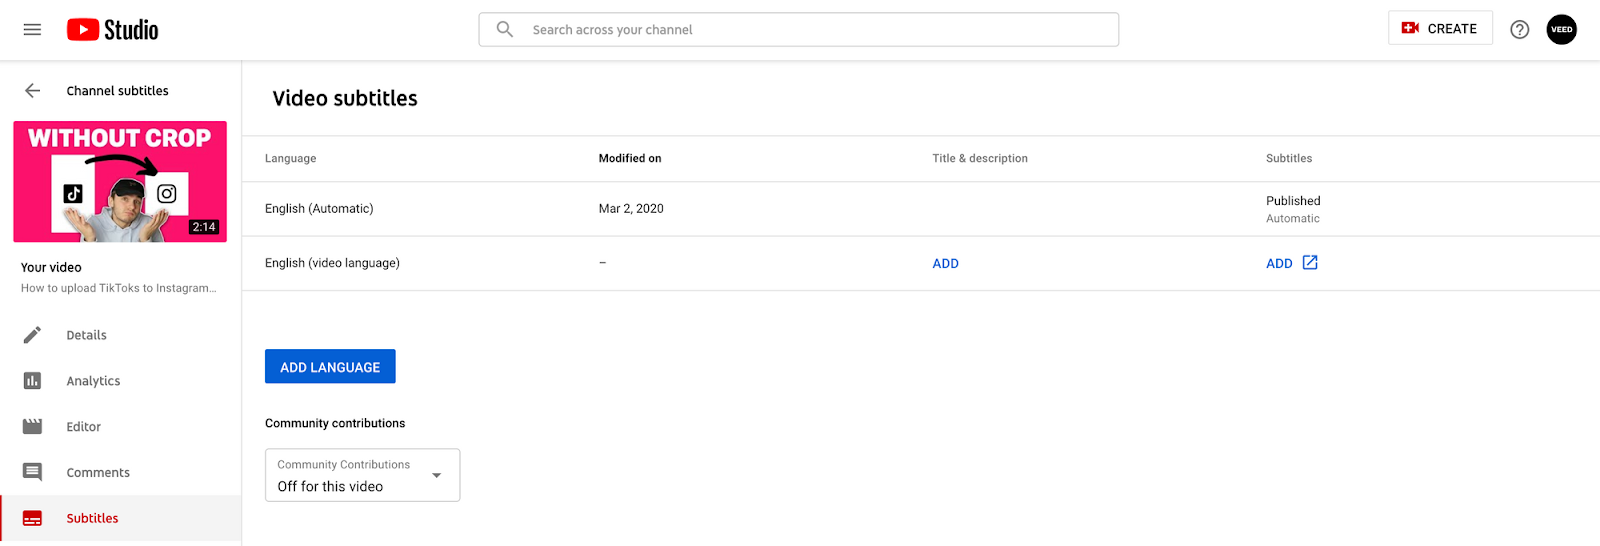
- Open your YouTube Creator Studio.
- Click on Subtitles on your left side and select the video you want to add those captions to.

- Select the blue Add Language button to indicate the language your subtitles are in. Click on Add under the Subtitles section when a new language lineup pops up on your screen.
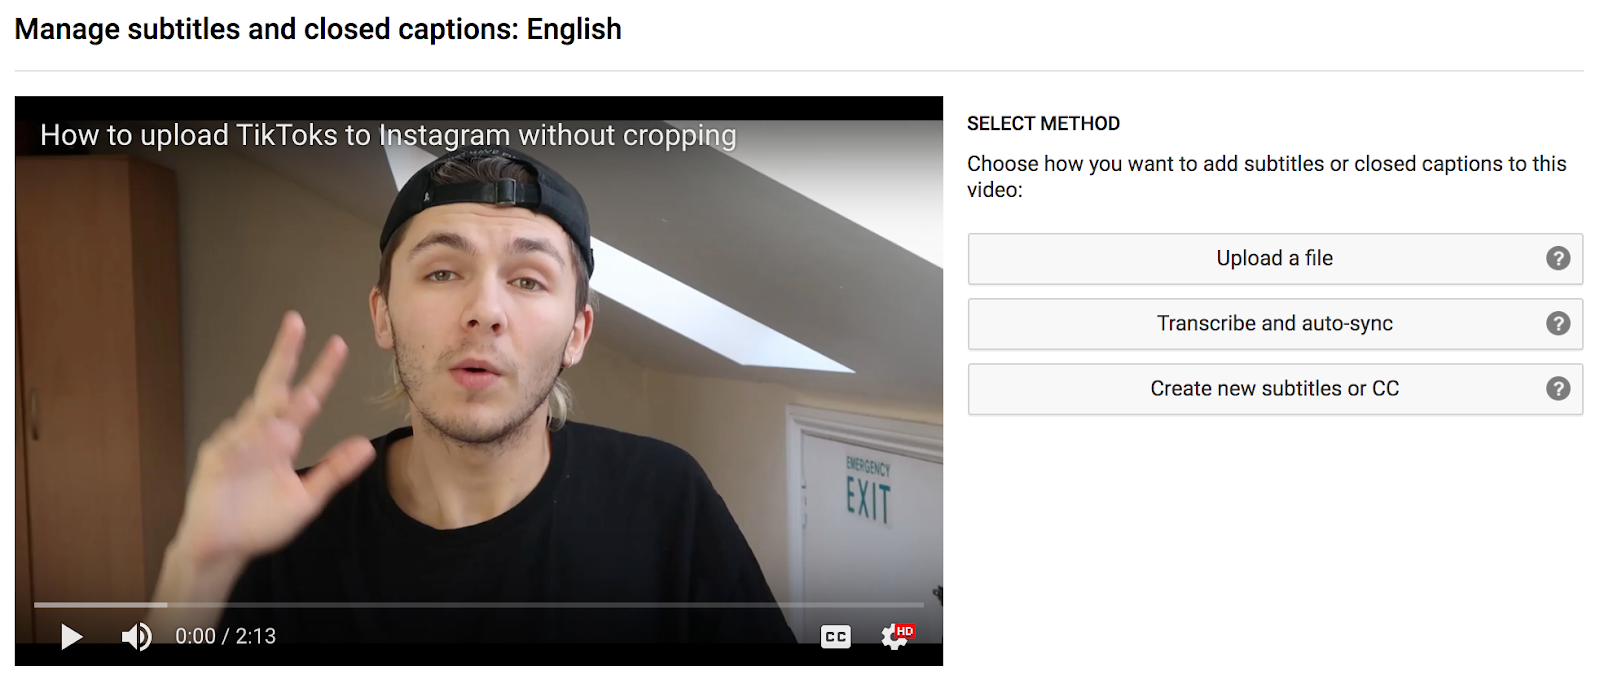
- You’ll be directed to YouTube’s subtitle editor. Here, click on Upload a file and choose the SRT file you want to upload. And you’re done!
How to Upload Your SRT File to Facebook
Over 2.85 billion people actively use Facebook. That’s a MASSIVE number! So, naturally, you want to make sure your content reaches as many people as possible, which is why adding closed captions to your Facebook videos from your Facebook page is a must.
- You’ll be taken through the entire creation process when you start the upload. This is where you’ll add your SRT file.
- Click on Subtitles and caption (CC) section to upload the SRT file to your video. You can add multiple other SRT files to support different languages too.
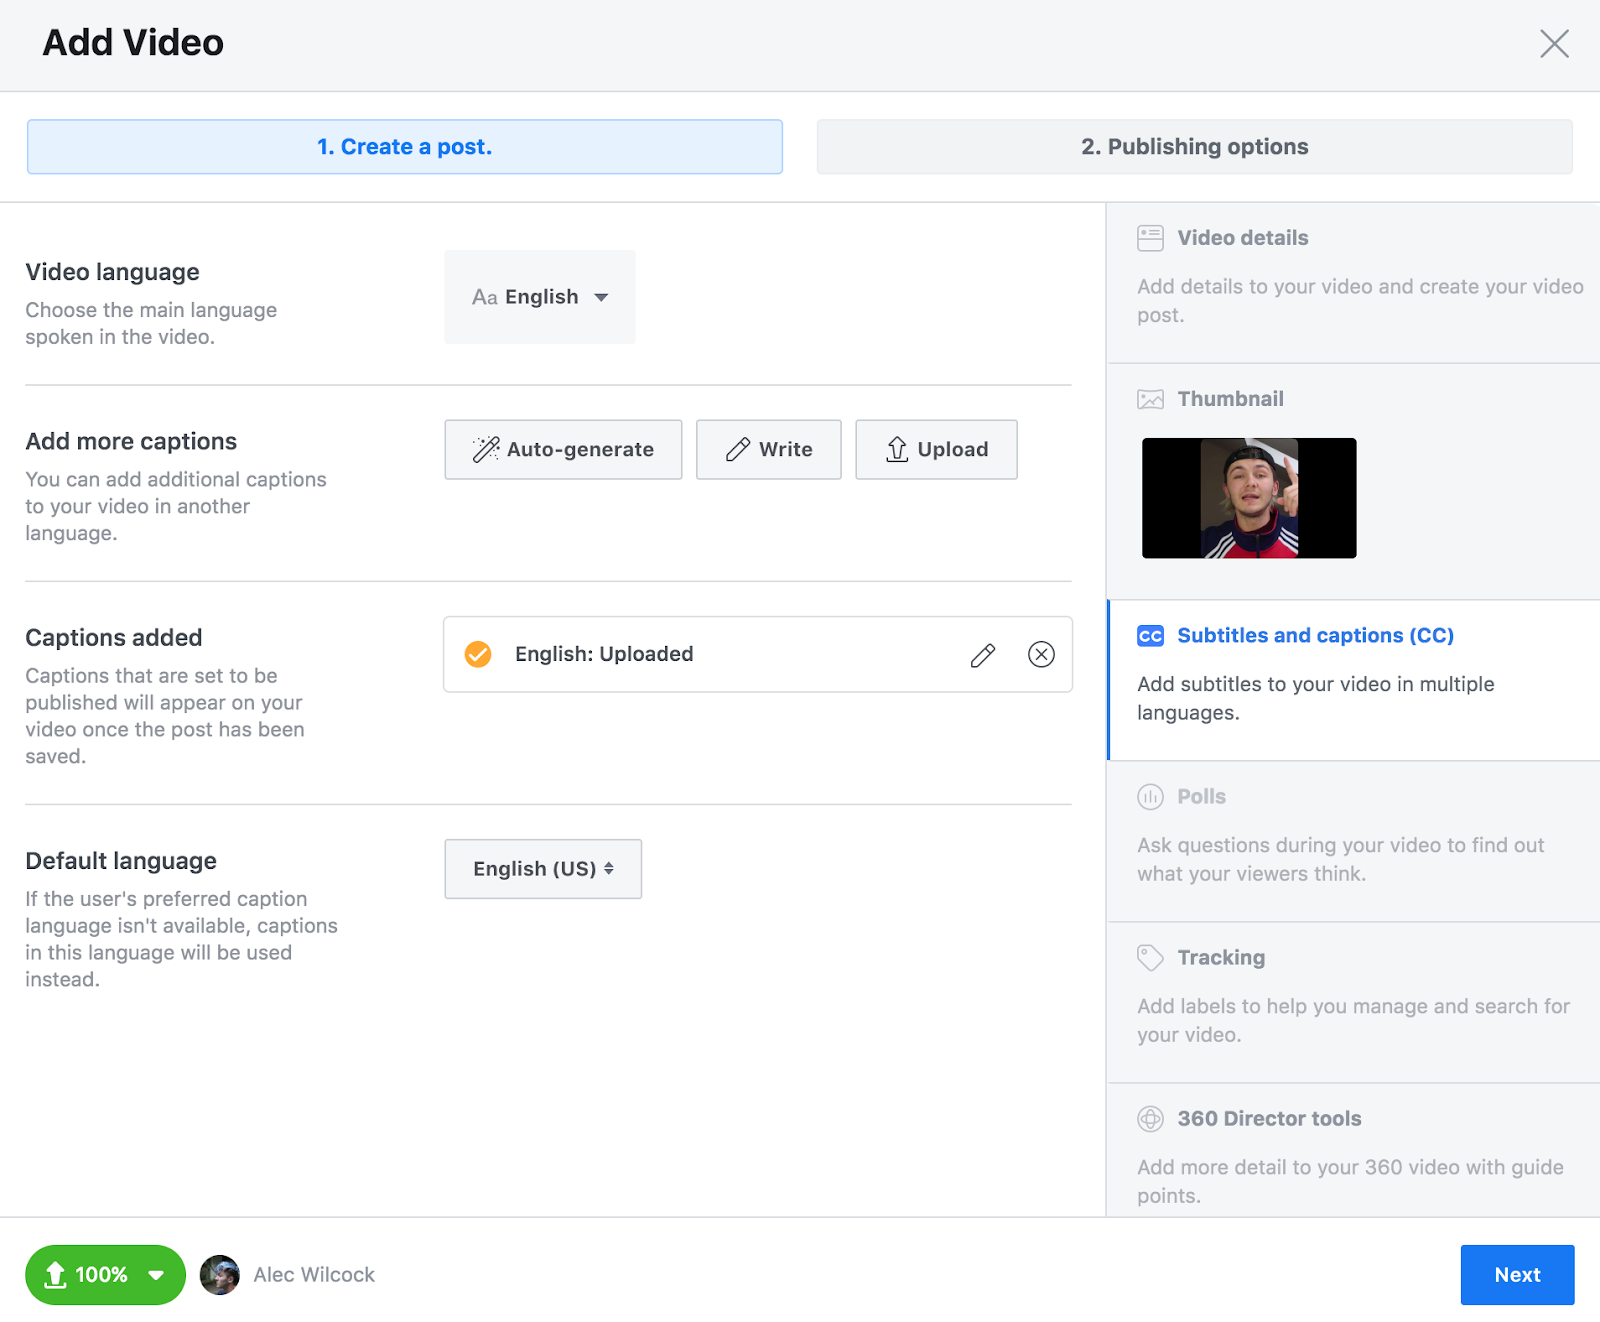
Note: If you see an error message on your screen, it means your SRT file is in the wrong format. You have to rename every SRT file depending on what language they are in and re-upload. For instance, when uploading SRT files for French, your file name can be something like Test file video.fr_FR.srt.

Unfortunately, if you want to add closed captions to your videos from your personal Facebook page, you have to follow a different set of steps. Not that it's difficult! You just have to remember a few extra steps.
- Upload a video as you normally would, i.e, click on Photo/Video from your Facebook homepage.
- Once that’s done, go to the video post and select Edit video.

- You’ll be directed to a page where you can edit the video’s thumbnail, description, and subtitles.
- Under the Captions section, click on Choose file and select the SRT file for that video.
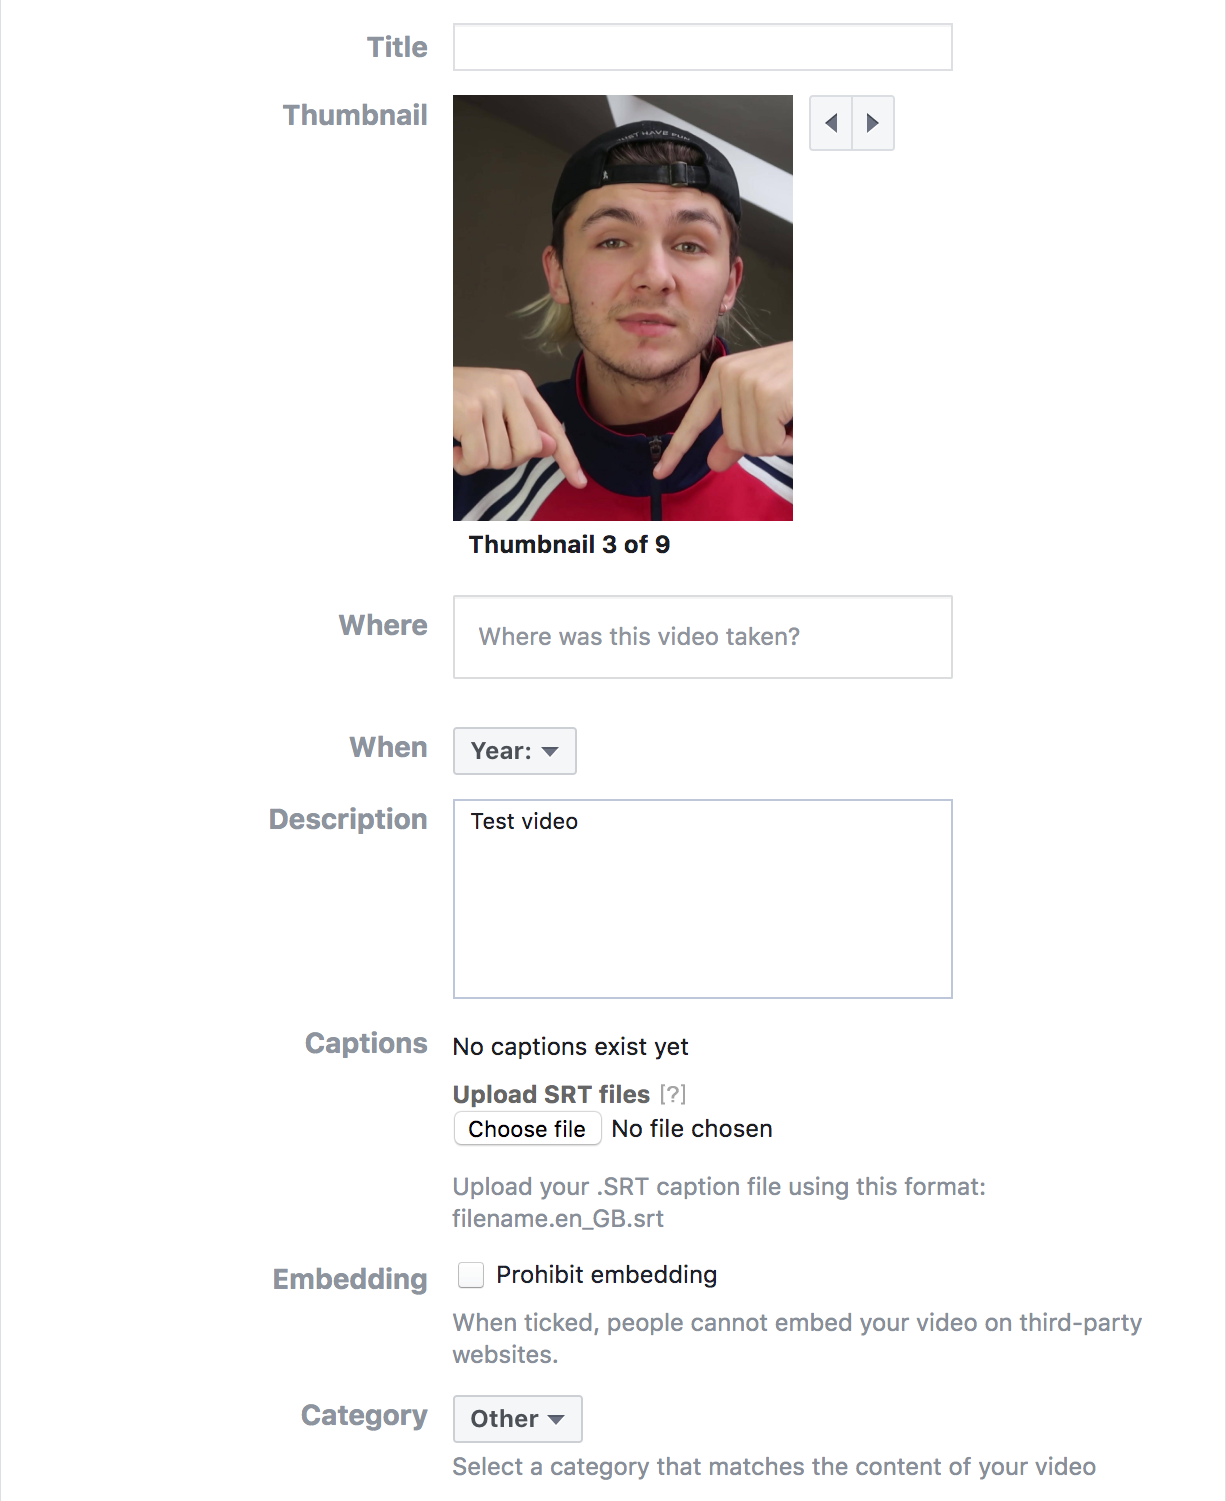
That’s all that you need to do to activate closed captions on Facebook!
How to Upload Your SRT File to LinkedIn
LinkedIn is the holy grail for everyone in the B2B space. Not only can you use the platform to network with authoritative people in your niche, but you can also establish your expertise by posting relevant content, especially videos.
The good news is adding closed captions on LinkedIn videos is way-yyy easier than on Facebook.
- Select the video you want to upload. But instead of clicking Next, choose Edit.

- You should upload your SRT file here. Save the subtitle file to that video post.
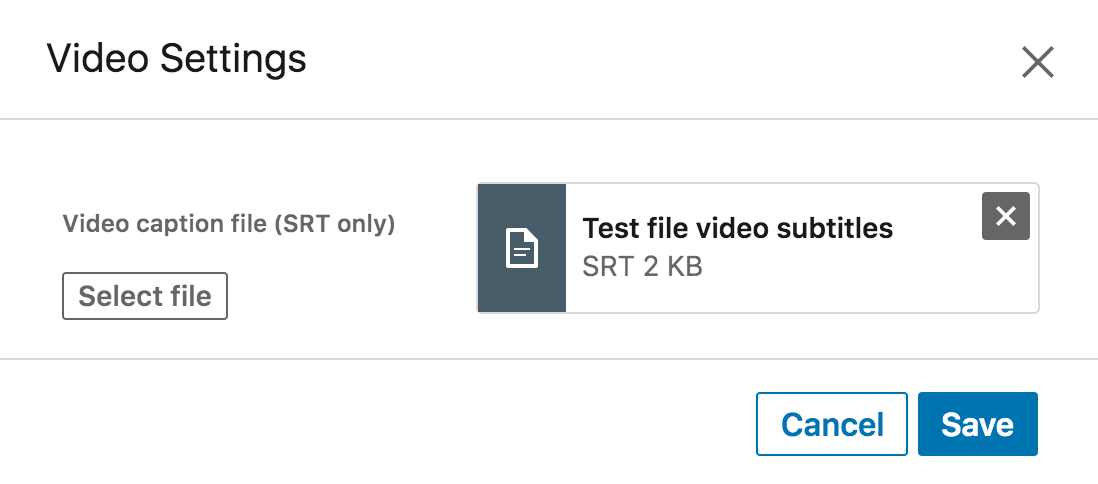
Short and sweet.
Remember, you can only add one SRT file to a video on LinkedIn. Be sure to choose a language that caters to the majority of your audience.
So that’s how you upload SRT files on YouTube, Facebook, and LinkedIn. As you can see, the process is very straightforward, and once you get a handle on things, it’ll become even easier!
Get Ready, Set, SRT!
SRT files and video go together. They expand your reach, improve user experience, and help your content rank higher on search engines.
Of course, content quality is still king. Creating and uploading SRT files is an extra step that takes some effort, but the engagement, accessibility, and SEO benefits make it worth the time.
Want to take your videos to the next level? Generate your SRT file with VEED today — free to start, runs in your browser, supports 125+ languages.