
Want to make great videos that capture attention and drive engagement across multiple platforms?
Video-sharing platforms like YouTube, Instagram, TikTok, etc., all have different frame dimensions. So to be on multiple platforms you’ll need to think of how you’re going to most efficiently create content for different spaces.
This means you're left with two options:
- Shoot clips for different platforms (effective but difficult and time-consuming)
- Learn how to crop your video into the right aspect ratio for each platform (fast, easy and effective)
By the end of this article, you’ll know how to crop a video with the click of a button using VEED. You’ll also learn how to choose the best size to up your chances of having great engagement.
What's the Difference Between Trimming, Splitting, and Cropping a Video?
If you’re new to video editing, things like cropping, trimming, and splitting videos may appear similar. Even experienced video makers sometimes confuse them and tend to use these terms interchangeably.
Let's quickly look at the differences between crop, trim, and split.
Trimming
Trimming involves cutting out the beginning or end portion of a video file to reduce its length and keep the desired content.
Let's say you're filming your footage, and the action didn't start until a few minutes later, or you've captured some extra yet irrelevant footage in the end. You can trim the fluffy part at the start or end of your video.
By eliminating the unnecessary content, you're more likely to capture and retain attention so people watch till the end.
With VEED video cutter, trimming your video is super quick and easy to apply. Whether you're a newbie or pro, you can cut and trim your video files to the perfect length with a few clicks.
Splitting
Splitting is like trimming except you can do it on any part of the video. Here’s what we mean. While trimming occurs at the start and endpoints, splitting is literally splitting the video at any point between the start or end.
Let’s say there’s an awkward silence in the video you don’t want. You would split the video at the start and end of the awkward silence and then delete that chunk. By splitting videos, you can efficiently work on bite-size clips, place a transition between multiple sections, spot errors and cut out the parts you don't need. This is especially useful with short-form videos where you need a clip to be no more than a few seconds.
Cropping
Trimming and splitting happen on the actual video timeline where your video frames live. Video cropping is when you resize the actual video footage on your canvas.
Cropping lets you remove unwanted areas from your footage or adjust the dimensions to fit within a specific aspect ratio.
With cropping, you're able to adjust the edges (top, bottom, left, and right) and corners of your video clips. Not only that, but you can resize your video to fit recommended dimensions for different platforms like desktop, mobile, blog, social media, etc.
How to Crop a Video on Windows 10 with VLC Media Player
WhileWindows 10 doesn't have a native video editor with a cropping feature, you can use a 3rd party tool like VLC media player.
Let's take a look at how to crop videos with a VLC media player.
Being one of the most widely used media players, VLC offers features for video editing operations like video cropping, merging, trimming, and more.
However, the process isn't so straightforward. You can either crop video for previewing purposes or go through a lengthy process to save it permanently.
Part 1: How to Crop a Video in VLC for View/ Preview
If you're only interested in seeing what the cropped video will look like, but not save it, here's how to go about it.
Step 1: Launch the VLC media player, and open your video file. Then go ahead and click on Tools, located right at the top menu bar.
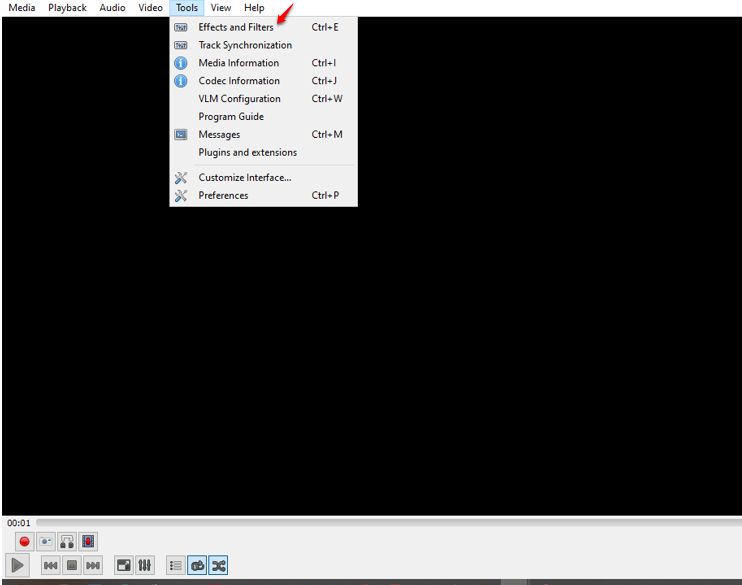
Step 2: Next, click on Effects and Filters and head to the Go to the Video Effects tab and click on Crop tab
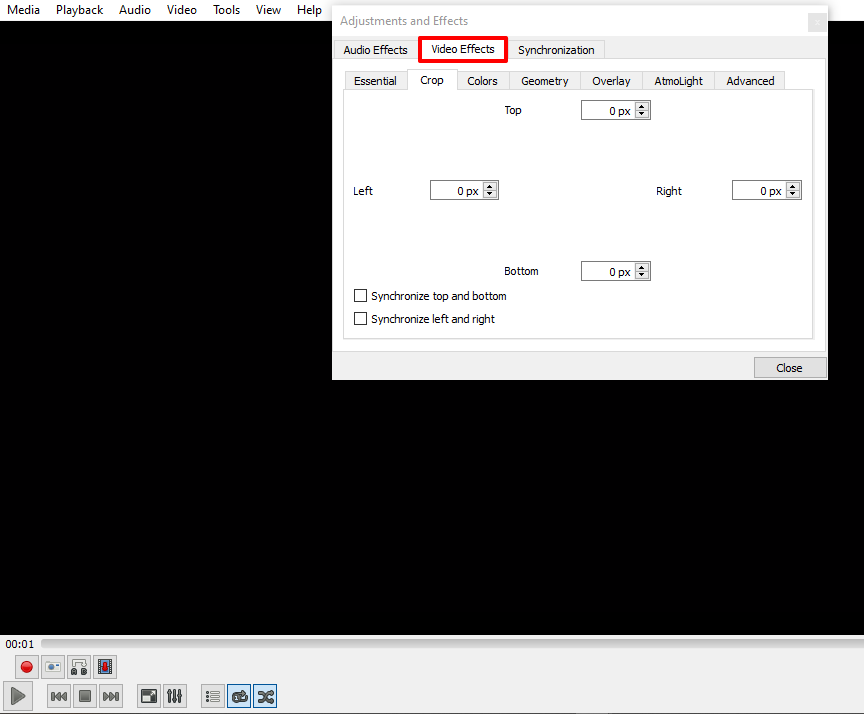
Step 3: Enter the dimensions in pixels you want to crop out from left, right, top, and bottom. As you increase the number of pixels, the video borders will adjust towards the center till you reach the desired aspect ratio.
Just like we've mentioned earlier, this only allows you to preview your video - you can't save your edited video.
Now let's get to the option that lets you permanently save your cropped video.
[#trim]Part 2. How to Crop a Video with VLC and Save[#trim]
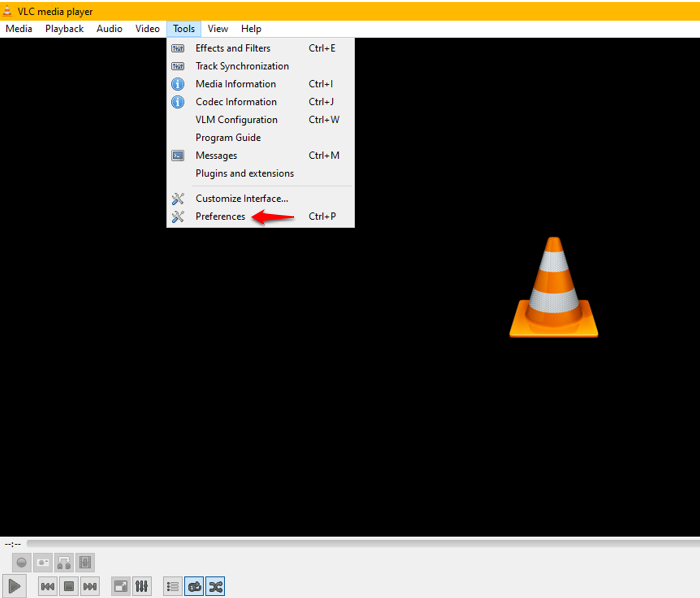
Step 1: To get started, launch your VLC player, click on Tools, and then head to Preferences.
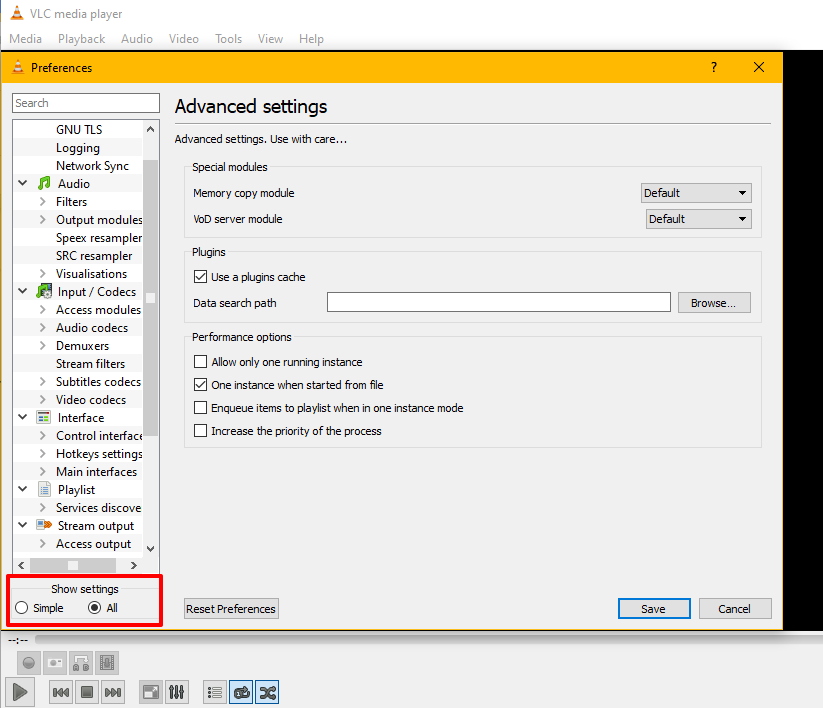
Step 2: On the bottom left, select All under Show settings to see all the available options.
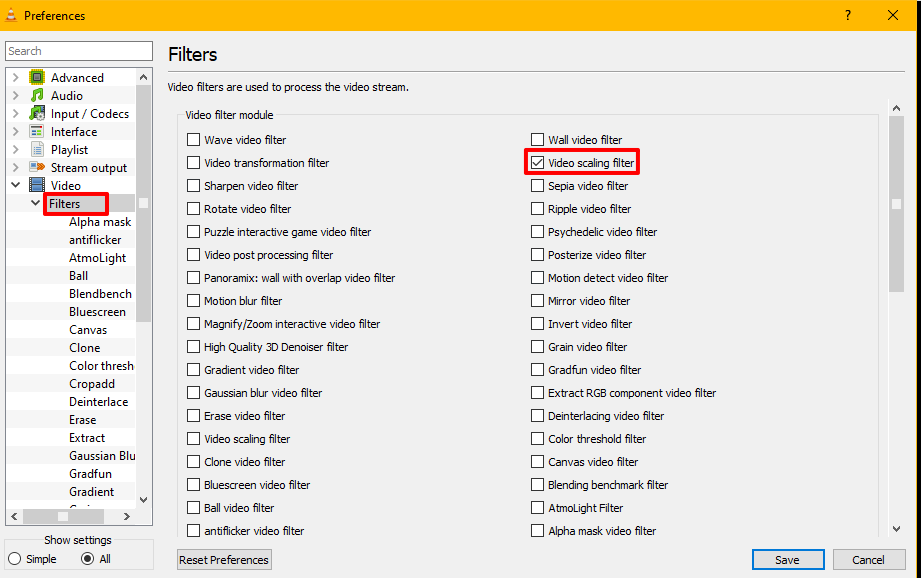
Step 3: Scroll down the left pane until you get to Video. Next, expand Filters to further reveal the option under it and click on Cropadd.
Another way to quickly get to Cropadd is to type it in the search bar at the top of the left pane.
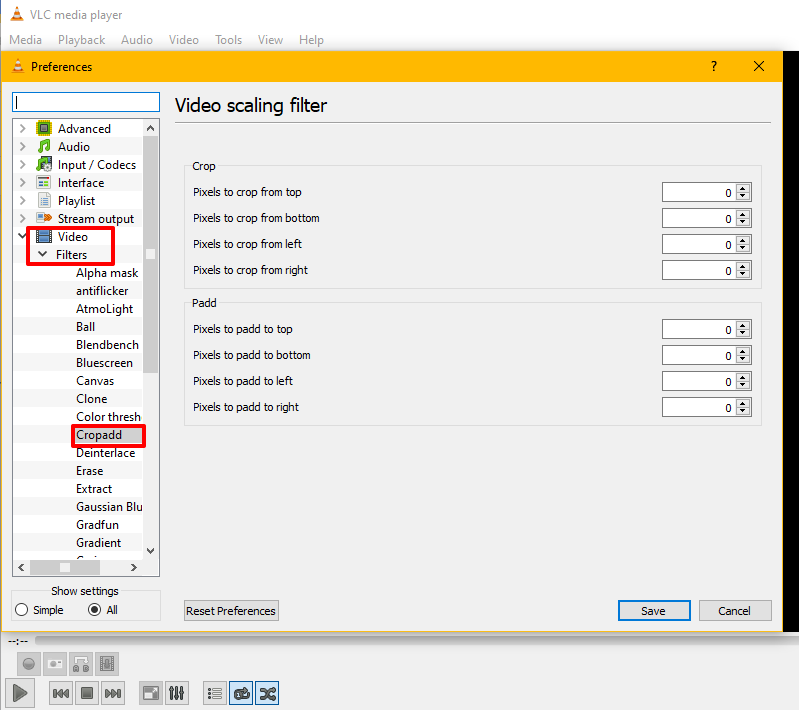
Once you've done this, you can go ahead and input the previous cropping parameters you used while previewing your video. Better still, go ahead and input new dimensions to scale the video to your desired size and click on Save.
Great stuff! But your job isn't done yet. There are still other steps left.
Step 4: Go back to the left pane, click on Filter (located under video), tick the Video cropping filter checkbox, and click Save to store your selections.
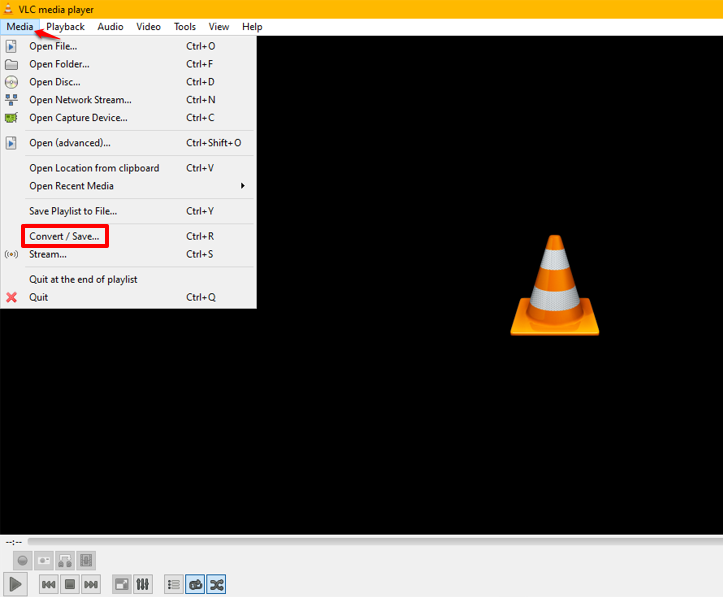
Step 5: Return to the Media tab on your main menu bar and hit Convert/Save.
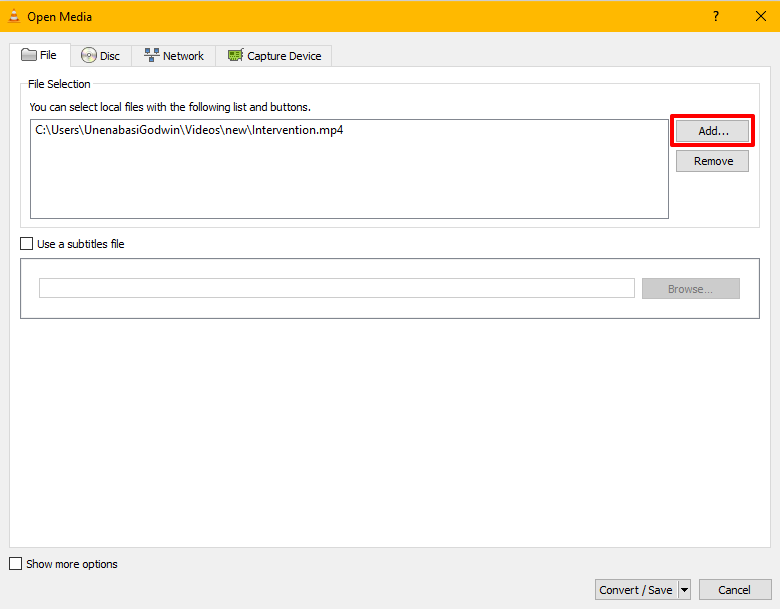
Step 6: After clicking Convert/Save, a new interface will pop up. There you'll click on the Add button to select one or more video files from your local folder to your cropping list. You can also drag and drop multiple video files from your device to the File Selection box.
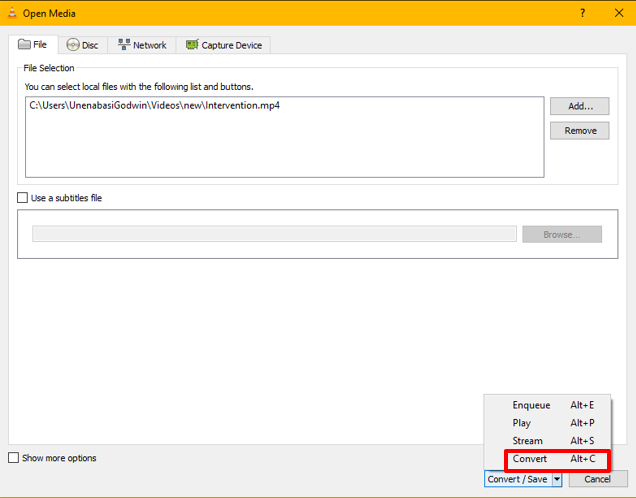
Step 7: At the lower right corner, you'll find Convert/ Save. Open the dropdown and select Convert.
Step 8: Now it's time to generate your file and save it in your local folder. You can rename the file, map it to your desired location.

Go ahead and click on Start to save your cropped video on your computer or local storage device.
How to Crop a Video Online With VEED on a PC or Mac
Whether you're creating videos for your brand or clients nobody wants to deal with clunky tools with a major learning curve.
If you want to not only crop videos with the click of a button but also want to:
- Edit multiple videos online
- Automatically add subtitles to video
- Add music and sound effects
- And more
Then a tool like VEED will help you make professional videos without the steep learning curve of professional software (and it doesn’t take up space on your computer since it’s online).
Here's how to crop your video online with VEED
Step By Step Tutorial
To get started:
- Create a free account on VEED (please note that while cropping is free other features are limited or exclusive to paid plans)
- Click on My Workspace at the upper left-hand corner of your screen.
- Go ahead and click on New Project at the top right corner to start from scratch.
Step 1: Upload your Video

Once you've clicked on New Project, tap Upload a File to select and add your video file. You can either drag and drop or choose a file from your computer or mobile device. VEED lets you import video clips in various formats such as MP4, MOV, AVI, FLV GIF, and more.
VEED also offers multiple video upload options, including file upload from dropbox, upload a video from a YouTube URL, or via the screen recorder tool.
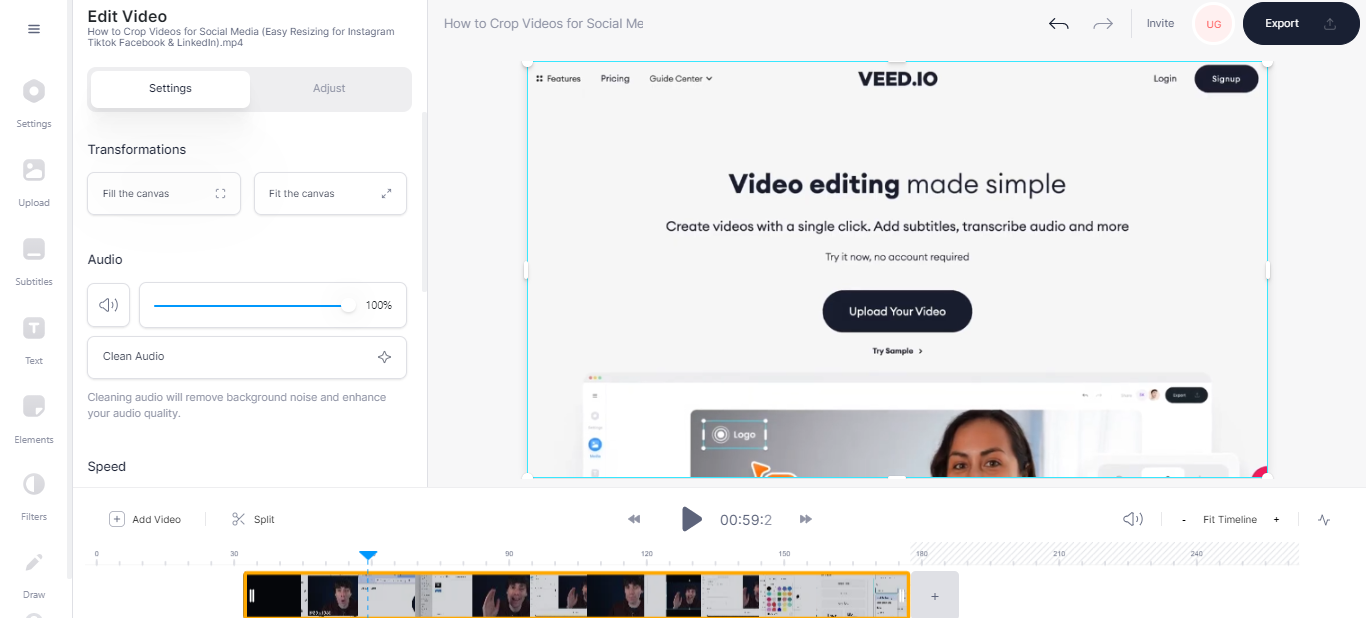
Step 2: Crop Video
To crop your video, click on the video in the canvas, and drag the lines along the edges to adjust the video to your preferred dimension.
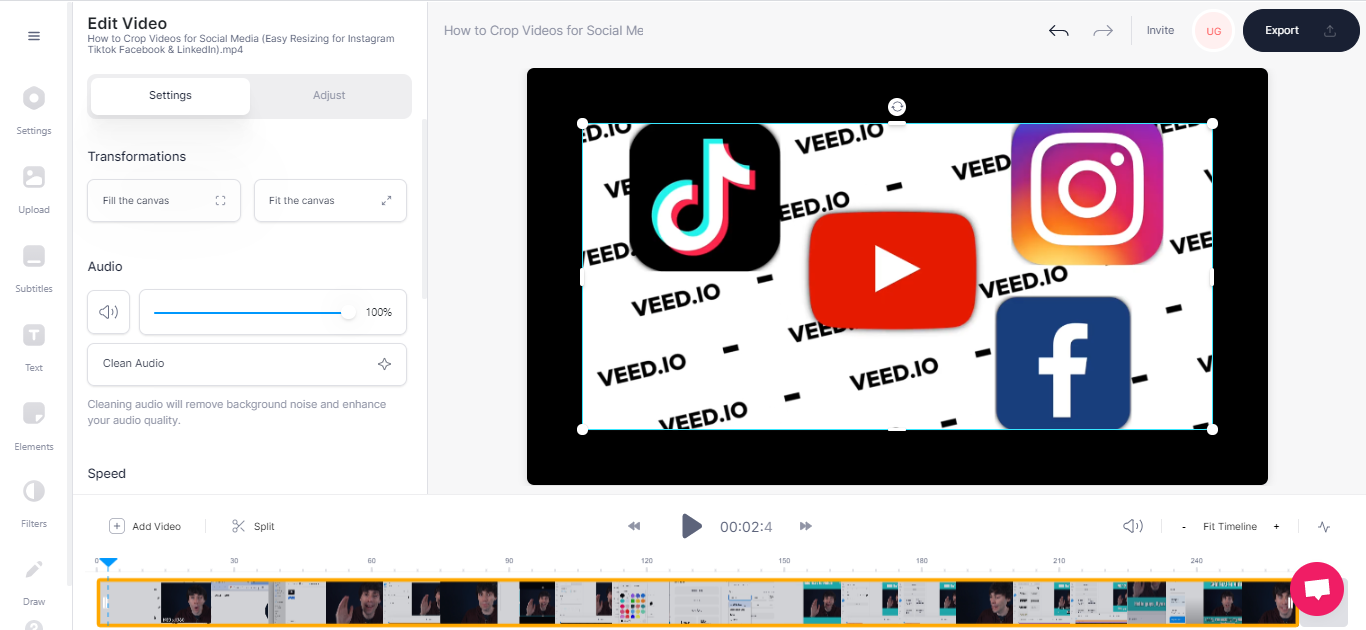
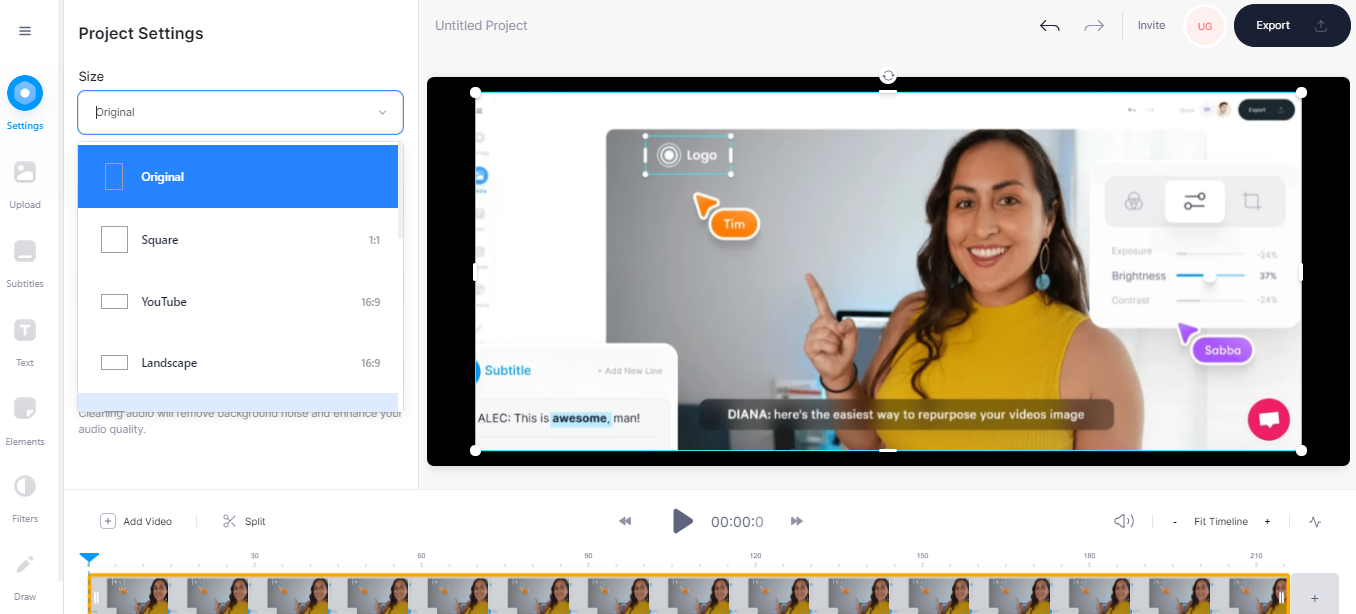
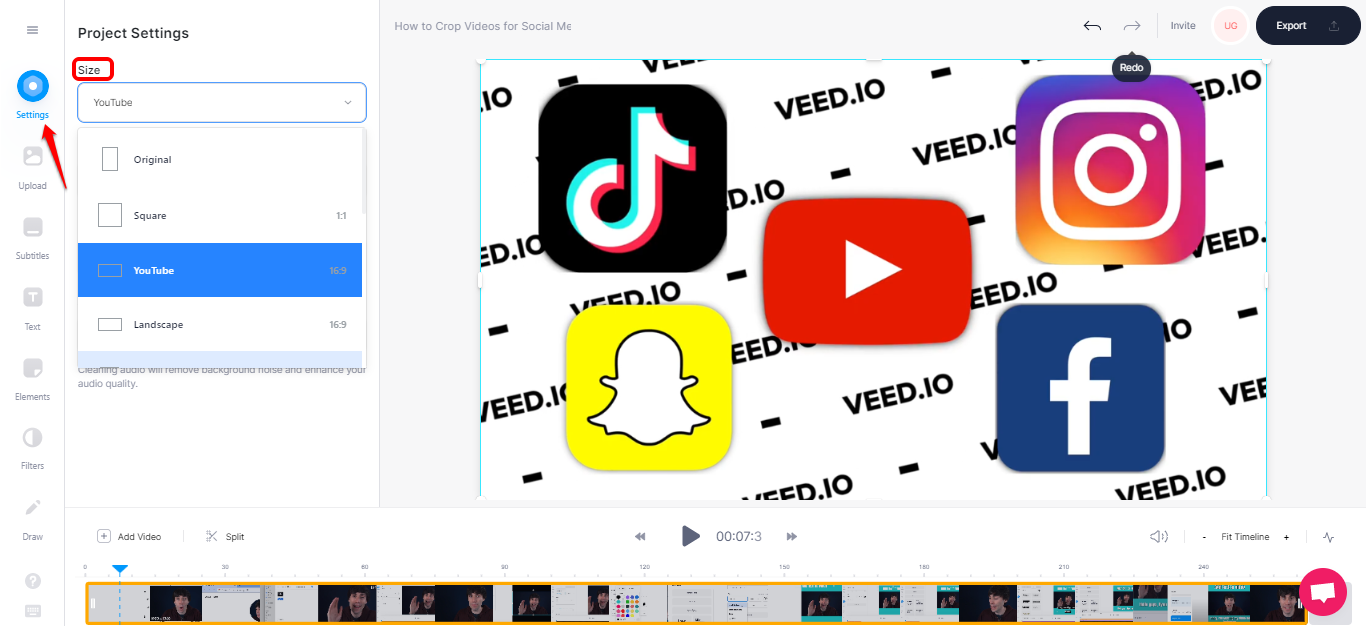
If you prefer to crop your video to preset canvas or video dimensions, VEED has got you covered. You can control how viewers experience your video using other preset canvas options like
- Square (1:1)
- Landscape and YouTube (16:9)
- Twitter and Facebook Portrait (4:5)
- Twitter and Facebook Landscape (5:4)
- Instagram Story (9:16)
- TikTok (9:16)
- Facebook Cover (820:312)
- Pinterest (2:3)
- LinkedIn Landscape (2:4:1)
- Linked Portrait (1:2:4)
So for example, you could select a square 1:1 aspect ratio size for Instagram and crop the video as a rectangle inside your square so you can add text, subtitles, and a progress bar animation (like Gary Vee does).
Click on 'Settings' at the left pane of the editor. Then Proceed to click the dropdown under Size to choose a preset canvas size. This automatically crops the video to the chosen canvas size.
Pro Tip: Rather than try a thousand different ways to crop your video so things don’t get awkwardly chopped off, keep things in frame when you record. Being mindful of your body and any object positioning as you record will make your life easier when editing. For example, if you shoot a landscape aspect ratio video for YouTube that you’ll reuse as a square post on Instagram keep important parts in the center of the rectangle frame as if there were an imaginary square.
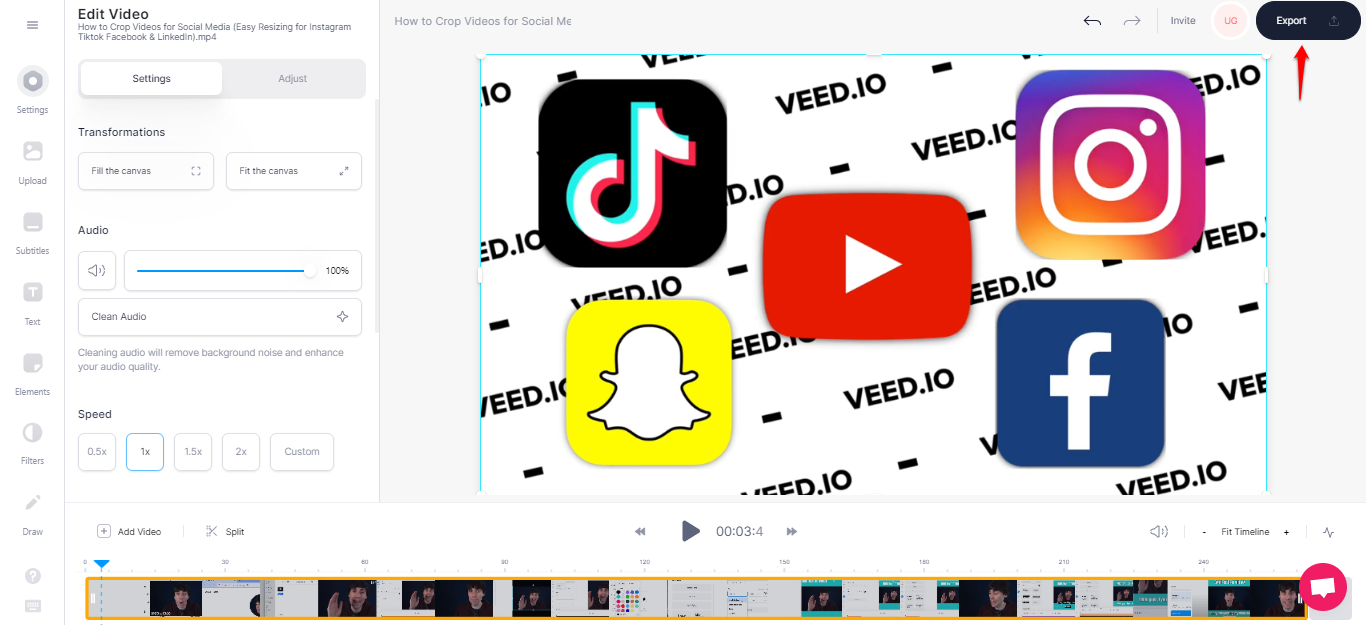
Step 3: Export your Video
Hit 'Export' at the top right and select your preferred export setting.
You can use simple export options such as draft, Standard, HD, 4K, etc. Or switch to Advanced export settings to manually adjust your video’s framerate limit, resolution, quality, and compression settings.
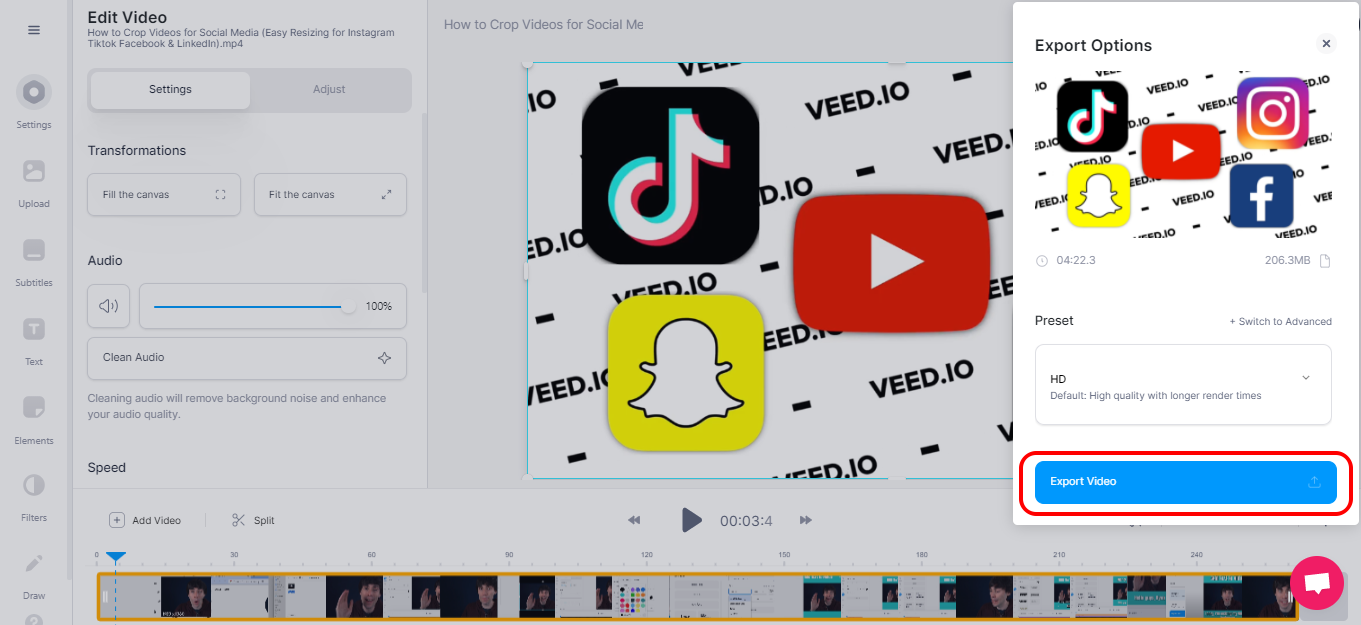
Once done, click on Export Video at the bottom right of your screen.
Step 4: Download or Share your Video. Kudos! Now that your video has the look and feel you want, it’s time to download or share.
You may choose to make your video public or private using the toggle button under the Edit and Share tab.

When your video is made public, anyone with the link can watch it (great if you need to collaborate with a team or clients). Simply copy the video link and share it with your friends and viewers. Alternatively, you can share the link directly from VEED to Facebook, Twitter, or Email.
But if you opt to download the video to your laptop or mobile device, it's pretty easy. Click the dropdown to select the file format (MP4 or convert your video to GIF), then hit the download icon to download your video.
How to Crop a Screen Recording
Whether you have existing screen recording footage that’s ready to upload OR you have yet to create your screen recording, you can follow the same steps as the tutorial on how to crop a video online.
So to recap:
- Go to VEED to upload your video (or record using the screen recording tool to create and upload directly)
- Crop your video by dragging the handles on your video
- Export your video
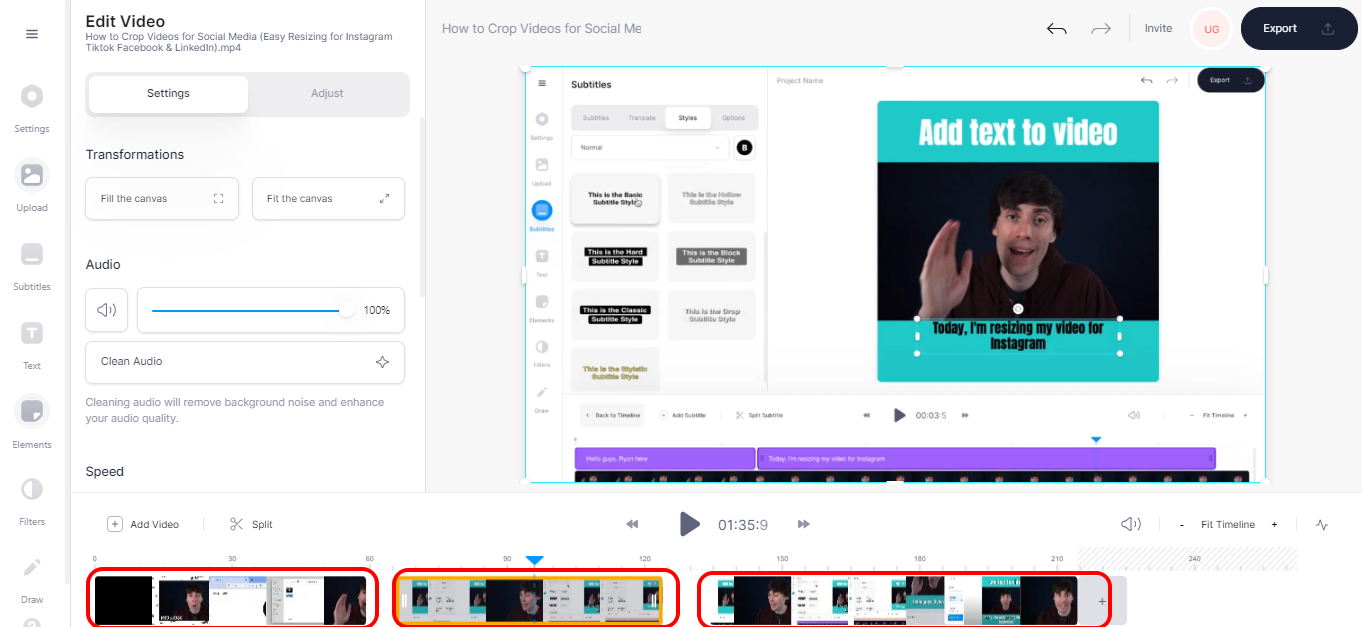
And of course, if you want to apply additional customizations such as subtitles you can do so before the export step.
How to Crop Videos on iPhone
iPhones come with a built-in editor that crops your video to perfection. Here's how to crop videos with the built-in video editor.
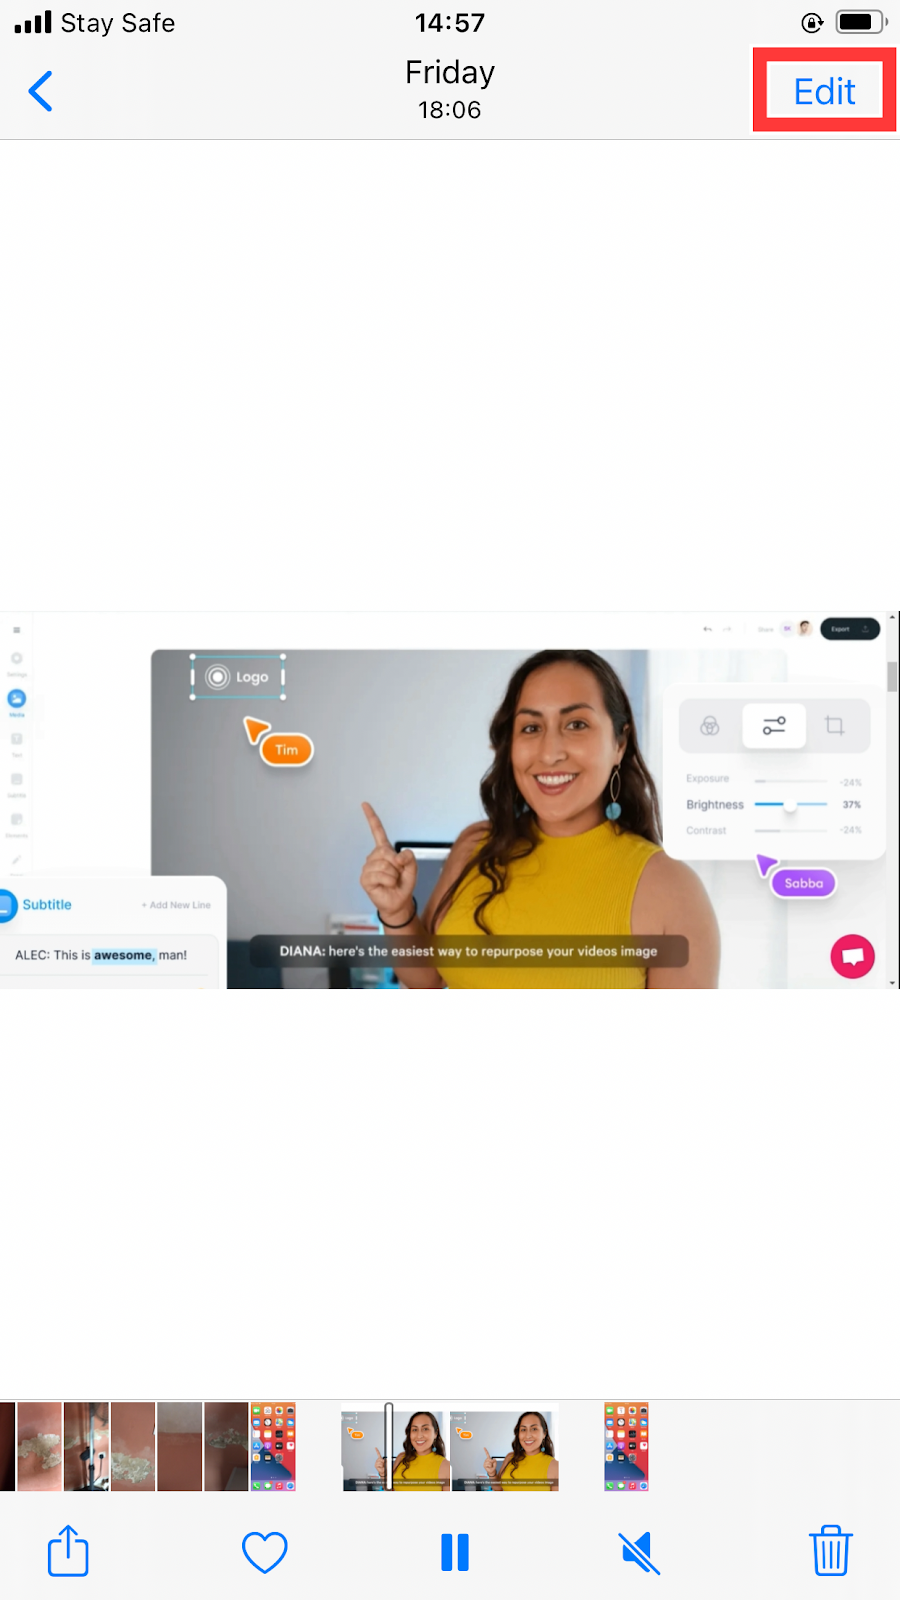
Step 1: Open Photos and tap the video you'd like to crop.
Step 2: Next, tap Edit in the top-right corner of your screen.
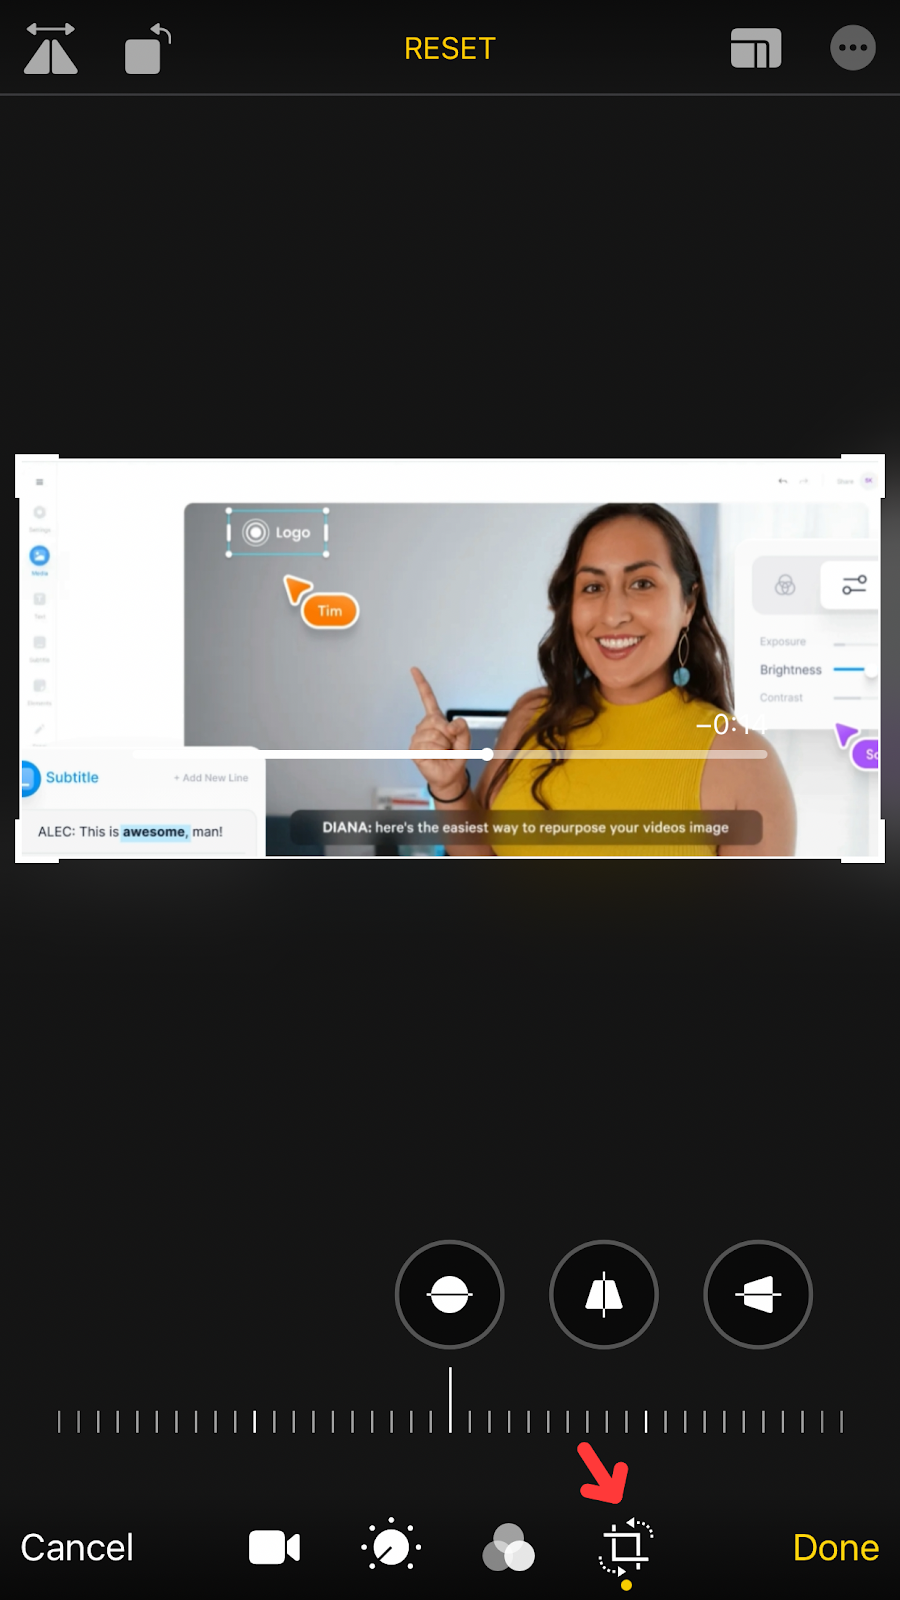
Step 3: Click on the Crop/Rotate icon located right at the bottom of your screen. Touch and hold each corner of the clip in the canvas. Then drag each of the edges inwards till you get your desired dimension. Repeat the same process with other corners till you're satisfied with the output.
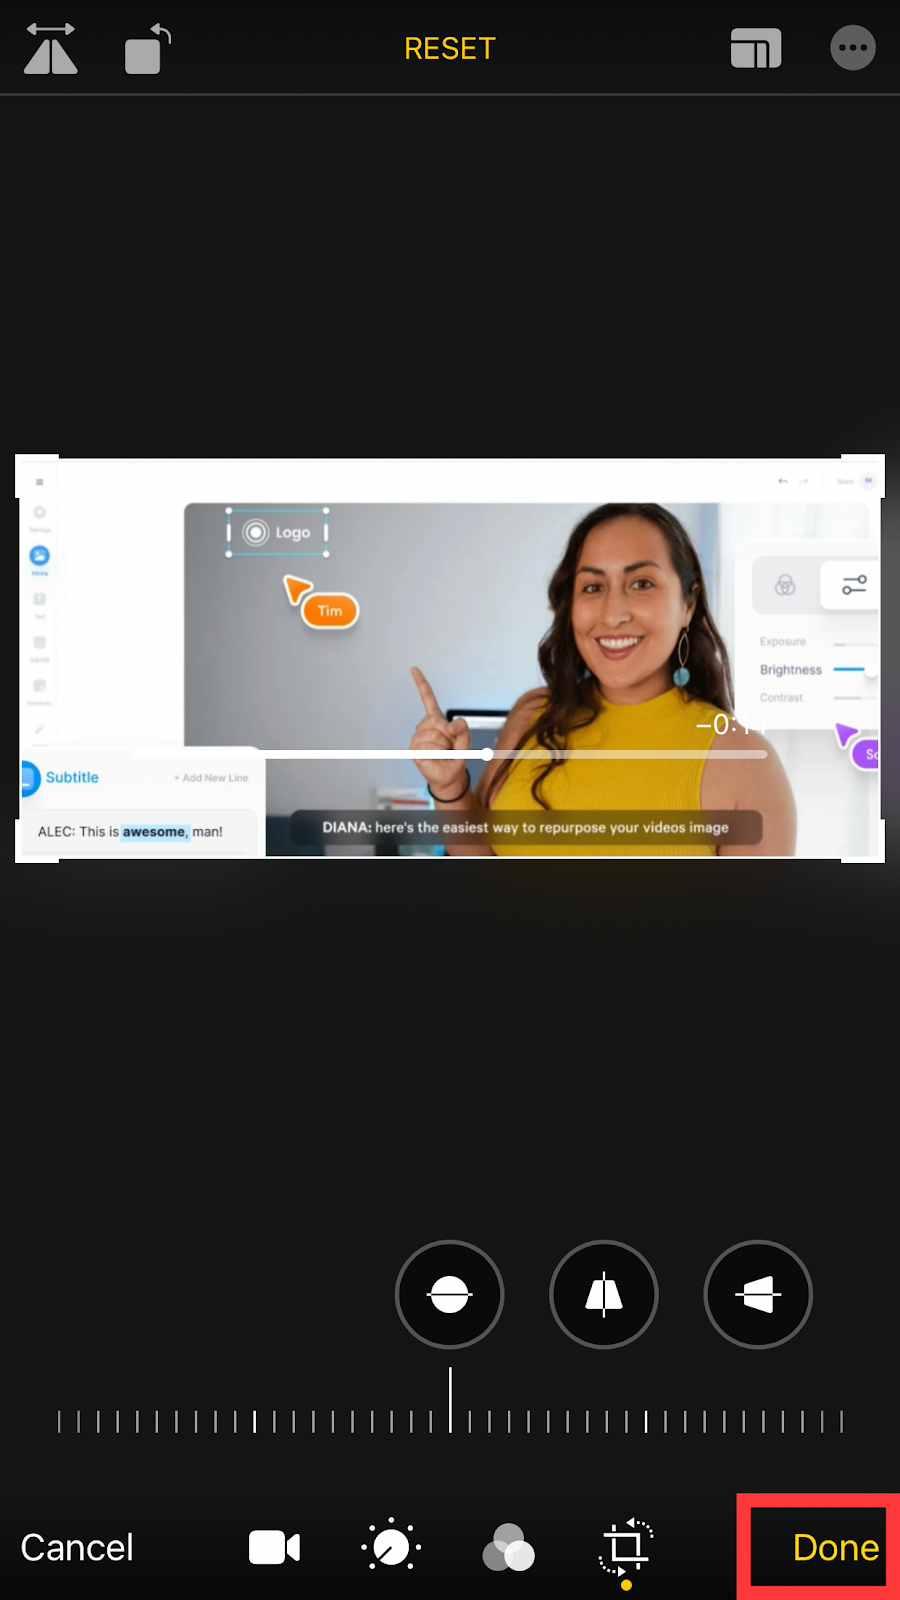
Step 4: Lastly, when you're satisfied with the look and feel of your video. Click on Done in the bottom-right corner to save the cropped video to your device.
How to Crop Videos on Android
Cropping videos on Android isn't as straightforward as doing the same on iOS. And that's because most Android devices don't have a built-in video cropping tool.
You'll need to rely on a third-party video editing app to crop your video.
The good news is that there are lots of incredible android apps to help you chop your video with ease. For example, VivaVideo is an easy-to-use video editing app with lots of positive reviews. The tool is bundled with features for cropping, trimming, and merging your videos.
Here's how to crop your video on Android using VivaVideo.
Step 1: Visit the Google Playstore to download and install the Viva Video app on your Android device. And then launch the app to get started.
Step 2: Tap on the New Project button at the center of the screen. Or click on Create at the bottom of the screen to proceed.

Step 3: Click on the Video at the top of the page to select the folder you want to import the video from. You'll see all the videos on your mobile device.
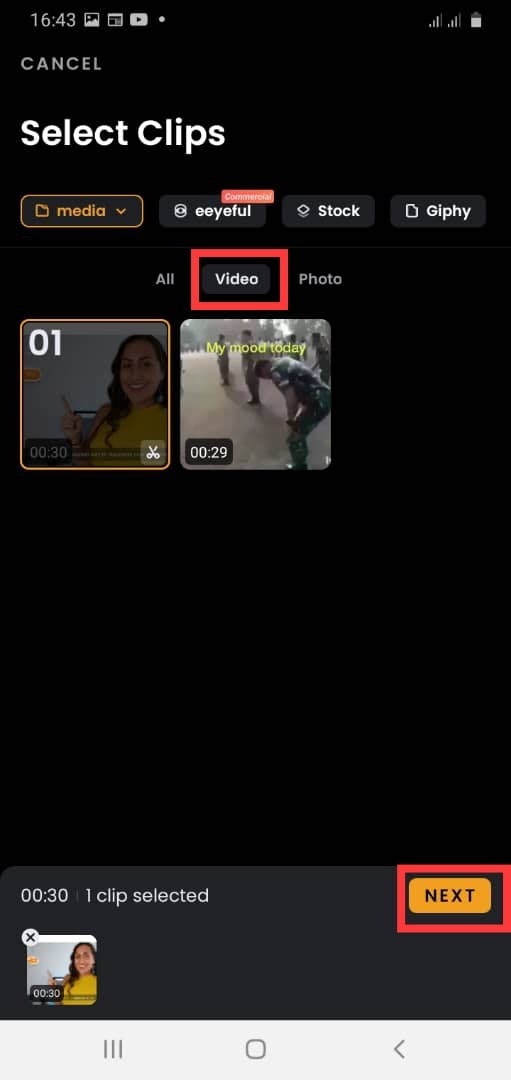
Choose the video you want to crop and tap Next at the bottom of the screen to proceed.
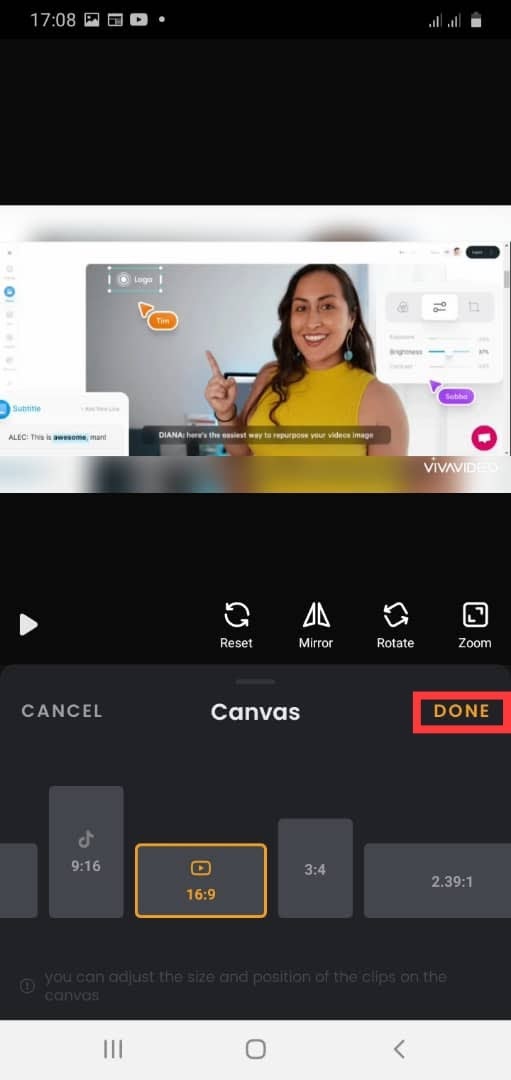
Step 4: Tap on Canvas to select the preset aspect ratio you'd like to crop your video to.
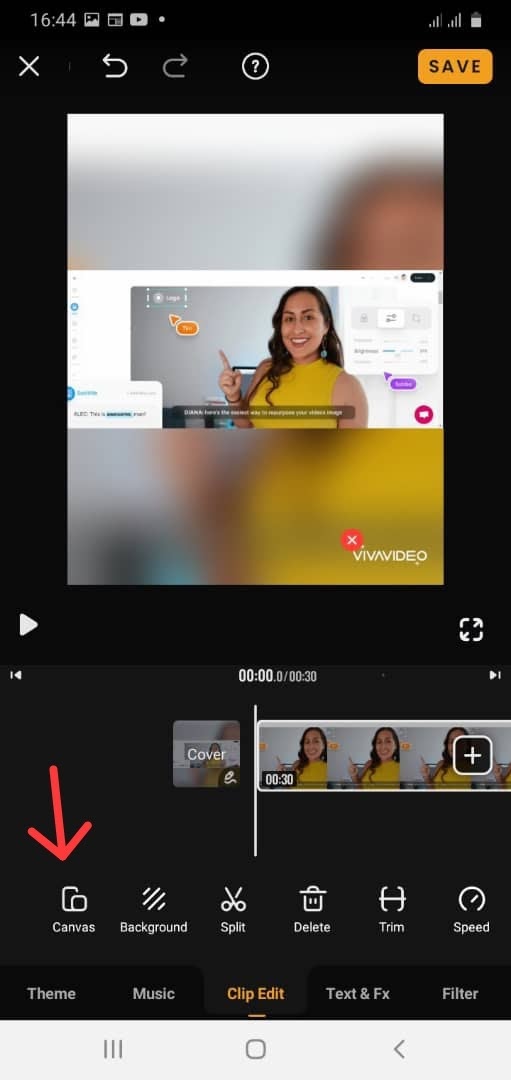
This action will adjust the size and position of the footage on the canvas.
After selecting your preferred aspect ratio, click Done on the right side of your screen.
Step 5: Click on the "Save" button on the top right hand of your screen.
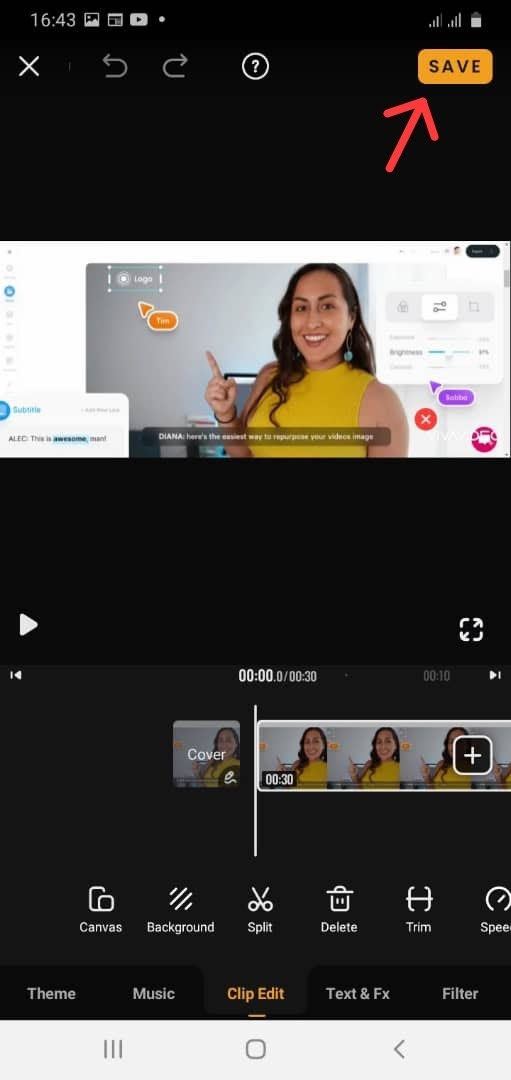
Once done, select your preferred file Export Size, and the app will automatically export the file to your mobile device.
3 Best Practices for Formatting and Cropping your Video
If you want to make videos people love to watch, here are some of the key things you need to look out for when formatting and cropping your video.
1. Always Pick the Largest Size To Attract More Attention Visually
If you want your videos to stand out, always pick the largest size possible.
You may be wondering why this is important since social media platforms allow users to upload horizontal videos. But studies have show smartphone users handle their devices in vertical positions more than 94% of the time.
Videos that take up more space on your screen command more visual attention and engagement. They can stop the scroll and immerse viewers in the visual world you've created.
So don’t waste your time making a horizontal video on vertical video-heavy platforms like Instagram, TikTok, or Snapchat. Instagram themselves has said they want you to take up all the space you can especially on Reels.
With so many platforms including vertical video, it’s no doubt that vertical video is the future. This is evident in the sharp rise in popularity and consumption of vertical video content. Only a few years ago, Snapchat pioneered the move to vertical video in the social space. And now Tiktok, YouTube, Facebook, Instagram have followed suit by launching features like Stories and Reels to cater to vertical videos.
The stats confirm it all. Over 7 billion videos are viewed on Snapchat daily, with the majority being shot in portrait mode. MediaBrix found that vertical videos have a 90% higher completion rate as compared to horizontal videos. The research also showed that 70% of users don't rotate their devices to view horizontal videos.
2. Center Important Elements To Avoid Awkward Platform Crops
If you'd like to share your video on multiple platforms, here are a few things to keep in mind.
First, you'll need to identify and use the appropriate aspect ratio for each platform.
While filming and editing your video, make sure to move essential elements closer to the center. By doing this, you can crop your visual assets appropriately without cutting out critical elements from the video frame during post-production.
Your preview mustn’t crop anything important out like your head, subtitles, or title text (if any) on your video. Pretend there's a square in the center of your vertical canvas and position key elements close to the middle to avoid awkward crops.
3. Keep Elements Away from the Edges
Depending on the device a video is being viewed on, not all videos will be cropped the same. Sometimes there’s a bit of extra cropping that goes on near the edges of your video.
Make sure nothing important is on the very edge of your video whether on the left, right, top, or bottom.
Next Steps
There you go. We've shared everything you need to know about cropping videos on all your devices. We've also shared best practices for cropping your videos.
Now it's time to put your newly learned video cropping skills to the test!
![75+ Captions for Instagram [For Every Mood, Vibe, and Occasion]](https://cdn.prod.website-files.com/616e938268c8f0a92cb2b540/65ad5248623eef32c39a7e0d_Hero%20(1)-min.png)
.png)
