


You’ve worked hard to record a great video and believe it has the potential to grab the attention of your audience across different channels — including Instagram. But here’s the catch: Instagram has 4 different video formats, each with its own unique dimensions and aspect ratios. It’s tough remembering all of them, let alone edit them properly to appeal to a specific audience.
Whether you originally made your content for YouTube, Twitch, or another platform,you can easily resize videos for Instagram with VEED. You can also edit videos to align them better with different Instagram video formats. Think adding subtitles to Reels, or call-to-action buttons on Stories to stop users mid-scroll and engage them for a longer time.
With that, let’s dive into how to convert video to Instagram format. We’ve also shared some bonus tips at the end to help you easily level up the production quality of your videos.
Skip to a section:
- Instagram Video Requirements
- Instagram Video Dimensions and Aspect Ratio Cheat Sheet
- How to Crop or Resize Videos For Instagram
- Taking Your Instagram Videos to the Next Level
[#TOC1]Instagram Video Requirements[#TOC1]
Instagram doesn’t strictly enforce format requirements and specifics for their videos. But if you want your videos to look high quality and drive higher engagement, it’s important to create/resize them in an ideal format that Instagram suggests.
Here’s a quick cheat sheet of the ideal specs to remember for IG videos:
- Aspect ratio should be between 1.91:1 and 9:16 for posts.The aspect ratio for Instagram Reels and Stories is 9:16 only.
- MP4 or H.264 Codec (Video file extension)
- AAC Audio (for separate audio tracks)
- Minimum frame rate of 30 FPS (frames per second)
- Minimum resolution of 720 pixels
- 3,500 bitrate (recommended)
- Maximum file size for videos that are 10 minutes or less is 650MB. And, the maximum file size for videos up to 60 minutes is 3.6GB.
- Recommended size for cover photos is 420px by 654px (or 1:1.55 ratio)
- Cover photo must be in png or jpg. format
If you want a full guide on the best Instagram video dimensions, check out our full guide.
[#TOC2]Instagram Video Dimensions and Aspect Ratio Cheat Sheet[#TOC2]

To ensure you publish videos at the highest possible video resolutions, it’s important to stick to the ideal specs in terms of resolutions, width, and height for Instagram. Otherwise, the platform compresses your video quality which can make your published video end up at a worse quality than your original file.
To make it easier, you can use a video editing tool like VEED that comes with pre-built Instagram templates to resize your videos. Our sizing and file export settings are designed with the best specs so you don’t need to even think about it twice. Just upload your video, select the size, and hit export.
[#TOC3]How To Crop or Resize Videos For Instagram[#TOC3]
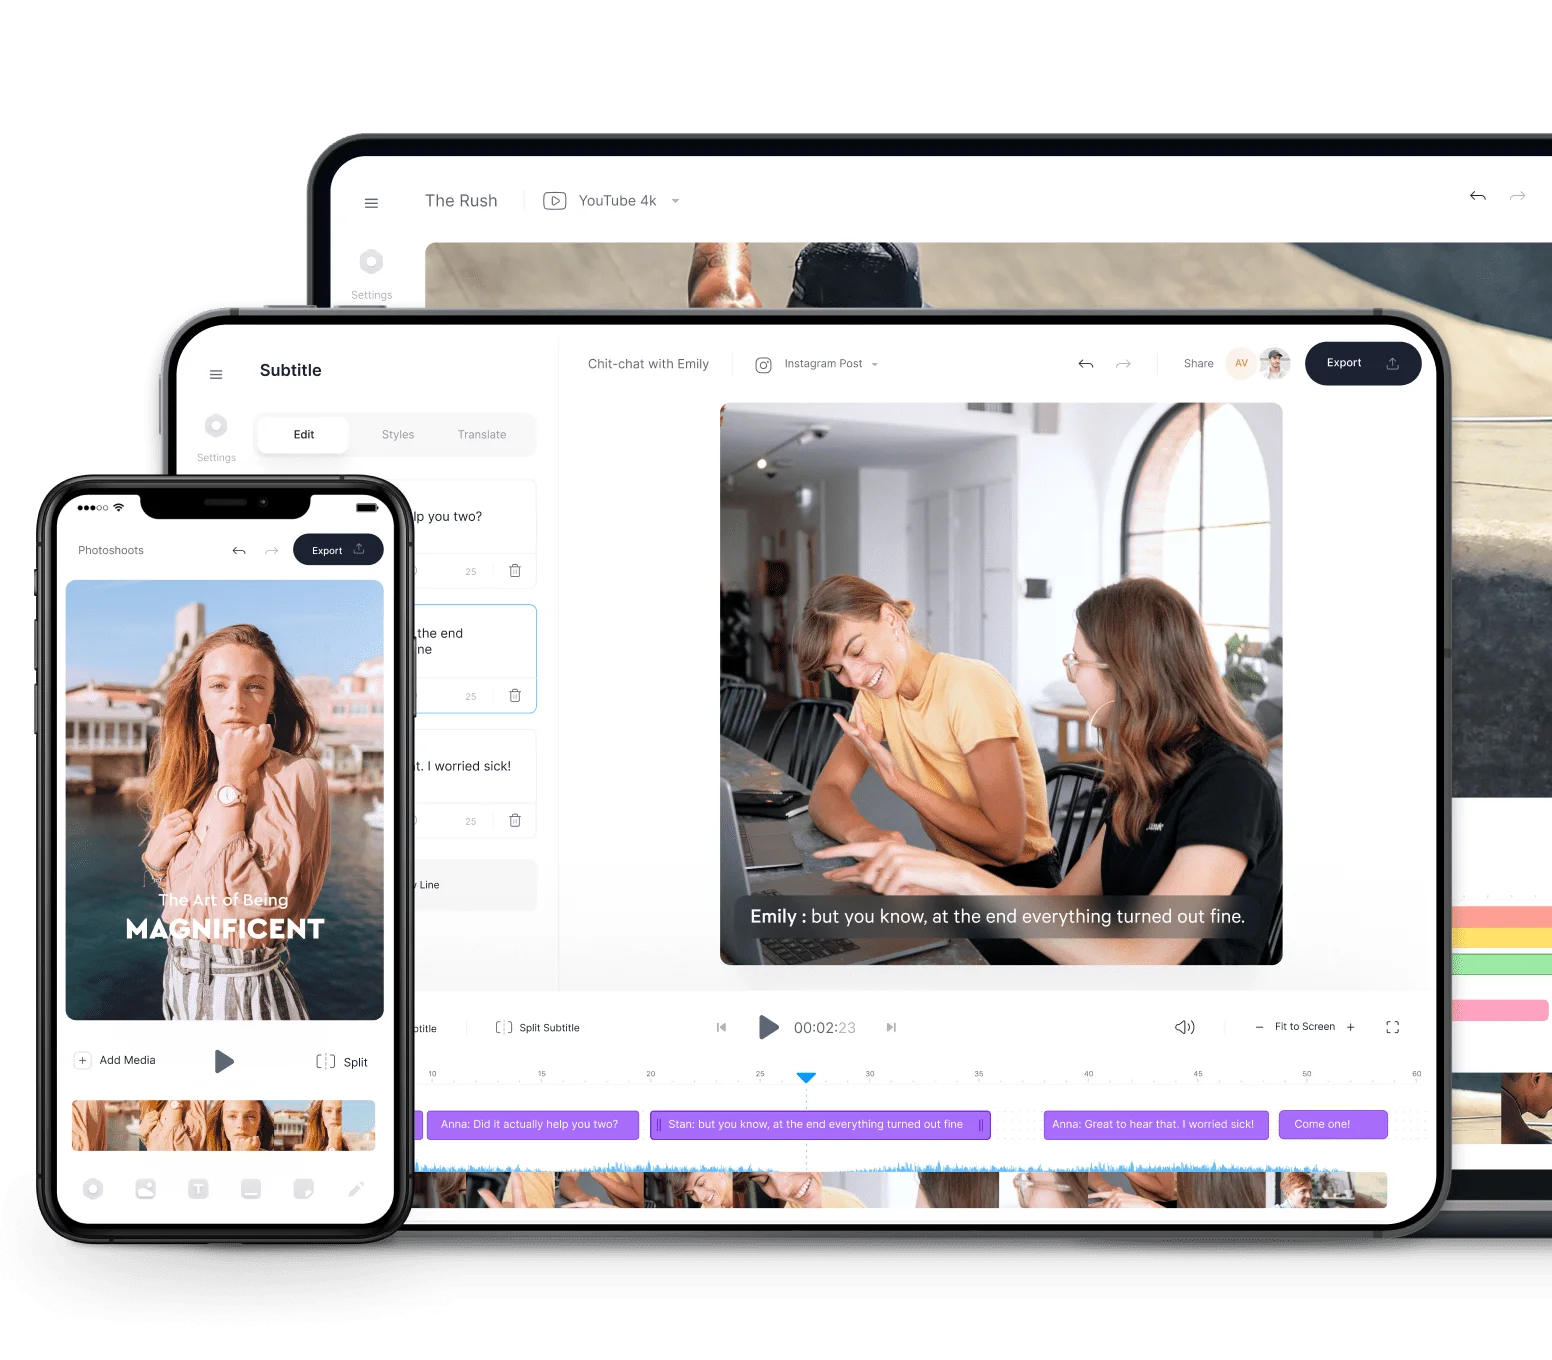
1. Go to VEED and Upload Your Video

Go to VEED and click on the Sign up button to create a free or paid new account. If you already have an account, simply click on Login to open your dashboard.
After you’ve logged into your account, click on Create Project.
From there, you can:
- Upload a file directly from your computer or drag and drop in the specified field.
- Record a video and start editing it directly within VEED.
- Copy-paste the live link of a TikTok or Twitch video, or add a video from Dropbox.

2. Click on Settings, Then Select the Desired Instagram Dimensions and Aspect Ratio

Once your video is loaded in the editor, click on Settings on the right-hand side of the screen and click on Size.
There, you’ll have a bunch of preset video dimensions and aspect ratios to resize your video for Instagram. Depending on what type of content you want to post and dimensions and aspect ratio mentioned in the cheatsheet above, select the most suitable option — Instagram Story, Post, and Reels.
3. Click and Drag the Corners of Your Video Content to Fit Your Canvas

VEED will automatically resize your video in your preferred aspect ratio. You can then drag the corners of your video to move things around and better fit important parts of your video in the canvas.
4. (Optional) Edit Your Video

Not a video editor? You and me both, bud. Luckily, VEED has a wide collection of pre-built templates, elements, and features you can use to easily add to your videos. You can browse them all and select the ones that help you communicate your story better (like music or stickers) and increase your video’s production quality (like our AI-powered subtitles).
Here are a couple of video editing options you can use:
- Add subtitles: Automatically generate subtitles with a single click of a button with VEED’s AI-powered feature. You can then manually tweak your subtitles if needed, or even upload an existing SRT file. Just click on Subtitles and select your preferred option.
- Templates: Get your creators’ block out of the way and work faster with ready-to–use templates. All you need to do is click on Templates and select the one you like best.
- Transitions: Create a flow between scenes and lead your viewer from one scene to the next effortlessly with Transitions. Simply click on Transitions and choose the ones that best fits your video’s story and style.
- Add music/audio: Want to show a creative tutorial or narrate a story better? VEED lets you record a voiceover, upload audio files, and even add sound effects like mouse clicks or bells in your videos. Just click on Audio and select the option you like most.
- Clean Audio: Automatically remove unwanted background noise from your videos. Toggle over to the audio clip you want to edit in the video timeline and click on Clean Audio.
- Remove video background: Remove your video background automatically in just a few seconds. Click on the video in the timeline and hit Remove Background.
- Text to speech: Create quick AI-generated voice-overs directly from your script. Just click on Audio and select the Text to Speech option.
- Filters: Enhance the look and feel of your videos with colorful effects. Click on the Filters option and choose the one that you like best.
- Elements: Make your videos more aesthetic, engaging, and polished by adding different elements. Click on the Elements option and browse different categories to select the one(s) you like most.
5. Click On Done Once You’re Ready, Hit Export, and Download your Video

Ready to publish your video on Instagram? Click on Done at the top-right corner of the editor, then click on the settings icon, and scroll down to select Instagram. Hit the Export Video button and give it a couple of seconds to render your final video.
You can preview your final video here, collaborate with your team and invite them to add comments (these won’t be visible in the live video and are solely for internal communication purposes), or even share directly via email.
Click on the Download icon and select the MP4 format to download your video.
[#TOC4]Take Your Instagram Videos to the Next Level[#TOC4]
Here are a few of our tried-and-tested tips on improving your Instagram videos’ production quality and build a better relationship with your audience:
1. Use Keywords in Subtitles to Drive Organic Traffic
Subtitles are arguably the most crucial element of an Instagram video. They complement your visuals and deliver a more impactful story. By adding keywords — searchable text you want your video to rank for — in your subtitles and captions, you can amplify your video’s reach and drive higher engagement from your target audience.
To add keywords in subtitles, use the auto-generated subtitle option in Instagram. Upload your video and tap on the sticker icon at the upper-right corner of the screen. Select the “captions” sticker and Instagram will automatically generate your subtitles.
However, VEED lets you generate hard-coded subtitles onto your video. This means that regardless of the platform you’re posting your video on, your subtitles will always be visible. So you can easily cross-post videos from Instagram to YouTube or Tiktok without needing to add subtitles separately again.
A good example of adding keywords to your subtitles and captions is this Instagram Reel by Easlo. This features the words “desk setup” in its subtitles as well as the caption. Additionally, Easlo also uses hashtags related to the keywords such as #desksetup #newdesk #desksetuptour to further cast a wider net and drive more organic viewers.

2. Turn On High-Quality Uploads in Your Instagram Settings
This feature can make or break your Instagram video’s quality and ultimately impact your engagement. Professional cameras are great for shooting high quality clips. However, Instagram compresses your video files to optimize upload speeds by default.
To ensure your video uploads in the highest resolution, you need to enable high-quality uploads in your Instagram settings. Or else, you might end up with grainy or lower-resolution videos that seem like they’ve been shot at 240p, while in reality, you’ve put your heart and soul into shooting the highest production quality video with HD quality or higher.
To turn this feature on, click on the three lines at the top-right corner of your Instagram profile, click on Account, and then enable the Upload at highest quality toggle button.

3. Add Elements to Enhance the Viewer Experience
Whether you want to add jump cuts to create a stylish intro, or zoom in to spotlight a certain product in your video, elements can truly take your viewers’ experience up a notch. The more viewer-friendly and engaging your video, the better performance you can expect — in terms of followers, comments, likes, and saves!
But here’s the tricky part: As much as design is a fun and exciting business, it’s also intricate and complicated. If you add too many elements, you can easily distract and frustrate your viewers, leading them to scroll to the next reel in their feed. But, if you add just the right mix of elements, it can keep the spotlight on your content and draw your viewers’ attention to your video.
For example, this Instagram Reel by Diana Briceño (Head of Content at VEED) strikes the right balance between different visual and text elements. A green screen, popping text, screenshots, and directional cues helps her amplify the message while improving retention for viewers.

4. Adjust Your Video Edits So They Take Up the Optimal Screen Space
Resizing videos isn’t just limited to cropping. Especially when you cross-post from one platform to another — let’s say from YouTube videos to Instagram Reels — you might need extra trimming so your final clip is more to-the-point and aligns with Instagram’s time limits.
Additionally, you might also need to move certain elements around so they fit more aesthetically in the transition from a landscape video to a square or vertical video. If you use an Instagram video resizer like VEED, you can simply drag the elements to the desired location.
5. Nudge Viewers to Click With A Compelling CTA Button
A call-to-action is a short text that prompts people to take a specific action. Ever seen “subscribe here,” “grab this offer now,” or “hurry! Last seats remaining” on blogs or social media posts? Those are CTA texts that invite people to convert from a passive viewer/reader to a more involved follower/subscriber.
At VEED, we refer to them as Callouts. You can select from a variety of different CTA button styles and customize them as per your liking.
But more often than not, people overcomplicate CTA buttons. Here are a few best practices for CTAs on Instagram:
- Focus on a single goal: Don’t expect your viewers to jump through hoops for you. Ask them to take a single action — be it following you, clicking on the link in bio, leaving a comment, or sending you a DM.
- Make your CTA buttons easy to find and follow: Remove all visual distractions around your CTA button so it’s easy to spot, read, and follow through. Consider what happens after they take a desired action — have you added the link in the bio you asked them to click on? Are you checking your DMs regularly after you asked them to DM you?
- Use colors that will make your CTA pop: We recommend you create a brand kit that consists of a color palette you want your brand to be associated with. Once done, make sure your CTA buttons use colors that stand out against the background.
As a rule of thumb for Instagram videos, add your CTA button after your video has finished. Adding it at the beginning like most YouTube videos can be a big turn off for viewers as it seems pushy and demands viewers to take action before they’ve even watched your content.
Resize Instagram Videos With Veed to Maximize Your Reach
Resizing videos with the ideal specs for Instagram can be the missing piece that unlocks higher reach, better engagement, and growth on the platform. To make this process easier for creators, VEED offers pre-built templates that, by default, align with Instagram’s ideal publishing criteria. This way, you don’t need to worry about remembering specs every time you want to publish videos on Instagram. So, whether you want to convert video to Instagram story size, or convert video to post size, VEED will let you do it all.
Ready to resize your video? Create a VEED account and get started.


/Video%20Editor.png)
/Add-Subtitles-to-Video.png)